A Complete Guide to Choosing the Right Lab Drying Oven

A lab drying oven is a common sight in any modern laboratory. It might look like a stronger version of a home oven, but it is a high-precision tool. It is engineered to create a stable and controlled heating environment for scientific work.

A standard kitchen oven might have temperature swings. In contrast, a lab oven delivers excellent uniformity and accuracy. This level of control is necessary for reliable and repeatable results.

TL;DR: Key Takeaways

  • Primary Function: A lab drying oven provides precise, uniform heat for drying samples, sterilizing equipment, and curing materials.
  • Two Main Types: Choose between gravity convection for gentle airflow with delicate samples, or forced air convection for faster, more uniform heating.
  • Selection Criteria: Key factors include internal capacity, temperature range and uniformity, controller type (digital vs. analog), and essential safety features like over-temperature protection.
  • Safety First: Proper installation with adequate ventilation (4-6 inches of clearance) and routine maintenance are crucial for safe, long-term performance. Never dry flammable solvents in a standard oven.
  • Plan Ahead: Increasing demand for lab equipment can lead to longer installation lead times. Planning your purchase helps avoid project delays.

What Is a Lab Drying Oven?

A white lab drying oven sits on a countertop next to several laboratory beakers in a modern lab.

A lab drying oven is a common tool for many thermal processes. Its main job is to remove moisture from samples, sterilize equipment, or cure materials at specific temperatures. This is not just about making something hot. It is about applying the right amount of heat consistently. A small change in temperature can ruin an experiment.

The global market for these ovens was valued at USD 1.31 billion in 2022. It is expected to climb to nearly USD 2.5 billion. This growth shows how essential these ovens are in both research and industry.

Key Functions and Applications

A lab drying oven is more than just a dryer. Its flexible use makes it a core piece of equipment in many fields. Some common tasks include:

  • Sample Drying: Gently and evenly removing all moisture from items like biological specimens, chemical compounds, or soil samples without causing damage.
  • Sterilization: Using high, dry heat to completely sterilize lab glassware and metal instruments.
  • Curing: Applying consistent, controlled heat over time to harden materials like polymers or special coatings.
  • Annealing: Carefully heating and then slowly cooling materials such as metals or glass to make them less brittle.

Primary Oven Designs

Lab ovens come in two main designs. Each design circulates heat in a different way.

  1. Gravity Convection: These ovens work on a simple principle. Hot air rises. The air heats up, becomes less dense, and naturally rises. As it cools, it sinks. This creates a gentle, continuous circulation. It is good for delicate samples that cannot handle a strong airflow.
  2. Forced Air Convection: These models have a fan inside that actively blows hot air around the chamber. This forced circulation heats things faster. It also provides very uniform temperatures from top to bottom.

Understanding the difference between these two types is the first step in picking the right oven. They are part of a family of essential lab washers, incubators, ovens, and water baths that form the backbone of a functional lab.

Comparing Gravity Convection and Forced Air Ovens

Two lab drying ovens, one open, on a counter in a modern laboratory setting.

When you pick a lab drying oven, the main factor is how the oven moves heat. The two main types are gravity convection and forced air. Making the right choice is important. It affects your drying times, temperature consistency, and the quality of your samples.

Gravity convection ovens operate on a simple principle of physics. Heating elements at the bottom heat the air. The air becomes less dense and naturally rises. As it cools, it becomes denser and sinks. This creates a slow, gentle circulation of air.

This gentle airflow is what you need for delicate work. If you are drying fine powders or lightweight films, a gravity oven is a good choice. It is designed for minimal disruption.

The Power of Forced Air

Forced air ovens are also called mechanical convection ovens. They are more powerful. They use an internal fan to push hot air throughout the entire chamber. This constant movement makes a big difference.

This circulation removes hot and cold spots. It gives you excellent temperature uniformity from the top shelf to the bottom. It also means the oven heats up faster and recovers its temperature quickly after the door is opened. It is the perfect choice for drying many samples at once or for tasks where speed and consistency are needed.

While gentler heating tasks are often handled by equipment like laboratory warming cabinets, forced air ovens are the workhorses built for high-performance drying and heating.

Head-to-Head Comparison

To make the decision easier, it helps to compare these two oven types. The table below shows the key differences in how they perform and where they work best.

Feature Gravity Convection Oven Forced Air (Mechanical) Oven
Airflow Method Natural circulation; hot air rises, cool air sinks. Fan-driven circulation for even distribution.
Temperature Uniformity Good, but can have slight temperature variations. Excellent; consistent temperature throughout the chamber.
Heat-Up Time Slower due to passive air movement. Faster heat-up and temperature recovery times.
Best For Fine powders, lightweight samples, sensitive materials. High-volume drying, dense samples, sterilization.
Potential Drawback Slower drying process for larger or denser loads. Airflow can disturb or dry out delicate samples.
Energy Use Generally lower due to the absence of a fan. Slightly higher due to the fan motor.

The right oven is the one that fits your lab’s specific workflow. By weighing the gentle nature of gravity convection against the speed and uniformity of forced air, you can choose the perfect tool to get accurate results every time.

5-Step Checklist for Selecting a Lab Drying Oven

A lab drying oven, a handheld device, and documents on a wooden countertop with blue cabinets.

Choosing the right lab drying oven is an important decision. Picking the perfect model requires a structured approach. It pays off by ensuring the oven meets your technical needs and fits into your lab's workflow. This five-step checklist will give you a clear framework to follow.

1. Evaluate Capacity and Footprint

First, consider the size of the oven, both inside and out. The internal chamber capacity is usually measured in cubic feet or liters. It determines how many samples you can process at once. Look at your typical batch sizes and leave enough room for air to circulate. Overloading an oven can affect temperature uniformity and increase drying times.

Also, measure the oven's external dimensions against your available lab space. You must account for proper clearance on all sides, usually 4 to 6 inches, for ventilation. This gap ensures the unit can dissipate heat correctly. Planning this is easier when designing your layout with versatile lab workstations and tables.

2. Define Temperature Requirements

Next, get specific about your temperature needs. What exact range and uniformity do your applications require? Most standard lab drying ovens operate from just above ambient temperature up to around 300°C (572°F). Check that the model you are considering can comfortably reach and hold your target temperatures.

Pay close attention to the temperature uniformity specification. You will often see it written as a tolerance like +/- 5°C. This number tells you how much the temperature might vary between different spots inside the chamber. For sensitive experiments, a tighter uniformity specification is necessary.

3. Assess the Control System

The controller is the brain of the oven. Basic models might have simple analog dials, which are durable and straightforward. However, for most modern labs, digital controllers are a better choice. They provide precise temperature settings, clear readouts, and better accuracy.

If your work involves complex processes, look for a programmable digital controller. These advanced systems let you create multi-step heating protocols with different temperatures and hold times. This automation is useful for applications like curing or annealing.

4. Examine Build Quality and Materials

An oven's construction affects its lifespan and maintenance. The interior chamber is especially important. Stainless steel interiors are the industry standard because they offer great corrosion resistance and are easy to clean. This is crucial for preventing cross-contamination.

Also, inspect smaller details like the door gasket, hinges, and shelving. A solid door seal is essential for maintaining temperature stability and energy efficiency. Sturdy, adjustable shelves provide flexibility for handling samples of different sizes.

5. Prioritize Essential Safety Features

Finally, never compromise on safety. A reliable lab oven must have built-in protections for your team and samples. Key safety features include:

  • Over-temperature protection: This is a critical failsafe. It automatically shuts the oven down if it overheats, preventing ruined samples and reducing fire risk.
  • Audible alarms: These alerts notify your team when temperatures stray or if there is another issue.
  • Circuit breakers: These protect against electrical faults that could damage the unit.

By following these five steps, you can confidently select an oven that is a perfect match for your lab.

Use-Case Scenarios: Which Oven is Right for You?

  1. Scenario 1: Sterilizing Glassware. You need to sterilize 50 glass beakers daily.
    Recommendation: A medium-sized forced air oven. Its fast heat-up time and uniform temperature distribution ensure all glassware reaches and maintains sterilization temperature efficiently.
  2. Scenario 2: Drying Fine Powders. Your work involves drying delicate chemical powders that cannot be disturbed.
    Recommendation: A gravity convection oven. Its gentle, natural airflow prevents the powders from blowing around inside the chamber.
  3. Scenario 3: Curing Polymer Coatings. You are developing a new polymer that requires a precise multi-step heating and cooling cycle over 12 hours.
    Recommendation: A forced air oven with a programmable digital controller. This allows you to automate the entire temperature profile for consistent, repeatable curing results.
  4. Scenario 4: High-Volume Soil Sample Drying. A geology lab processes over 100 soil samples per day for moisture content analysis.
    Recommendation: A large-capacity forced air oven. It can handle a high volume of samples simultaneously while ensuring each one is dried uniformly for accurate measurements.
  5. Scenario 5: Preparing Biological Tissue Slides. A biologist needs to slowly dry tissue samples without causing structural damage before microscopy.
    Recommendation: A small gravity convection oven. The gentle heating is ideal for preserving the delicate structure of biological specimens.

Safe Installation and Routine Maintenance

A technician in a lab coat and blue gloves inspects a lab drying oven with an open door.

A lab drying oven is a significant investment. Getting the most out of it requires proper setup and regular care. Correct installation ensures the oven performs as it should, protecting your team and your experiments. A simple maintenance routine is the best way to prevent unexpected downtime and poor results.

Following these guidelines is about more than just protecting equipment. It is about building a culture of safety and precision in your lab. Always have the manufacturer's manual and your facility's safety protocols available. They are your ultimate guides.

Best Practices for Installation

You only get one chance to install your oven correctly. A rushed setup can cause problems, from temperature swings and safety hazards to a shorter oven lifespan.

Before you plug it in, run through your checklist. Your main concerns are location and power. The oven needs to sit on a stable, level surface that can handle its weight. It is also important to give it enough room to dissipate heat safely.

  • Ensure Proper Clearance: Give the oven at least 4 to 6 inches of clear space on all sides. This is critical for air circulation that prevents the unit and nearby surfaces from overheating.
  • Verify Power Supply: Check that your wall outlet matches the oven’s voltage and amperage specs. Using the wrong power source or a weak extension cord is a fire hazard.
  • Avoid Flammable Materials: Never place the oven near flammable liquids, combustible materials, or heat-sensitive equipment. The outside of an oven gets very hot during use.

A Simple Maintenance Checklist

Routine maintenance for a lab drying oven is straightforward. You do not need to be a service technician to handle the basics. These simple checks help you find small issues before they become major failures.

A well-maintained oven is an accurate oven. Regular checks on components like door gaskets and temperature sensors are essential for maintaining tight temperature uniformity.

Follow this simple checklist to keep your oven in peak condition:

  1. Clean the Interior Regularly: Once the oven is completely cool, wipe down the stainless steel interior. Use a soft cloth and the cleaning solution recommended by the manufacturer to remove any residue.
  2. Inspect the Door Gasket: Look closely at the seal around the door. If you see cracks, brittleness, or other damage, it needs to be replaced. A bad gasket lets heat escape, which wastes energy and affects temperature stability.
  3. Calibrate Temperature Periodically: At least once a year, check the oven's temperature accuracy with a calibrated external thermometer. This ensures that the temperature you set is the temperature you are actually getting.
  4. Check Air Vents: Make sure the oven's intake and exhaust vents are clear of dust and other obstructions. Blocked vents mean poor airflow and poor performance.

Planning for Future Success

When you choose a lab drying oven, you are making a decision that impacts your workflow and your lab's future. With the demand for high-quality lab gear increasing, planning ahead is a strategic move. Placing your order sooner helps you avoid installation backlogs that can delay your project timelines.

Technology in this area is also advancing. About 40% of new lab ovens now come with digital monitoring features. This technology gives you tighter control over your processes and makes data tracking easier. Securing your choice now sets your lab up to handle future demands.

Of course, a new oven needs a place to go. You will need the right laboratory work surfaces that can handle the heat and weight of your new unit. Figuring out these practical details early saves a lot of trouble later. We have seen how effective layouts support this work in projects like this lab furniture for material testing laboratory.

Deciding sooner helps secure your place in installation queues. This ensures your lab upgrades happen on your timeline, not someone else's.

Frequently Asked Questions (FAQs)

Here are answers to some common questions about choosing and using a lab drying oven.

1. What is the difference between a lab oven and a furnace?

The main difference is temperature and purpose. A lab drying oven is used for lower-temperature work like drying, curing, and sterilizing, usually up to 300°C. A laboratory furnace is a high-temperature unit for applications like ashing materials or melting metals, often reaching over 1000°C. They are different tools for different jobs.

2. How often should we calibrate our lab oven?

This depends on your lab's quality standards and how often you use the oven. As a general rule, annual calibration is the best practice. A regular schedule verifies that the displayed temperature matches the actual internal temperature, which is crucial for reliable results.

3. Can I dry flammable solvents in a standard lab drying oven?

No. You should never put flammable solvents or materials in a standard lab drying oven. These ovens are not built to handle volatile substances and lack the necessary safety features. This creates a serious risk of fire or explosion. You must use a specially designed solvent-rated or explosion-proof oven for such work.

4. What does a temperature uniformity of +/- 5°C mean?

Temperature uniformity is a key specification. A rating of +/- 5°C means that the temperature inside the chamber will not vary by more than 5°C from the set point. If you set the oven to 150°C, the temperature on every shelf will stay between 145°C and 155°C. This consistency is vital for ensuring all samples receive the same thermal treatment.

5. How much space does a lab oven need for ventilation?

Providing enough room for ventilation is necessary for performance and safety. Most manufacturers recommend at least 4 to 6 inches of clearance on all sides, including the top and back. This space allows for proper air circulation, letting the unit dissipate heat and preventing dangerous temperature buildups.

6. Why choose a stainless steel interior?

A stainless steel interior is the standard for lab ovens because it is highly resistant to corrosion and easy to clean. This helps prevent cross-contamination between different batches of samples and ensures a long service life for the oven.

7. Are digital or analog controls better?

For most modern applications, digital controllers are better. They offer precise temperature setting, clear readouts, and higher accuracy than analog dials. Programmable digital controllers also allow for automated multi-step heating cycles, which is essential for complex processes like curing or annealing.

Get Expert Guidance on Your Lab Needs

Choosing the right lab equipment is a critical step in setting up a successful workspace. The details matter, from oven capacity to workflow integration. Making an informed decision now can prevent delays and ensure your facility operates efficiently for years to come.

Compare our selection of lab drying ovens to find the model that fits your needs. To discuss your specific requirements, call us at 801-855-8560 or email us at Sales@Labs-USA.com to request a free quote and lab layout plan.

Related Resources

Explore more solutions and guides that complement this topic:


Types of Laboratory Drying Ovens

A lab drying oven removes moisture from samples, glassware, and materials through controlled heating. Types of laboratory ovens include gravity-convection ovens (natural airflow, gentle drying), mechanical-convection ovens (fan-forced for uniform temperature), vacuum ovens (low-temperature drying for heat-sensitive samples), and cleanroom ovens (HEPA-filtered supply air). Each type serves different applications in chemistry, biology, materials science, and quality control.

Drying Oven Applications in Chemistry & Research

In chemistry labs, a drying oven is used to remove solvents from precipitates, prepare anhydrous reagents, and cure coatings. Typical operating temperatures range from 50 to 300 degrees C. When selecting a laboratory drying oven, consider chamber volume, temperature uniformity, air exchange rate, and whether your samples require vacuum or inert-atmosphere drying.

Frequently Asked Questions

What is a lab drying oven used for?

A lab drying oven is used to remove moisture, solvents, or volatile compounds from samples, glassware, and materials. Common applications include drying precipitates, curing coatings, sterilizing glassware, and conditioning samples for gravimetric analysis.

What types of laboratory ovens are available?

The main types are gravity-convection ovens (gentle drying), mechanical-convection ovens (uniform fan-forced heating), vacuum ovens (low-temperature drying for heat-sensitive materials), and cleanroom ovens (particle-free environments). Specialty models include high-temperature ovens (up to 500+ degrees C) and inert-atmosphere ovens.

What temperature range do lab drying ovens cover?

Most standard lab drying ovens operate from ambient +5 degrees C up to 250-300 degrees C. High-temperature models reach 500 degrees C or higher. Vacuum ovens can dry effectively at much lower temperatures (40-100 degrees C) by reducing chamber pressure.

A Complete Guide to the Vertical Laminar Flow Hood

A vertical laminar flow hood creates a sterile workspace. It bathes the work area in a continuous stream of clean air. This process protects sensitive samples from airborne contaminants. It is like an invisible shower of pure air flowing down onto the work surface.


TL;DR: Key Facts About Vertical Laminar Flow Hoods

  • What It Is: A clean bench that uses filtered air to make a sterile work zone. It protects the items on the work surface.
  • What It Does NOT Do: It does not protect the user from the materials being handled.
  • Who Uses It: Technicians in microbiology, cell culture labs, sterile compounding, and electronics assembly.
  • Main Benefit: It provides a high degree of product purity and prevents sample cross-contamination.
  • Critical Safety Note: Never use it for hazardous, infectious, or volatile chemical work.

Understanding the Vertical Laminar Flow Hood

A gloved hand in a sterile lab workspace pipetting green culture in a petri dish.

Alt text: A gloved hand pipetting green liquid into a petri dish inside a sterile vertical laminar flow hood.

A vertical laminar flow hood is a special enclosure. It is designed to create a particle-free environment for non-hazardous tasks. It works through a simple but effective process. A blower pulls in room air to start.

Next, the air is forced through a high-efficiency particulate air (HEPA) filter. These filters are very effective. They capture 99.99% of particles as small as 0.3 microns. This clean air then flows straight down in a uniform curtain. This is called "laminar flow." It covers the entire work area.

This constant downward pressure of clean air does two things. First, it acts as a barrier, stopping room contaminants from entering the workspace. Second, it sweeps away any particles generated by your procedure. This ensures your process stays clean.

This focus on product protection makes it a vital tool in many fields. But it is important to remember its limits. For equipment that protects the user from hazardous materials, you would need a laboratory fume hood. A fume hood operates on a different principle.

The design is simple and effective. Since the air flows from top to bottom, you can place larger equipment inside the hood without blocking the sterile field. The air just flows around it. This makes it a flexible choice for tasks where preventing contamination is the top priority.

How Vertical Airflow Creates a Sterile Environment

A vertical laminar flow hood uses a controlled stream of air to make a clean workspace. Think of it like a smooth waterfall flowing from the top of the unit to the work surface. This constant, gentle downward flow is the key to protecting your work from contamination.

A scientist working with cell cultures inside a vertical laminar flow hood, with arrows showing the downward airflow.

Alt text: A diagram showing the downward airflow pattern inside a vertical laminar flow hood where a scientist works with cell cultures.

The process starts when a blower motor sucks in room air at the top of the hood. Before this air goes further, it passes through a pre-filter. This filter catches larger particles like dust and hair. This step is important for protecting the main filter and making it last longer.

From there, the air is pushed into a chamber called the plenum. The plenum spreads the air evenly across the main filter. This ensures the pressure and speed are consistent. This uniformity makes true laminar flow possible.

The Role of the HEPA Filter

At the center of every laminar flow hood is the HEPA filter. HEPA stands for High-Efficiency Particulate Air. It is a dense mat of fine fibers designed to trap tiny particles.

A true HEPA filter is very effective. It is rated to remove at least 99.99% of airborne particles down to 0.3 microns in size. This particle size is the industry standard for testing because it is one of the hardest sizes for a filter to catch.

This level of filtration means the air coming out of the filter is nearly free of bacteria, spores, and other small contaminants. When you perform tasks that need total sterility, like preparing a sterile vial, this clean environment is necessary.

How the Components Work Together

Each part inside a vertical laminar flow hood has a specific job to keep the sterile field clean.

  1. Blower Motor: This is the engine. It pulls in room air and pushes it through the filters at a steady rate.
  2. Pre-filter: This is the first line of defense. It grabs large particles and keeps the HEPA filter from clogging quickly.
  3. Plenum: This chamber equalizes the air. It spreads air evenly over the HEPA filter surface.
  4. HEPA Filter: This is the most important part. It removes microscopic contaminants to create sterile air.
  5. Work Surface: This is where the clean air finishes its journey. The air flows down onto this surface before exiting the front of the hood.

This system produces the steady, clean air needed for microbiology, pharmaceutical compounding, and electronics assembly. Keeping controlled spaces like this is the purpose of facilities such as modular cleanrooms.

Comparing Vertical Flow Hoods and Other Cabinets

Two modern laboratory cabinets, including a white vertical laminar flow hood, in a lab setting.

Alt text: Two laboratory cabinets, one a vertical laminar flow hood, in a modern lab setting.

Choosing the right cabinet for your lab is important. It affects safety, results, and your budget. People often use terms like "flow hood" and "biosafety cabinet" interchangeably, but they are very different.

A vertical laminar flow hood has one main job: product protection. It is all about keeping non-hazardous samples sterile. It is not a substitute for a biological safety cabinet.

Vertical Flow Versus Horizontal Flow

The most common point of confusion is between vertical and horizontal laminar flow hoods. Both use HEPA-filtered air to create a clean work area. The direction of the airflow changes how you use them.

  • Vertical Flow: Air flows down from a filter at the top. It passes over the work surface and exits out the front. This top-down path is useful because larger items do not easily block it. It also pushes nuisance aerosols down and away from the user's face.

  • Horizontal Flow: Air comes from a filter at the back. It blows across the work surface and directly at the user. This can be good for small electronics assembly. However, it offers no operator protection.

For cell culture or sterile compounding, vertical flow is usually the better choice.

How Do They Compare to Biological Safety Cabinets?

This is the most critical difference. A vertical flow hood protects the product. A biological safety cabinet (BSC) protects the user, the environment, AND the product.

You should only work with infectious agents or other biohazards inside a BSC. These units use HEPA filters on both the intake and exhaust air to keep everything safe. You can learn more about the biological safety cabinet vs fume hood to understand their roles.

Warning: Never use a vertical laminar flow hood for biohazardous, infectious, or volatile chemical work. It blows air toward the user, which would expose them to harmful agents.

Equipment Comparison Table

This table shows the core functions for the three main types of clean air cabinets.

Feature Vertical Laminar Flow Hood Horizontal Laminar Flow Hood Class II Biological Safety Cabinet
Primary Protection Product Product User, Product, and Environment
Airflow Pattern Top-to-bottom, exits at front Back-to-front, exits at front Downward, with front air curtain; exhaust is HEPA-filtered
Use with Hazards No No Yes (for biological agents)
Typical Use Cases Sterile compounding, cell culture, media prep, electronics Non-hazardous IV prep, optics assembly, sterile parts Work with bacteria, viruses, and pathogenic agents

Knowing these differences helps you equip your lab correctly. With demand for specialized lab equipment growing, planning ahead and getting specifications right the first time helps avoid project delays.

Key Applications and Decision Scenarios

Scientists in lab coats and safety glasses perform experiments using a vertical laminar flow hood in a modern lab.

Alt text: Scientists in a modern lab using a vertical laminar flow hood for research experiments.

A vertical laminar flow hood is essential when your process cannot tolerate contamination. Its downward flow of HEPA-filtered air creates a clean workspace. This makes it a key technology in several industries.

Use Case 1: Pharmaceutical Compounding

A pharmacy needs to prepare sterile IV solutions according to USP 797 standards. Contamination could harm a patient. The vertical laminar flow hood provides an ISO Class 5 environment, bathing the work area in sterile air and preventing microbes from entering the IV bags.

Use Case 2: Mycology and Mushroom Cultivation

A mycology lab works with fungal spores and agar plates. Cross-contamination between different mushroom strains can ruin experiments. The downward airflow of the hood continuously sweeps away airborne spores, ensuring each culture remains pure.

Use Case 3: Medical Device Assembly

A company assembles sensitive pacemakers. A single dust particle could cause the device to fail. They use a vertical laminar flow hood to create a particle-free zone, ensuring the electronic components remain perfectly clean during assembly.

Use Case 4: Plant Tissue Culture

An agricultural research lab clones plant species from small tissue samples. Bacteria or fungi can easily infect and kill the delicate plantlets. The hood provides a sterile environment for transferring the tissues between containers, improving success rates.

Use Case 5: Electronics and Semiconductor Work

A tech firm inspects semiconductor wafers for defects. Microscopic dust can be mistaken for a flaw, leading to costly errors. The clean bench provides a workspace free of airborne particles, allowing for accurate quality control.

Understanding potential workplace safety risks in pharmaceuticals is the first step to using the right controls.

How to Choose the Right Vertical Laminar Flow Hood

Choosing a new vertical laminar flow hood is an important decision. A good choice ensures process integrity for years. A bad choice can lead to workflow problems or costly mistakes.

This five-step checklist will help you match the right hood to your lab's needs.

1. Define Your Application Needs

First, what will you do in the hood? Different tasks require different levels of sterility.

Ask yourself these key questions:

  • What materials will I work with? (e.g., liquids, powders, solid parts)
  • What is the main goal? (e.g., prevent cross-contamination, protect a sterile product)
  • Do I need to meet specific standards? (e.g., USP 797 for compounding)

Answering these questions will guide your other decisions.

2. Determine the Right Size

Size is a balance between having enough work area and not taking up too much lab space. A common mistake is choosing a hood that is too small. This can lead to a cramped workspace where you might block the airflow.

Measure the equipment you will use inside the hood. Think about how your hands will need to move. Common widths are 3, 4, 5, and 6 feet. Also check the external dimensions to ensure it will fit in your lab.

3. Select Construction Materials

The hood's material affects its lifespan, chemical resistance, and ease of cleaning. The two most common options are powder-coated steel and stainless steel.

Material Best For Key Advantages Considerations
Powder-Coated Steel General research, electronics assembly, dry applications Economical, durable finish Can scratch, not for harsh chemicals
Stainless Steel (Type 304/316) Pharmaceutical compounding, wet processes Excellent chemical resistance, easy to sterilize Higher upfront cost

For most lab work, powder-coated steel is a good choice. If you use harsh sterilizing agents, stainless steel is a better long-term investment. Choosing the right laboratory work surfaces is also critical.

4. Evaluate Technical Specifications

Next, look at the technical details. The most important specification is the filter.

  • HEPA Filters: This is the industry standard. HEPA filters remove 99.99% of particles down to 0.3 microns. This is suitable for most lab applications.
  • ULPA Filters: For an even higher level of filtration, ULPA filters remove 99.999% of particles at 0.12 microns. These are for ultra-sensitive work like semiconductor manufacturing.

Another key spec is face velocity. This is the speed of the air coming out of the hood. Most units run between 90 and 100 feet per minute (FPM). This speed creates a protective barrier without causing turbulence.

5. Consider Essential Accessories

Finally, think about add-ons that can improve your workflow.

Common accessories include:

  • UV Germicidal Light: To sterilize the work surface between uses.
  • Service Fixtures: Factory-installed ports for gas, air, or vacuum lines.
  • IV Bar: A stainless steel bar for hanging IV bags in pharmacies.
  • Ergonomic Stand: Puts the hood at the correct working height and can add storage.

Planning for these accessories early helps secure a better timeline for delivery and installation. This ensures you get the setup you need without delays.

Installation, Validation, and Maintenance

Proper care of your vertical laminar flow hood is about more than just protecting your equipment. It is about ensuring your work is reliable. A smart approach to setup and upkeep guarantees your unit will perform well for years.

Initial Installation and Placement

First, find the right spot in your lab. Where you place the hood affects how well it works. Keep it away from high-traffic areas, doors, windows, and HVAC vents. Even a small draft can disrupt the sterile airflow.

When setting it up, make sure the hood is on a level, solid surface. Also check that the electrical supply matches the unit's needs. You can find this on the manufacturer's data plate.

Validation and Certification

After installation, your vertical laminar flow hood must be validated. This proves it meets operational standards. This step is not optional, especially in regulated fields like pharmaceutical compounding.

Validation is usually done by a qualified technician. They run a few key tests:

  • Airflow Velocity Test: Checks if the air speed from the HEPA filter is between 90 and 100 feet per minute.
  • HEPA Filter Integrity Test: This leak test uses an aerosol to scan the filter for any small holes or damage.
  • Particle Count Test: Confirms the air inside the work area meets standards like ISO Class 5.

This certification should happen after installation, anytime the hood is moved, and at least once a year.

Routine Cleaning and Maintenance

Daily cleaning is vital to stop contamination. Your lab needs clear cleaning protocols. Use appropriate cleaners like 70% isopropyl alcohol and lint-free wipes.

A good rule is to clean from the cleanest areas to the dirtiest. Start with the ceiling, then the side walls, and finish with the work surface. This prevents spreading contaminants.

Long-term care is also important. The pre-filter catches larger dust particles. Check it regularly and replace it every three to six months. A clogged pre-filter makes the motor work harder and can shorten the life of the HEPA filter. Understanding these procedures is part of good fume hood safety. HEPA filters last for years, but they will eventually need to be replaced by a certified technician.

Frequently Asked Questions

Getting the specs right for a vertical laminar flow hood can raise a few questions. Here are answers to common questions to help you choose the right equipment.

1. Does this hood protect the person using it?

No. A standard vertical laminar flow hood is designed for product protection, not user protection. The airflow pushes out the front, directly toward the operator. If you work with hazardous materials, this would expose you to them. For user protection from biological agents, you need a Class II Biological Safety Cabinet.

2. How often do HEPA filters need replacement?

The life of a HEPA filter depends on your lab's environment and how often you use the hood. It is not based on a set schedule. A certified technician will tell you when the filter is too loaded to maintain the required airflow of 90 feet per minute. To extend the life of the main HEPA filter, replace the cheaper pre-filter every 3 to 6 months.

3. What is the difference between a laminar flow hood and a fume hood?

They are opposites. A laminar flow hood protects what is inside the hood by bathing it in clean air. A chemical fume hood protects the user from what is inside the hood. It pulls hazardous fumes away from the user and exhausts them outside. Never use a laminar flow hood for work with volatile chemicals.

4. Can I use a vertical flow hood for hazardous materials?

No. Vertical laminar flow hoods are only for non-hazardous applications where the goal is to keep the product sterile. This means no biohazards, infectious agents, potent powders, or volatile chemicals. The unit provides zero user protection from these materials.

5. What are the typical electrical requirements?

Most standard-sized vertical laminar flow hoods run on a dedicated 115V/60Hz circuit. Larger models or units with extra features might require a 230V connection. Always check the electrical specs for your specific model and plan for a dedicated outlet.

6. How can I confirm my hood is working correctly?

The only way to know for sure is through professional certification. A qualified technician will test the airflow velocity and check the HEPA filter for leaks. This validation should be done after installation, at least once a year, and any time the unit is moved.

7. What is the difference between an ISO 5 and an ISO 7 environment?

ISO 5 is a very clean classification, allowing no more than 3,520 particles (0.5 microns or larger) per cubic meter of air. A vertical laminar flow hood creates an ISO 5 work zone. ISO 7 is a less stringent cleanroom classification, often used for the room surrounding an ISO 5 area. It allows up to 352,000 particles per cubic meter.

8. Is a UV light necessary?

A UV light is not required but is a useful accessory. It can sterilize the work surfaces between procedures, killing lingering bacteria or mold. However, it is only a surface sterilant and does not replace regular manual cleaning with disinfectants like 70% isopropyl alcohol.


Take the Next Step

Planning your laboratory setup requires careful consideration of equipment that meets both current and future needs. With project timelines for specialized equipment often extending, initiating the planning process sooner allows for more thorough design and helps avoid potential delays.

Compare Vertical Laminar Flow Hoods
Explore our range of clean benches to find the right size and specifications for your application.

Request a Quote
Contact our specialists at 801-855-8560 or Sales@Labs-USA.com to discuss your needs and get a detailed quote.

Need Help Designing Your Lab?

Our laboratory design specialists provide free consultations, 3D lab layouts, and competitive pricing on all laboratory furniture and equipment.

Request a Free Consultation → | Call (801) 999-8277

Related Resources

Explore more solutions and guides that complement this topic:


How Does a Vertical Laminar Flow Hood Work?

A vertical laminar flow hood pushes HEPA-filtered air straight down onto the work surface in a uniform, non-turbulent stream. This vertical laminar flow pattern sweeps particulates away from the product and out through the front or rear exhaust. The result is an ISO Class 5 (Class 100) clean-air environment inside the hood — essential for electronics assembly, pharmaceutical compounding, and sensitive sample preparation.

Vertical vs. Horizontal Laminar Flow Hoods

The key difference between vertical flow hoods and horizontal hoods is airflow direction. Vertical airflow hoods blow air downward, which is ideal when you need operator protection (air moves away from the user). Horizontal hoods blow air toward the operator, protecting the product but not the user. Choose a vertical airflow hood when working with materials that could pose an inhalation risk, or when multiple items on the work surface could cross-contaminate each other.

Frequently Asked Questions

What is a vertical laminar flow hood used for?

A vertical laminar flow hood is used to provide a sterile, particle-free work zone for tasks like pharmaceutical compounding, electronics assembly, tissue culture, and sample preparation. The downward HEPA-filtered airflow protects both the product and the operator.

How does a laminar flow hood work?

A laminar flow hood draws room air through a pre-filter and HEPA filter, then delivers it in a smooth, unidirectional stream across the work area. This continuous flow of ultra-clean air prevents airborne particles from settling on the work surface.

What is the difference between vertical and horizontal laminar flow?

Vertical laminar flow moves HEPA-filtered air downward onto the work surface, offering both product and operator protection. Horizontal laminar flow moves air horizontally toward the operator, primarily protecting the product. Vertical flow is preferred when operator safety is a concern.

Biological Safety Cabinet Types: Find the right fit

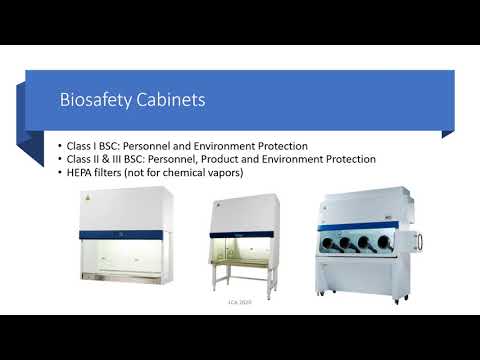
Biological safety cabinets, often called BSCs, are highly specialized containment workstations designed to protect lab personnel, the delicate samples being worked on, and the surrounding environment from hazardous biological materials. They are categorized into three main biological safety cabinet types: Class I, Class II, and Class III, with each class offering a progressively higher level of containment for different risk scenarios.

Unpacking the Role of Biological Safety Cabinets

A scientist working carefully inside a biological safety cabinet

It’s best to think of a BSC not just as a piece of lab furniture, but as an advanced containment shield. It relies on a meticulously engineered airflow system to forge an invisible barrier between the scientist and any potentially harmful microorganisms. This is a world away from a standard chemical fume hood, which just pulls air away from the user without filtering it to protect the sample inside.

A BSC’s real magic lies in how it manages airborne contaminants. It uses a combination of inward airflow to protect the person working and a HEPA-filtered downflow to keep the product sterile. This two-pronged approach is essential for maintaining a clean work area while simultaneously stopping hazardous aerosols from escaping into the lab.

The Three Pillars of Protection

Every single BSC is engineered around three non-negotiable protection goals. Getting a handle on these pillars is the first step to choosing the right cabinet for your lab’s specific needs:

  • Personnel Protection: This is all about keeping the researcher safe from exposure to the biohazardous agents inside the cabinet. It’s accomplished by pulling room air into the front of the cabinet, creating a curtain that keeps contaminants away from the user.

  • Product Protection: This pillar focuses on stopping airborne contaminants from the lab from getting into the work area and ruining samples, cell cultures, or other sterile materials.

  • Environmental Protection: Finally, this ensures that any contaminated air from inside the cabinet is thoroughly cleaned by high-efficiency particulate air (HEPA) filters before it’s exhausted back into the room or vented outside.

A Critical Tool for Modern Labs

You really can’t overstate the importance of these devices. Globally, biological safety cabinets are the bedrock of safely handling hazardous materials. In fact, over 70% of laboratories depend on them to maintain biosafety. That growing reliance is reflected in the market, which stood at USD 189 million in 2024 and is forecast to climb to nearly USD 387 million by 2033.

The primary purpose of a BSC is to act as the main containment tool for working safely with infectious microorganisms. Its design creates a tightly controlled environment where precise airflow isolates and captures particles that could pose a danger.

How you organize the space around a BSC is also critical to its performance. Storing supplies on a sturdy, easy-to-reach wire shelf helps keep airflow paths clear and minimizes clutter that could disrupt the cabinet’s protective air curtain. Next, we'll dive into the specifics of each class—I, II, and III—and see how their unique designs map to different biosafety levels and lab duties.

Decoding Class I and Class II Cabinets

Scientist carefully handling samples inside a Class II biological safety cabinet.

When you step into the world of biological safety cabinets, you’ll find that Class I and Class II models are the ones you'll see most often. They are the backbone of countless labs, handling everything from basic research to diagnostics and production. While they both aim for containment, they get there in very different ways.

Getting these differences right is about more than just checking a compliance box. It’s about making sure your lab is set up for success with the best possible safety and workflow. Let’s break down how each of these cabinets works, starting with the original workhorse, the Class I.

Class I: The Original Guardian

Think of a Class I biological safety cabinet as the original guardian of lab personnel. Its design is straightforward but highly effective, focusing entirely on protecting you and the surrounding lab environment from whatever is inside the cabinet. It does this by pulling a continuous stream of room air into the cabinet, away from the operator.

This constant inward flow of air, called inflow, creates an invisible but powerful barrier. It makes sure any aerosols or tiny particles kicked up during your work are immediately sucked into the cabinet’s filtration system before they have a chance to escape.

But there’s an important tradeoff. Because unfiltered room air is flowing directly over your work surface, the Class I cabinet provides zero product protection. This means it’s a no-go for sensitive applications like cell culture or preparing sterile compounds, where keeping your samples pristine is paramount.

It's best used for:

  • Housing specific equipment like centrifuges or fermenters.

  • Procedures that generate aerosols but don't require product sterility.

  • General containment of low- to moderate-risk biological materials.

Class II: The Triple-Duty Workhorse

The Class II cabinet is where things get more sophisticated, evolving to deliver all three kinds of protection: personnel, product, and environmental. This incredible versatility is exactly why it’s the most common type of BSC you'll find in labs all over the globe.

So how does it do it all? Through a clever combination of protective inflow and HEPA-filtered downflow.

Picture an invisible, sterile air shower constantly washing down over your work area—that’s the downflow. At the same time, room air is pulled into the front grille, creating that protective inflow curtain just like in a Class I. This dual-airflow system keeps the user safe from aerosols, the product safe from contamination, and the exhausted air clean.

This all-in-one protection makes Class II cabinets essential. They are so dominant, in fact, that they command over 40% of the global market share. Their ability to safeguard the user, the experiment, and the lab makes them a fixture everywhere from basic research labs to major pharmaceutical facilities. You can dig deeper into the market data for these vital lab tools on MarketsandMarkets.com.

Because of their more complex design, Class II cabinets are broken down into several subtypes, each with a unique way of managing airflow.

Diving into Class II Subtypes

The key difference between Class II subtypes comes down to how they handle air—specifically, the ratio of air that gets recirculated inside the cabinet versus the amount that gets exhausted. Let's walk through the most common types you’ll encounter.

The table below gives a quick overview of the main players in the Class II family. We'll break down the specifics of each one right after.

Class II Biological Safety Cabinet Subtype Comparison

Subtype Air Recirculation Exhaust Method Best For
Type A2 Recirculates ~70% HEPA-filtered exhaust into the room (can be thimble-ducted) Most common BSL-1, BSL-2, and BSL-3 applications; minute amounts of volatile chemicals with proper exhaust.
Type B1 Recirculates ~30% Hard-ducted exhaust to the outside (~70%) BSL-2 or BSL-3 work with trace amounts of volatile toxic chemicals or radionuclides.
Type B2 Recirculates 0% Hard-ducted total exhaust (100%) to the outside Work with significant amounts of volatile toxic chemicals and radionuclides where recirculation is dangerous.

As you can see, the choice really boils down to whether your work involves volatile chemicals and, if so, how much.

Class II, Type A2

The Type A2 is the undisputed champion of versatility and the most widely used BSC in clinical and research labs. It typically recirculates about 70% of the HEPA-filtered air back over the work surface (the downflow) and exhausts the remaining 30% back into the lab through another HEPA filter.

Because it can be ducted to the outside via a thimble connection, the Type A2 cabinet is suitable for work with minute quantities of volatile chemicals if properly exhausted. This flexibility makes it an ideal choice for a wide range of BSL-2 applications.

Class II, Type B1

The Type B1 cabinet strikes a different balance. It exhausts a much higher percentage of air—around 70%—and recirculates only 30%. Crucially, the exhausted air is hard-ducted directly to the outside of the building. This makes it a better option when you're working with trace amounts of toxic chemicals or radionuclides alongside your biological agents.

Class II, Type B2

For maximum chemical safety in a BSC, the Type B2 is the gold standard. It’s a total exhaust cabinet, which means 100% of the air is HEPA-filtered and ducted outside the lab; absolutely none of it is recirculated. This design prevents any buildup of chemical vapors inside the cabinet and the lab, making it essential for any procedure that involves significant amounts of volatile toxic chemicals.

Class III Cabinets for Maximum Containment

A Class III biological safety cabinet showing the sealed glove ports and pass-through chamber.

When you're dealing with the world's most dangerous pathogens, there's absolutely no room for error. This is the world of the Class III biological safety cabinet, the peak of personnel, product, and environmental protection. These aren't just cabinets; they are fully sealed, gas-tight containment systems.

Think of a Class III BSC as a high-tech isolation chamber or a "laboratory in a box." Its most defining feature is the absolute physical barrier it creates between the scientist and the hazardous materials. All manipulations happen through heavy-duty, arm-length rubber gloves built right into the cabinet's view screen.

This setup completely eliminates any chance of direct contact. It’s the ultimate expression of containment, reserved for work that carries the highest possible risk.

Advanced Filtration and Negative Pressure

The integrity of a Class III cabinet is locked down by a sophisticated airflow system. Unlike any other BSC, supply air enters through one HEPA filter, but the exhaust air is scrubbed by two HEPA filters in series before it's ever released outside. That double-filtration system creates critical, redundant safety.

On top of that, the entire cabinet is kept under significant negative pressure—at least 0.5 inches of water gauge—compared to the lab around it. This means that even if a leak were to somehow occur, air would rush into the cabinet, not out, preventing any hazardous aerosols from escaping.

A Class III cabinet is essentially a primary containment enclosure designed to be completely gas-tight. All materials are transferred into and out of the work area through a pass-through box that can be decontaminated, maintaining the sterile and contained environment at all times.

Reserved for Biosafety Level 4 Pathogens

Because of their uncompromising design, Class III cabinets are the exclusive tool for work with Biosafety Level 4 (BSL-4) agents. We're talking about dangerous and exotic pathogens that pose a high risk of aerosol-transmitted infections, are often fatal, and frequently have no available treatments or vaccines.

BSL-4 agents include some of the most infamous viruses known to science:

  • Ebola virus

  • Marburg virus

  • Lassa fever virus

  • Various hemorrhagic fever viruses

These cabinets are the cornerstones of high-containment labs focused on public health, biodefense, and emerging infectious diseases. The need for these facilities is undeniable; the global count of high-containment labs that rely on Class III BSCs or similar systems now tops 10,000. You can dive deeper into the growing demand and market dynamics in the full biological safety cabinets market report.

Working in a Class III cabinet requires incredibly strict protocols and serious training. Every single step, from introducing samples to disposing of waste, is meticulously planned to maintain absolute containment and protect researchers and the public from the most formidable biological threats.

Matching Cabinet Types to Biosafety Levels

Picking the right biological safety cabinet isn't just a matter of checking a box—it's the single most important decision you'll make for the safety and compliance of your lab. It all comes down to aligning your cabinet's capabilities with the risk level of the biological agents you're working with. This is where Biosafety Levels (BSLs) come into play.

Think of BSLs as a four-tiered system of containment, with each level building on the last. BSL-1 is for the microbes we understand well and that pose little risk, while BSL-4 is reserved for the world's most dangerous pathogens. Getting this match right isn't just a good idea; it's a non-negotiable rule in any lab.

This is especially true for the biggest players in the field, like pharmaceutical and biopharma companies. They make up over 40% of the market share and rely on these advanced containment systems to protect their people and their groundbreaking research. You can learn more about the market forces driving demand for these advanced containment solutions.

Biosafety Level 1: The Foundation of Safety

Biosafety Level 1 (BSL-1) is where it all starts. This level is for work with well-known agents that aren't known to cause disease in healthy adults—think non-pathogenic strains of E. coli or even chickenpox. The risk to lab staff and the environment is minimal.

Lab practices here are pretty basic, focusing on fundamentals like handwashing and wearing standard personal protective equipment (PPE).

For most BSL-1 work, you don't even need a BSC. Procedures can often be done safely on an open bench. But if there's any chance of creating aerosols, it’s a good practice to use a Class I or Class II cabinet for an extra layer of safety.

Biosafety Level 2: The Standard for Moderate Risk

Biosafety Level 2 (BSL-2) raises the bar for agents that pose a moderate hazard. We're talking about pathogens often linked to human diseases, like Hepatitis B, HIV, and various staph infections.

Here, the primary risks are accidental needlesticks, ingestion, or contact with mucous membranes. Because the risk is higher, lab access is more restricted, and everyone inside needs to wear enhanced PPE.

When it comes to BSL-2 work, there's a hard and fast rule: any procedure that could create infectious aerosols or splashes must be done in a Class II biological safety cabinet. It delivers the crucial combination of personnel, environmental, and product protection that you simply can't get on an open bench.

Biosafety Level 3: Containing Serious Threats

Biosafety Level 3 (BSL-3) is for labs handling indigenous or exotic agents that can cause serious, even lethal, disease if inhaled. This includes pathogens like Mycobacterium tuberculosis (which causes TB), West Nile virus, and SARS-CoV-2.

Since the biggest threat is aerosol transmission, the entire facility has to be designed for containment, with features like self-closing doors and specialized ventilation that creates directional airflow.

The cabinet requirements get much more stringent:

  • All procedures involving BSL-3 agents must be performed inside a Class II or Class III biological safety cabinet.

  • The most common choices are ducted Class II Type A2 cabinets or any of the Type B models, which provide the high level of containment required.

Biosafety Level 4: The Peak of Containment

Biosafety Level 4 (BSL-4) represents the absolute highest level of biocontainment. This is reserved for the most dangerous and exotic pathogens that pose a high risk of life-threatening disease, often with no vaccines or treatments available. Think Ebola and Marburg viruses.

The facility is completely isolated, almost like a building within a building, with incredibly complex ventilation and waste management systems. Researchers must wear full-body, air-supplied positive-pressure "space suits."

At this pinnacle of safety, there's no room for compromise. All work with BSL-4 agents must be conducted in a Class III biological safety cabinet, which provides a gas-tight, absolute physical barrier between the scientist and the pathogen.

To make it simple, we've put together a quick reference table that maps each Biosafety Level to the cabinets you should be using. This matrix helps you see at-a-glance which BSC types meet the safety requirements for the agents you handle in your lab.

Biosafety Level (BSL) and Required Cabinet Matrix

Biosafety Level Agent Risk Recommended/Required BSC Type
BSL-1 Low risk; not known to consistently cause disease in healthy adults. Not required, but a Class I or Class II can be used if aerosols may be generated.
BSL-2 Moderate risk; associated with human disease. Class II is required for any work with the potential to create infectious aerosols.
BSL-3 High risk; can cause serious or lethal disease through inhalation. All work must be performed in a Class II (ducted Type A2, B1, B2) or Class III cabinet.
BSL-4 Extreme risk; dangerous/exotic agents with high risk of life-threatening disease. All work must be performed in a Class III cabinet.

Ultimately, matching the right cabinet to the BSL is the foundation of a safe lab. This table ensures you’re not just guessing but making an informed decision that protects your team, your research, and the surrounding community.

Installation and Maintenance Best Practices

A technician in protective gear certifying a biological safety cabinet.

Picking the right biological safety cabinet is just the first step. To get the protection you're paying for, you absolutely have to get the installation and maintenance right. A BSC isn't just another piece of lab equipment; it's a precision instrument, and its performance depends entirely on where you put it and how you take care of it. This is where the rubber meets the road—turning your careful selection into real-world safety.

The single biggest factor during installation is its location. Think of that protective air curtain at the front of the cabinet as a delicate, invisible bubble. Anything that creates a draft can burst that bubble and compromise containment. A door swinging open, someone walking by too quickly, or even an HVAC vent blowing nearby can put your team at risk.

Placement is non-negotiable for safety. A biological safety cabinet should always be installed in a low-traffic area, away from doorways, open windows, and HVAC supply vents to prevent disruptive air currents that can compromise the protective air curtain.

Getting this right isn't just a suggestion; it's a global standard. North America, for instance, leads the market with over a 30% share, driven by a strong focus on healthcare infrastructure and safety. The U.S. alone accounted for about USD 68 million of the market in 2023, largely because of strict regulations that demand correct installation and upkeep. You can see more on these trends in this comprehensive market forecast.

Understanding Exhaust and Ducting

For many Class II cabinets, especially if you're working with volatile chemicals, the exhaust system is a critical safety feature. How you connect that cabinet to your building's HVAC system makes all the difference. There are two main ways to do it.

  • Thimble-Ducted Connection: This setup uses a small gap between the cabinet's exhaust port and the building's ductwork. It’s perfect for Type A2 cabinets handling tiny amounts of chemicals, as it lets the lab’s HVAC system stay balanced while still venting the filtered air outside.

  • Hard-Ducted Connection: This is a must for Type B1 and B2 cabinets. It creates a direct, sealed link to the building's exhaust, ensuring that 100% of any hazardous chemical vapors are pulled straight out of the building with no chance of re-entering the lab.

The Mandate for Professional Certification

A biological safety cabinet is not a plug-and-play device. Its performance must be verified by a qualified professional according to standards like NSF/ANSI 49. Certification isn't optional—it's mandatory when the cabinet is first installed and then at least once a year after that.

During certification, a technician runs a series of tests on critical functions:

  • Inflow and Downflow Velocities: Making sure the air curtain is strong enough and the work area stays sterile.

  • HEPA Filter Integrity: A smoke test to check for any leaks that could let contaminants escape.

  • Alarm Functions: Confirming that the safety alarms for airflow failure are actually working.

This whole process guarantees your cabinet is operating within its safety limits and gives you a documented record of compliance. Never, ever assume a cabinet is safe to use unless it has a current certification sticker from an accredited professional.

Simple Steps for Daily Upkeep

While the annual certification is the big one, the daily habits of your team play a huge part in a cabinet's long-term performance and safety. A simple routine can prevent a world of problems. Before and after every single use, wipe down all interior surfaces with the right disinfectant, always moving from the clean areas to the dirty ones.

Organization inside the cabinet matters, too. Keep your essential supplies neatly arranged on a dedicated wire shelving unit with bins to avoid cluttering the air grilles, which can mess with the airflow. At the end of the day, close the sash completely and run the UV light (if you have one) for decontamination—but only after everyone has left the area for the night.

Your Checklist for Selecting the Right BSC

Picking the right biological safety cabinet is a huge decision. It's not just about the budget; it's about the safety of your team and the integrity of your work. To sidestep any costly mistakes, a solid risk assessment is non-negotiable.

This final checklist boils everything down into a few practical questions. Think of it as your step-by-step guide to systematically figuring out exactly what you need.

Assess Your Biological Agents

First things first: what are you working with? The answer to this question drives the entire decision. The risk level of your agents determines the level of containment you absolutely must have.

  • What is the Biosafety Level (BSL) of your agents? This is the bedrock question. BSL-1 agents might not even need a BSC. If you're generating aerosols with BSL-2 materials, a Class II cabinet is mandatory. BSL-3 or BSL-4 work? That requires the serious containment of a ducted Class II or a Class III cabinet.

  • Do you need to protect your product from contamination? If you're dealing with cell cultures, sterile media, or anything sensitive to outside contaminants, you need product protection. This immediately takes Class I cabinets off the table and points you straight to a Class II or Class III model.

Evaluate Your Chemical Usage

Lots of lab work is a mix of biology and chemistry. If you're using volatile or hazardous chemicals alongside your biological agents, this becomes a critical factor that will quickly narrow your choices, especially within the Class II subtypes.

The single biggest differentiator between Class II subtypes is how they handle chemical vapors. Recirculating cabinets (like Type A2) are not suitable for significant chemical work, as vapors can build up to dangerous levels.

  • Will you work with volatile toxic chemicals or radionuclides? If yes, the next question is how much.

  • Trace Amounts: A Class II, Type B1 cabinet could be a good fit. It exhausts around 70% of its air, which can handle small amounts safely.

  • Significant Amounts: For anything more than trace quantities of volatile chemicals, you have to go with a Class II, Type B2 "total exhaust" cabinet. It ensures zero contaminated air is recirculated back into the lab.

Consider Your Facility and Workspace

Finally, let's get practical. The world's best BSC is useless if it doesn't fit in your lab or if your building can't support it.

  1. What are your spatial constraints? Get out the tape measure. Check the footprint and, just as importantly, the ceiling height to make sure the cabinet will physically fit. Don't forget to think about the people who will be standing in front of it all day—ergonomics matter.

  2. What are your building’s ventilation capabilities? Do you have the existing ductwork to hard-pipe a Type B cabinet to the outside? If your building's infrastructure can't support it, a ductless Class II, Type A2 cabinet might be your only realistic option.

  3. How will you organize your workspace? A cluttered workspace is a dangerous workspace, especially when it comes to airflow. Keep the area clear. Solutions like a bench rack bin organizer can help keep essential supplies handy without blocking the critical air grilles that make the cabinet work.

Got Questions About BSCs? We've Got Answers.

When you're dealing with something as critical as a biological safety cabinet, a few questions are bound to come up. In fact, it's a good thing—getting the details right is what keeps your lab, your people, and your work safe.

Let's clear up some of the most common points of confusion.

Class II A2 vs. B2: What's the Real Difference?

This is probably the number one question we get. The short answer? It’s all about the airflow.

A Class II Type A2 cabinet is the workhorse for many labs. It recirculates about 70% of the HEPA-filtered air back into your workspace and exhausts the other 30%. This makes it a fantastic choice for general cell culture and microbiology, but it's not designed for significant chemical use.

Then you have the Type B2, which is in a league of its own. This is a 100% total exhaust cabinet. Absolutely 0% of the air is recirculated; every bit of it is filtered and vented directly outside the building. This design means hazardous vapors can't build up, making the B2 the only safe option if your work involves more than just trace amounts of volatile toxic chemicals.

Can I Just Use a Fume Hood Instead?

Another frequent question, and the answer is always a hard no. It's easy to confuse the two, but they serve completely different purposes. A chemical fume hood is built for one thing: protecting you, the user, from chemical fumes by aggressively pulling air away from you and shooting it outside.

That's it. There’s no product protection from contamination and no HEPA filters. Using one for biological work is a major safety risk.

Think of it this way: a biological safety cabinet uses HEPA-filtered air to create a sterile bubble, protecting the user, the product, and the environment. A fume hood is a one-way street, only protecting the user from chemicals. It's not safe for biologicals, period.

How Often Do I Need to Get My BSC Certified?

Certification isn't a "one and done" deal. It's a critical, ongoing process. A qualified technician must certify your cabinet right after it's installed, any time you move it (even just across the room), and at a minimum, annually after that.

This isn't just a suggestion; it's a mandatory safety check. The technician runs a series of tests to verify everything from airflow velocities to the integrity of the HEPA filters. This process confirms your cabinet still meets the strict NSF/ANSI 49 standards and is actually providing the protection you count on.

Need Help Designing Your Lab?

Our laboratory design specialists provide free consultations, 3D lab layouts, and competitive pricing.

Request a Free Consultation → | Call (801) 855-8560

Frequently Asked Questions

How do I choose the right biological safety cabinet types?

Choosing the right biological safety cabinet types depends on your application, space, and budget. Labs USA provides free expert consultations. Call (801) 855-8560 or request a quote.

What is the lead time for biological safety cabinet types?

Lead times vary by product. Many items ship quickly; custom orders take 4-8 weeks. Call (801) 855-8560 for availability.

Do you offer installation?

Yes. Labs USA provides professional installation across the United States with factory-trained installers.

Can I get a custom configuration?

Absolutely. Our design team provides free layouts, specs, and competitive pricing tailored to your needs.

Who This Is For

Our biological safety cabinet types solutions are ideal for:

  • Laboratory directors
  • Facility architects
  • University science departments
  • Pharma/biotech companies
  • Hospital labs
  • Government research facilities

A Guide to Modular Laboratory Carts

A Guide to Choosing the Best Modular Laboratory Carts

Modular laboratory carts are mobile, configurable storage units designed for efficiency in busy clinical and research environments. They act as adaptable workstations on wheels, bringing necessary supplies, instruments, and medications directly to the point of care. This flexibility is essential in demanding medical and laboratory settings.

This guide is for lab managers, nursing leaders, supply chain teams, and facilities planners. It addresses the common challenges of transporting materials across labs and clinical areas. We will explore how modular laboratory carts create flexible storage and help you choose the right configurations for your team.

Staff often waste time walking to central supply rooms, which can cause delays and pull them from patient care or research tasks. Traditional fixed casework is not suitable for modern labs and clinics where rooms must serve multiple purposes. Modular carts solve these problems by creating mobile supply hubs that improve organization and workflow.

Key Takeaways on Modular Laboratory Carts

  • What They Are: Modular carts are mobile storage units that bring supplies directly to the point of care, improving workflow and efficiency.
  • Why They Matter: They reduce staff movement, improve organization, and provide flexibility that fixed cabinets cannot match.
  • Types of Carts: Key types include procedure carts, emergency carts, medication carts, isolation carts, and mobile workstations, each designed for a specific function.
  • How to Choose: Follow a 5-step process: identify users and workflows, list all necessary supplies, choose the right cart size and drawer layout, select essential accessories, and plan for restocking and maintenance.
  • Integration: Carts work best when integrated with larger storage systems like high-density mobile shelves and fixed casework.
  • Maintenance: Regular cleaning, inspection of casters and drawers, and attention to ergonomics are crucial for safety and longevity.

Exploring the Main Types of Modular Carts

To find the right mobile solution for your facility, you must understand the available options. Modular laboratory carts are not a one-size-fits-all product. They are purpose-built for specific tasks to boost efficiency, safety, and organization in demanding environments. This specialization ensures that supplies for routine procedures are as organized as equipment for emergencies.

Three different colored modular laboratory carts with multiple drawers in a hospital hallway.
Different types of modular carts are designed to support specific clinical and laboratory workflows.

These carts have become essential in modern labs and medical facilities. The global market reflects their importance, with significant investment in adaptable, mobile furniture to support advanced instruments and smooth workflows. Let’s review the main categories of modular carts and their functions.

Procedure Carts

Procedure carts are versatile workhorses found in clinical labs, imaging suites, and outpatient clinics. Their main job is to keep all necessary supplies for a specific procedure, from blood draws to minor surgical tasks, organized and ready. These medical lab carts usually have a mix of shallow and deep drawers for vials, slides, kits, and instrument trays. The top surface provides a clean, mobile workspace. For common layouts, review this procedure cart spec sheet.

Modular laboratory cart with color coded drawers and <a href=work surface in a clinical setting.” />
Modular lab carts combine drawers, trays, and accessories to support different procedures.

Emergency and Crash Carts

When time is critical, no one can search for supplies. Emergency carts, or crash carts, are designed for rapid response. They are placed in high-stakes areas like emergency departments and intensive care units. They contain life-saving medications, defibrillators, and intubation kits. Tamper-evident seals or locks ensure all items are present and ready. You can find more information in this document covering emergency crash cart details.

Medication Carts

Medication carts ensure the secure and organized distribution of pharmaceuticals. Used by nursing staff on patient floors, these carts prioritize security with locking drawers to control access. Each drawer is typically divided into compartments for individual patient prescriptions, helping to prevent errors. You can explore security features in these medication management cart options.

Isolation Carts

Infection control is critical in healthcare. Isolation carts are a key part of this strategy, providing mobile storage for personal protective equipment (PPE). Stationed outside patient rooms, these carts hold gowns, gloves, and masks. Their bright yellow color makes them instantly identifiable, signaling that special precautions are required. Learn more about their features with these isolation cart configurations.

Mobile Workstation Carts

Modern healthcare relies on data. Mobile workstation carts combine storage and technology. They typically have a mount for a laptop or monitor, a keyboard tray, and a power source. These carts allow clinicians to access electronic health records and chart patient information at the point of care. They merge the utility of a desk and a supply cart. See an example in this mobile workstation cart layout.

Comparing Key Features of Modular Laboratory Carts

Choosing the right cart requires understanding its specific role. This table compares the most common types of modular carts, highlighting their unique features.

Cart Type Primary Use Case Typical Storage Configuration Security Features Infection Control Features Typical Departments
Procedure Cart General tasks, sample collection, minor procedures Mix of shallow and deep drawers, open shelves, work surface Optional key locks or breakaway seals Smooth, easy-to-clean surfaces Labs, Clinics, Imaging
Emergency Cart Rapid response to medical emergencies (code blue) Specific drawers for airway, breathing, circulation supplies Tamper-evident seals, central key lock Non-porous materials ER, ICU, Patient Floors
Medication Cart Secure distribution of patient medications Multiple locking drawers, often with dividers Key locks, electronic keypad locks Antimicrobial surfaces available Nursing Units, Long-Term Care
Isolation Cart Storing personal protective equipment (PPE) Bins, shelves, and holders for gowns, gloves, masks Generally unlocked for quick access Brightly colored for high visibility Anywhere with isolation rooms
Workstation Cart Mobile computing and documentation at point of care Small drawers for basic supplies, integrated tech mounts Lockable laptop compartments Surfaces withstand frequent disinfection All clinical areas

How to Choose the Right Modular Laboratory Cart: A 5-Step Checklist

Selecting the right modular lab cart is a planning process. The best choice comes from analyzing your team’s work, their daily tasks, and how a cart will fit into your lab’s workflow. A well-chosen cart becomes a central part of operations, improving efficiency. This five-step checklist will guide you to a solution that fits your lab’s needs.

Step 1: Identify Users and Procedures

Before looking at cart models, observe your team. Who will use the cart most often? What does their typical day involve? Map the physical path the cart will take from the stockroom to the point of care. Ask these questions:

  • Will one department own the cart, or will it be a shared resource?
  • What are the top 2-3 procedures it needs to support?
  • Are there workflow issues you can solve, like technicians frequently returning for supplies?

Step 2: List Supplies, Instruments, and Devices

Make a detailed list of every item the cart must hold. Be specific. Note different sizes of syringes and the quantity needed per shift. Your inventory should cover everything:

  • Consumables: Gloves, gauze, tubing, and specimen vials.
  • Instruments: Pipettes, scalpels, and other specialized tools.
  • Medications: Vials, pre-filled syringes, and solution bottles.
  • Technology: Laptops, tablets, or barcode scanners.

Step 3: Choose Cart Sizes, Drawer Configurations, and Tray Layouts

With your list, you can consider the cart’s physical specifications. The size must be large enough for all items but nimble enough for doorways and tight corners. For drawers, shallow ones are good for small items like slides. Deeper drawers hold bulky kits and bottles. Dividers and trays help keep small items organized. A smart drawer layout makes modular laboratory carts so efficient.

A red modular medical cart with a large top work surface and multiple drawers of varying sizes.
Drawer configurations can be tailored with different sizes and dividers to match specific supply needs.

Step 4: Select Accessories

Accessories turn a basic cart into a specialized workstation. Based on your workflow analysis, choose add-ons that help your team. Popular accessories include:

  • IV poles for infusion setups.
  • Sharps container holders for safe disposal.
  • Glove box holders for quick PPE access.
  • Monitor arms and keyboard trays for mobile data entry.

Step 5: Plan Restocking, Cleaning, and Maintenance

Think about the cart’s life after it arrives. How will it be restocked? Where will it be cleaned? Assign responsibility for these tasks. Your plan should also cover routine maintenance. Regularly inspect casters, brakes, and drawer slides to ensure they work smoothly. This planning ensures your new cart remains a reliable asset.

Decision Scenarios: Customizing Carts for Real-World Use

The value of modular carts is clear when they solve specific, daily challenges. A cart is a mobile command center designed for efficiency. These mini-guides show how a cart’s layout and accessories can be tailored to meet the demands of different environments.

Scenario 1: Central Lab Specimen Collection Carts

A busy central lab processes many samples daily. Phlebotomists need every supply organized and accessible. An ideal cart would have shallow drawers with dividers for needles and tubes, a sharps container holder for safety, a small waste bin, and a barcode scanner mount to speed up labeling and reduce errors.

A blue modular lab cart with an organized top surface including a monitor, keyboard, and sharps container.
A mobile workstation cart combines technology and storage for efficient point-of-care data management and supply access.

Scenario 2: Standardizing Hospital Procedure Carts

Consistency across departments is a common hospital challenge. To standardize, a facility should form a planning committee with staff from different units. Use color-coded drawers for universal identification, like blue for respiratory supplies. Establish a standard quantity for each item to simplify restocking. Select versatile accessories useful in multiple settings.

Scenario 3: Flexible Exam Rooms in Outpatient Clinics

Outpatient clinics often have limited space. Replacing fixed cabinets with mobile carts allows a single exam room to be reconfigured for different specialties. Create specialty-specific carts, such as one for dermatology with biopsy kits and another for orthopedics with casting materials. Use a “cart-in, cart-out” system based on the day’s schedule to keep the space uncluttered.

A tall, blue anesthesia cart with numerous clear tilt bins and labeled drawers in a clinical room.
Specialty carts, like this anesthesia cart, provide highly organized access to critical supplies for specific procedures.

Scenario 4: Upgrading Emergency Response Carts

When upgrading crash carts across a health system, standardization is key. Carts should have a consistent layout so clinical staff can find equipment quickly, regardless of location. Use tamper-evident seals for immediate visual confirmation that the cart is fully stocked. Choose durable casters that can navigate different flooring types smoothly during a response.

Integrating Carts with Other Storage Systems

A modular cart is most effective as part of a larger system. Integrating carts into your broader storage and workflow networks creates a smooth flow of materials from a central stockroom to the point of care.

Connection to High-Density Storage

Efficient facilities use a tiered storage system. At the core are high-density systems like medical inventory mobile shelves, which act as the central hub for bulk supplies. These systems store a large amount of material in a small footprint. Staff can wheel carts directly to these units for restocking, creating an efficient replenishment cycle. This system keeps point-of-care areas uncluttered.

A high-density mobile shelving unit filled with organized medical supplies in a storage room.
High-density mobile shelves serve as a central supply hub that supports the restocking of modular laboratory carts.

Working with Fixed Casework

Modular carts work alongside traditional laboratory casework and benches. Fixed casework is best for stationary items like heavy equipment. Carts provide the mobility that fixed furniture lacks, transporting shared instruments and daily consumables between rooms. This allows a single lab to serve multiple purposes. It combines the stability of fixed casework with the adaptability of mobile carts.

Streamlining Central Supply Workflows

The link between modular carts and departments like Sterile Processing (SPD) and Pharmacy is critical. SPD can prepare and load procedure-specific carts with sterile instrument kits. After a procedure, the cart returns to SPD for decontamination and restocking. This creates a closed-loop system that ensures consistency. Pharmacies can use secure medication carts to distribute patient-specific drugs, improving accuracy and security.

Well-organized medical inventory on mobile shelving units, demonstrating an efficient central supply area.
Medical inventory mobile shelves provide organized, high-capacity storage that simplifies cart replenishment workflows.

Maintenance, Safety, and Usability

Modular carts require a proactive plan for maintenance and safety to keep them functional and long-lasting. This involves regular cleaning, routine inspections, and considering ergonomics.

Cleaning and Disinfection Practices

Establish a consistent routine for disinfecting your carts. Wipe down all surfaces, including the top, frame, handles, and drawer fronts, with a disinfectant approved by your facility’s Environmental Health and Safety (EHS) team. Also clean accessories like IV poles and monitor arms. Periodically empty drawers to clean the interiors. Always follow your organization’s specific rules on cleaning agents and frequency.

Inspecting Casters, Brakes, and Drawers

Regular check-ups can catch small issues before they become major problems. Check that casters roll and swivel smoothly. Test the brakes to ensure they lock securely. Open and close each drawer to check for smooth operation. Look for any sticking or misalignment. Inspect the cart’s frame for any cracks or weak spots and ensure all accessories are securely fastened.

Accessibility and Usability Considerations

A cart’s usability is essential for staff safety and efficiency. Consider handle height, push force, and turning radius when planning where carts will be used. Ensure aisles are wide enough for easy navigation. For workstation carts, check that the work surface height and monitor placement are ergonomically sound to prevent strain. A photo’s alt text for a screen reader could be: “A lab technician of average height comfortably pushes a modular cart with an adjustable-height handle down a well-lit corridor, demonstrating good ergonomic design.”

Frequently Asked Questions (FAQs)

Here are answers to common questions about selecting the best modular laboratory carts for your facility.

How do I decide between different cart sizes and heights?

Your choice depends on your workflow and physical space. Measure doorways and hallways the cart will pass through. A taller, narrower cart might work better in tight corridors, while a shorter, wider cart offers a larger work surface. The handle and surface height should also be ergonomically comfortable for your staff.

What are the benefits of standard versus custom drawer layouts?

Standard layouts are cost-effective, ship quickly, and are designed for common tasks. Custom layouts allow you to tailor drawers with dividers and inserts for specific procedures, which can improve efficiency and reduce errors. You can explore options in this modular cart configuration guide.

Which brake and caster options are best for my floors?

Use hard casters for carpeted floors and softer rubber casters for hard surfaces like tile. Rubber casters are quieter and provide better grip. For safety, ensure at least two casters are locking. Total-locking casters, which lock both the wheel and the swivel mechanism, offer maximum stability.

What locking options are available for medication or controlled substances?

Common options include key locks, which are simple and reliable. Electronic keypad locks offer keyless entry and often include an audit trail. Breakaway seals provide a visual indicator that an emergency cart has been opened and needs restocking.

What are the typical lead times and delivery logistics?

Lead times vary. Standard, in-stock carts may ship in a few days. Custom orders with special colors or configurations will take longer. Always confirm current inventory and shipping estimates when you request a quote to plan accordingly.

How do modular carts support accreditation and regulatory requirements?

Modular carts help meet standards from organizations like The Joint Commission by promoting organization, safety, and infection control. Locking systems support secure medication management, while marked isolation carts enforce infection prevention protocols. Standardizing supplies with organized carts builds the consistency that regulators require.

Can carts be reconfigured if our needs change?

Yes, modularity is a key benefit. Drawers, trays, and accessories can often be rearranged or swapped out. This flexibility allows the cart to adapt to new procedures, technologies, or departmental needs, making it a long-term investment.

What materials are the carts made from?

Most modular laboratory carts are constructed from durable materials like powder-coated steel, aluminum, and high-impact polymers. These materials are chosen for their strength, light weight, and resistance to chemicals and frequent cleaning.

Conclusion: Flexible Carts for Modern Labs

Modular laboratory carts offer a powerful solution to the workflow challenges faced by modern labs and clinics. They enhance flexibility, improve organization, support infection control, and create more efficient processes. By carefully assessing your needs and choosing the right configurations, you can equip your team with tools that help them perform their best work.

Labs USA can assist with cart selection, standardization across departments, and configuration drawings. We offer quick quotes and quick ship options from our current inventory to support your projects.

Ready to improve your workflow? Explore our wide selection of modular medical carts to find the perfect fit for your facility. For personalized assistance, request a quote today and let our experts help you plan your ideal cart layout.

Contact Labs USA

If you need help with modular cart planning, budgeting, or standardization for your labs and clinical spaces, our team is here to assist. We serve facilities across the United States and can help you find the right solutions for your specific needs.

Please reach out to us through the Labs USA contact page, and one of our specialists will be in touch to discuss your project.

Who This Is For

Our modular laboratory carts solutions are ideal for:

  • Laboratory directors
  • Facility architects
  • University science departments
  • Pharma/biotech companies
  • Hospital labs
  • Government research facilities

Choosing the Right Balance for Laboratory Success

A balance for laboratory use is a sensitive instrument. It is built to measure mass with a level of precision that standard scales cannot match. While a regular scale measures weight, a true lab balance is critical equipment for any experiment where accuracy determines valid results.

For any serious scientific work, getting the right instrument is not just a good idea. It is non-negotiable.


TL;DR: Key Takeaways on Choosing a Lab Balance

  • Accuracy is Essential: A laboratory balance is the foundation of reliable data. Inaccurate measurements can lead to failed experiments and wasted resources.
  • Types Vary by Need: Analytical balances offer high precision for tiny samples. Precision balances handle larger capacities for general tasks. Microbalances provide extreme sensitivity, and moisture analyzers determine water content.
  • Key Specs Matter: Understand readability (smallest displayed increment), repeatability (consistency), and capacity (maximum load) to choose the right tool.
  • Environment is Crucial: A stable, vibration-free surface away from drafts and temperature fluctuations is necessary for accurate readings.
  • Regular Maintenance is Key: Daily checks, routine cleaning, and annual professional calibration ensure long-term accuracy and reliability.

Why the Right Lab Balance Is Non-Negotiable

A laboratory precision balance with a small sample container, amber bottles, and papers on a wooden desk.

Think of your lab balance as the foundation of reliable scientific discovery. It guarantees that every measurement is not just precise but also repeatable. This is the cornerstone of any credible research. From developing new pharmaceuticals to running quality control on food products, the entire outcome often hinges on the accuracy of initial measurements.

This is why a dedicated balance for laboratory settings is essential. These instruments are engineered to detect small increments of mass, often down to a fraction of a milligram. The demand for such precision tools is growing. According to some reports, the global market for lab balances is projected to expand significantly.

The Foundation of Good Science

Every compound you formulate and every sample you analyze starts with a measurement. Just one inaccurate reading can create a ripple effect. This can lead to skewed conclusions, wasted materials, and failed experiments. A reliable balance is more than just equipment. It is a commitment to data integrity and scientific accuracy.

Planning and funding for these critical tools is a key part of setting up any lab. Many scientific projects secure funding through specific channels, like applying for NSF grants. These grants are crucial for properly equipping a lab. Investing in the right balance is an investment in the quality and integrity of your work.

Comparing the Most Common Laboratory Balances

A row of three different laboratory balances on a wooden bench, illustrating their varying sizes.

When you outfit a lab, you will quickly realize that a "balance" is not a one-size-fits-all tool. The right balance for laboratory work depends entirely on the job at hand. You would not use a delicate instrument to weigh bulk reagents. Likewise, you would not use a rugged top-loader for precise pharmaceutical formulation.

It all comes down to matching the instrument's capabilities to your specific application. Using a balance that is too sensitive for a simple task will slow you down. Using one that is not precise enough for a critical measurement can invalidate your entire experiment. Let’s break down the common types to help you choose what you need.

Analytical Balances

Analytical balances are built for extreme precision. They are capable of measuring mass with a high degree of accuracy. This sensitivity is why they always come enclosed in a draft shield. Even a slight breeze from an HVAC system or someone walking by can affect the reading.

  • Primary Use: Indispensable for quantitative chemical analysis and preparing standards.
  • Typical Readability: From 0.1 mg down to 0.001 mg.
  • Capacity: These are not for heavy loads. Capacity usually is between 1 g and 500 g.

When working with fine powders or volatile chemicals, it is important to use these balances inside a controlled space. A specialized powder weighing fume hood is perfect for this. It protects both the user and the sample by containing airborne particles.

Precision and Top-Loading Balances

Precision balances offer a good mix of capacity and accuracy. This makes them perfect for a wide range of daily tasks. Top-loading balances are a common type of precision balance, valued for their durability and simple operation.

  • Primary Use: Great for routine sample prep and general weighing where you need reliable numbers but not sub-milligram precision.
  • Typical Readability: Ranges from 1 g down to 0.001 g (1 mg).
  • Capacity: These can handle bigger jobs, with capacities starting around 150 g and going up to 10,000 g or more.

Microbalances and Ultra-Microbalances

Sometimes, even an analytical balance is not sensitive enough. When your work involves tiny samples and demands the highest level of precision, you need a microbalance. These instruments take sensitivity to a new level, measuring mass in the microgram range. Microbalances are used in highly specialized roles, like analyzing particulate matter or weighing small medical components.

Moisture Analyzers

A moisture analyzer is a hybrid instrument. It is a balance for laboratory use with a heating element built in. The process is simple. It weighs a sample, heats it to remove moisture, and then weighs it again. From the difference, it calculates the exact moisture content.

  • Primary Use: Essential for quality control in industries like food production and pharmaceuticals.
  • Readability: Typically calculates moisture content to 0.01% or 0.001%.

Comparison of Common Laboratory Balance Types

This table gives you a quick look at the key differences between the most common types of laboratory balances.

Balance Type Typical Readability Common Capacity Range Primary Application
Analytical Balance 0.1 mg to 0.001 mg 1 g – 500 g Quantitative chemical analysis, density determination, high-precision formulation.
Precision Balance 1 g to 0.001 g (1 mg) 150 g – 10,000 g+ General lab weighing, sample preparation, quality control checks.
Microbalance 0.001 mg (1 µg) or better 1 g – 10 g Filter weighing, particulate matter analysis, stent weighing.
Moisture Analyzer 0.01% to 0.001% 50 g – 200 g Determining moisture content in food, plastics, and pharmaceuticals.

Choosing the right balance comes down to understanding the demands of your specific workflow. By matching the instrument's features to your application, you ensure your measurements are both accurate and efficient.

Decoding the Technical Specifications That Matter

Looking at a spec sheet for a balance for laboratory use can feel complex. The technical terms are there for a reason, but you must know what they mean to pick the right tool. This is about looking past the price to see if a balance can deliver the results your work demands.

Understanding these key specs is what separates a smart purchase from an expensive mistake. It is how you ensure the instrument you choose will be accurate and reliable for years to come.

Readability, Repeatability, and Linearity

These three terms describe a balance's performance. They might sound similar, but they measure different aspects of how a balance behaves.

  • Readability is the smallest increment the balance can display on its screen. A balance with 0.001 g readability can show weight changes down to a thousandth of a gram.
  • Repeatability is about consistency. If you weigh the same sample ten times, how close are the results to each other? Good repeatability gives you confidence in your numbers.
  • Linearity checks the balance's accuracy across its entire weighing range. Good linearity means the balance is just as accurate measuring a 1-gram sample as it is a 100-gram sample.

You could have a balance with great readability, but if the repeatability is poor, you cannot trust the numbers. For reliable measurements, you need a balance that scores high on all three.

Capacity and Calibration Explained

Beyond precision, you need to think about practical factors. This includes how much weight the balance can handle and how you keep it accurate. This is where capacity and calibration come in.

Capacity is the maximum weight the balance can measure. A good rule is to choose a balance with a capacity above the heaviest item you will weigh. Do not forget to include the weight of your container. Pushing a balance past its limit can permanently damage its weighing mechanism.

Calibration is the process of adjusting a balance to make sure its readings are accurate. It corrects for any drift by using a known, certified weight. There are two ways this is done.

  • External calibration is a manual process. You physically place certified weights on the pan and follow prompts.
  • Internal calibration is automatic. The balance has a built-in mechanism that handles the adjustment, either on command or on a schedule.

Your workspace itself is a huge factor. The slightest vibration can throw off a sensitive measurement. That is why investing in the right anti-vibration laboratory work surfaces is just as critical as choosing the right balance. New models with features like digital sensors and automated calibration are always entering the market, driven by the push for more efficient lab workflows. Keeping an eye on market trends can give you a sense of where the technology is heading.

Your 5-Step Checklist for Choosing a Lab Balance

A '5-STEP CHECKLIST' text, a laboratory balance, a detailed form on a clipboard, and a pen.

Choosing the perfect balance for laboratory work does not have to be complicated. When you break it down into a clear process, finding the right fit becomes much simpler. This checklist covers five actionable steps. Think of this as building a profile of the ideal instrument for your needs.

Step 1: Define Your Weighing Application

First, what are you actually weighing? Be specific. Think about the smallest and largest sample masses you will work with. Are you doing simple weigh-ins, creating chemical formulations, or running moisture analysis? The nature of your task is the most important factor.

Step 2: Determine Required Readability

Next, consider precision. How exact do your measurements need to be? Look at your smallest sample and figure out the acceptable margin of error for your experiments. A good rule is that your balance's readability should be at least 10 times smaller than your required weighing accuracy. For example, if you need to weigh a sample with an accuracy of 0.1 grams, look for a balance with a readability of at least 0.01 grams.

Step 3: Assess Capacity and Pan Size

Now consider the heaviest items you plan to measure. Do not forget to include the weight of any containers you use. The balance’s maximum capacity must comfortably handle that total weight. At the same time, check the physical size of the weighing pan. Is it large enough for your containers to sit flat and stable? An undersized pan can lead to inaccurate readings.

Step 4: Evaluate Your Laboratory Environment

Where you put the balance matters. High-precision instruments are sensitive to their surroundings. An unstable environment can cause readings to drift. Look around the potential location. Ask yourself about vibrations, air currents from doors or vents, and temperature fluctuations. The most precise instruments might need a dedicated anti-vibration table.

Step 5: Check Connectivity and Compliance

Finally, think about how the balance will fit into your lab's workflow. Do you need to connect it to a printer or a Laboratory Information Management System (LIMS)? Are features like Good Laboratory Practice (GLP) printouts essential for your compliance needs? Proper planning of your workspace is key. Our guide on laboratory casework specifications can help ensure your benches support your new equipment.

Setup and Maintenance for Lasting Accuracy

A person in a lab coat and jeans adjusting a laboratory balance or scale for accuracy.

A high-quality balance for laboratory use is only as good as the care you give it. An advanced instrument will not give you accurate results if it is not set up and maintained correctly. Proper installation and routine checks are the keys to preserving its accuracy.

It all starts with picking the right spot. A stable surface away from vibrations, direct sunlight, and air drafts is non-negotiable for this sensitive equipment. Simple daily habits, like quick cleaning and careful handling, also prevent damage and keep your measurements trustworthy.

Best Practices for Installation

Getting the setup right is the foundation for every measurement you will take. An incorrectly placed or leveled balance will never be accurate.

  • Find a Stable Surface: A heavy, sturdy bench is your best bet. Avoid placing the balance near large equipment like centrifuges that can send vibrations through the floor.
  • Avoid Air Movement: Keep the balance away from doors, windows, and HVAC vents. For the most precise work, a dedicated balance enclosure can shield it from the environment.
  • Check for Level: Your balance has a built-in leveling bubble. Adjust the feet until the bubble is perfectly centered. Check this regularly.
  • Let It Acclimate: Let the balance sit in its new location for several hours to adjust to the room's temperature and humidity. This simple step prevents measurement drift.

Creating a Routine Maintenance Schedule

Once your balance is set up, a consistent maintenance schedule will keep it in peak condition. These simple, regular tasks prevent most common issues before they start. A well-maintained balance is an instrument you can trust.

Daily Habits

  1. Inspect and Clean: Before each use, look for any debris on the weighing pan. Use a soft brush to gently remove spilled powders or dust.
  2. Verify with a Check Weight: Place a known weight on the pan to make sure the balance is reading correctly. This quick check gives you confidence in your results for the day.

Periodic Upkeep

  • Scheduled Calibration: Stick to a regular calibration schedule based on your lab's protocols. Periodically verify its accuracy with certified external weights.
  • Professional Servicing: At least once a year, have a certified technician perform a full service and calibration. They can spot and fix potential problems.

Use-Case Scenarios: Choosing the Right Balance

To make your decision easier, here are five common scenarios. Each one highlights which balance type is the best fit for a specific task.

  1. Pharmaceutical Compounding: A pharmacy needs to prepare a custom medication requiring 25 mg of an active ingredient. Accuracy is critical.

    • Best Choice: An analytical balance. Its high readability (0.1 mg or better) is necessary to weigh such a small quantity with the required precision.
  2. University Chemistry Lab: Students are preparing solutions and need to weigh out 50 to 150 grams of common chemicals like sodium chloride.

    • Best Choice: A top-loading precision balance. It offers sufficient capacity and good readability (e.g., 0.01 g) for routine educational tasks without being overly sensitive.
  3. Food Quality Control: A food manufacturer needs to test the moisture content of potato chips to ensure product quality and shelf life.

    • Best Choice: A moisture analyzer. This specialized balance automates the process of heating and reweighing to provide a fast and accurate moisture percentage.
  4. Environmental Air Monitoring: A research institute is analyzing particulate matter collected on filters. The samples are extremely small, often in the microgram range.

    • Best Choice: A microbalance. Only a microbalance has the sensitivity (1 µg or better) required to accurately measure the tiny mass collected on the filters.
  5. Geological Sample Analysis: A geologist is weighing large rock and soil samples, some weighing up to 2 kg, for density analysis.

    • Best Choice: A high-capacity precision balance. This balance can handle the heavy load while still providing the necessary accuracy (e.g., 0.1 g) for the analysis.

Your Questions About Laboratory Balances, Answered

When you deal with a precise instrument like a balance for laboratory work, questions will come up. Getting the right answers is what separates a good measurement from a useless one. Here are answers to common questions from lab managers and technicians.

What Is the Difference Between a Balance and a Scale?

The biggest difference is precision and how they measure. A balance measures mass by comparing an object to a known, calibrated mass inside the instrument. This makes it very sensitive and accurate. A scale measures weight, which is the downward force of gravity on an object. For any serious scientific work that needs high precision, a balance is necessary.

How Often Should I Calibrate My Laboratory Balance?

Calibration frequency depends on your lab's Standard Operating Procedures (SOPs) and any regulatory rules. As a best practice, do a quick check every day with a certified weight. This confirms the balance is working as expected. A full calibration by a certified technician should be done at least once a year. You should also recalibrate anytime the balance is moved.

What Is Drift and How Can I Prevent It?

Drift is when the number on the display slowly changes, even with nothing on the pan. This instability can make getting a solid measurement difficult. Common causes include temperature changes, static electricity, air drafts, and vibrations. To prevent drift, let the balance warm up for a few hours before use. Place it in a location away from drafts and vibrations.

Why Do Analytical Balances Have a Draft Shield?

Analytical balances are highly sensitive, often measuring mass down to 0.1 mg or smaller. At that level of precision, the slightest disturbance can affect the reading. The draft shield is a glass box around the weighing pan. It creates a pocket of still air, protecting the pan from air currents. This feature is critical for getting repeatable, accurate results.

What Does Readability Mean for a Balance?

Readability is the smallest increment of mass the balance can show on its screen. For example, a balance with a readability of 0.001 g can display weight changes in one-thousandth-of-a-gram steps. Do not confuse readability with accuracy. A balance can have great readability but be inaccurate if it is not calibrated correctly.

Can I Use Any Container to Weigh My Samples?

You can use various containers like weighing boats or beakers, but the material matters. Plastic and glass can build up static electricity, which can affect measurements on a sensitive balance. For best results, make sure your container is clean, dry, and has adjusted to the temperature inside the weighing chamber. If you have static problems, try an anti-static weighing dish or an ionizer.

Conclusion: Investing in Precision for Your Lab

Choosing the right balance for laboratory work is a critical decision that directly impacts the quality of your research. By understanding the different types of balances, decoding key specifications, and following a structured selection process, you can find an instrument that meets your exact needs.

Proper setup, regular maintenance, and consistent calibration are just as important as the initial purchase. These practices ensure your balance remains a reliable tool for years to come. Investing in the right balance is an investment in data integrity and the success of your lab.

Ready to find the perfect balance for your applications?

Compare Balance Options

Request a Quote for Your Lab

Need Help Designing Your Lab?

Our laboratory design specialists provide free consultations, 3D lab layouts, and competitive pricing.

Request a Free Consultation → | Call (801) 855-8560

Frequently Asked Questions

How do I choose the right balance for laboratory?

Choosing the right balance for laboratory depends on your application, space, and budget. Labs USA provides free expert consultations. Call (801) 855-8560 or request a quote.

What is the lead time for balance for laboratory?

Lead times vary by product. Many items ship quickly; custom orders take 4-8 weeks. Call (801) 855-8560 for availability.

Do you offer installation?

Yes. Labs USA provides professional installation across the United States with factory-trained installers.

Can I get a custom configuration?

Absolutely. Our design team provides free layouts, specs, and competitive pricing tailored to your needs.

Who This Is For

Our balance for laboratory solutions are ideal for:

  • Laboratory directors
  • Facility architects
  • University science departments
  • Pharma/biotech companies
  • Hospital labs
  • Government research facilities