A Practical Guide to the Modern Lab Glove Box
A lab glove box is a sealed container that lets you handle sensitive materials in a controlled environment. It has built-in gloves that allow you to work inside the chamber. This design keeps everything inside isolated from the outside air. The main goal is to protect your materials from contamination or to protect you from hazardous substances.
Your Quick Guide to Lab Glove Boxes
- What it is: A sealed box with gloves to handle sensitive materials in a controlled atmosphere.
- Key Types: Inert atmosphere boxes protect samples from air, while containment boxes protect users from hazards.
- Main Materials: Stainless steel for durability and chemical resistance; acrylic for visibility and lower cost.
- How to Choose: Your choice depends on your application, chemical use, size needs, and budget.
- Safety First: Always use the correct pressure (positive or negative) and perform regular leak tests.
Understanding How a Lab Glove Box Functions

You can think of a lab glove box as a small, personal cleanroom. Its main job is to create an isolated atmosphere. This is essential for many scientific and industrial tasks. This isolation stops oxygen, moisture, dust, or microbes from ruining an experiment or harming a worker.
The need for these controlled spaces is growing. In 2024, the global market for lab glove boxes was valued at about US$270 million. It is expected to reach US$364 million by 2031. This growth is logical because these boxes are critical in fields like battery research, pharmaceuticals, and electronics.
The Core Components of a Glove Box
A glove box is a system of key parts working together. Understanding these components helps explain how the system maintains such precise control.
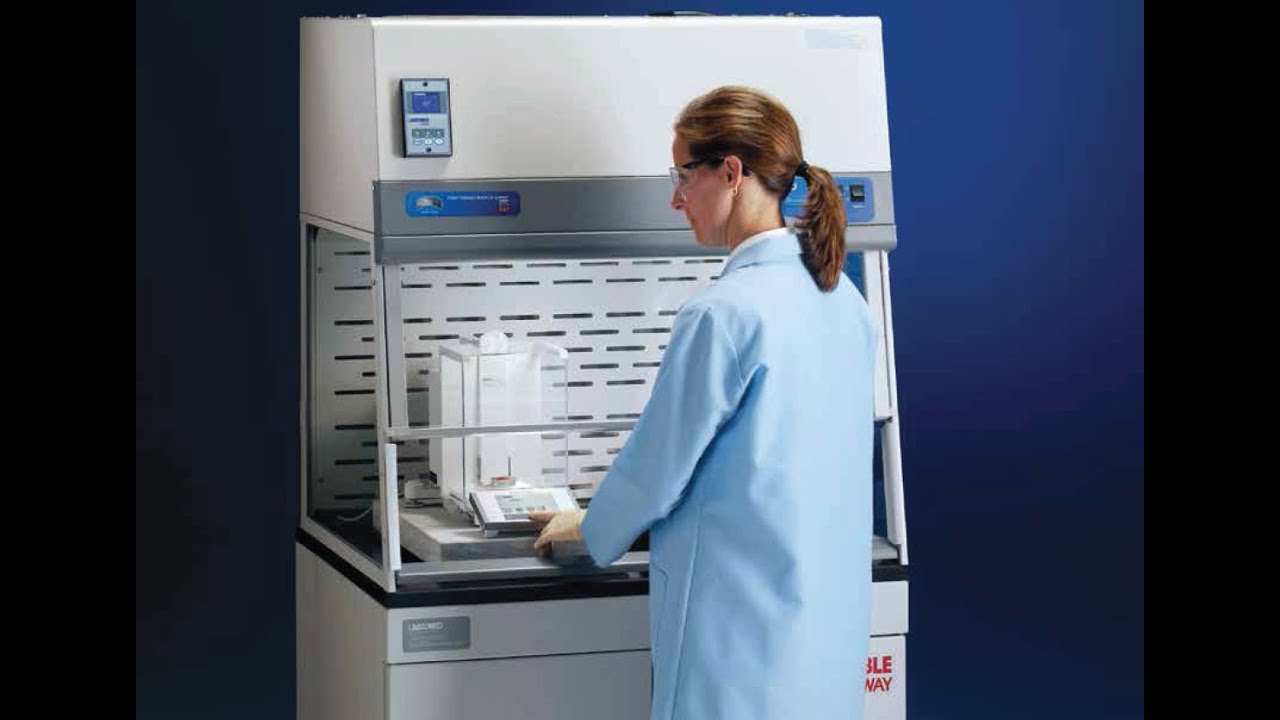
- Main Chamber: This is the large, sealed workspace. It is usually built from materials like stainless steel or acrylic. It always has a large, clear window so you can see your work.
- Antechamber (Airlock): This is a smaller chamber attached to the main one. You place materials here to move them in or out. This process ensures the main workspace stays pure.
- Gloves: These are long, heavy-duty gloves sealed to the glove ports. They allow you to work inside without breaking the seal. The glove material depends on the chemicals you handle.
- Gas Purification System: Many glove boxes have this feature. It is a closed-loop system that circulates the internal atmosphere through filters. It removes oxygen and moisture to very low levels, often less than one part per million (ppm).
Positive vs Negative Pressure Systems
The internal pressure is a critical safety feature. It can be set higher or lower than the air pressure outside. The choice depends on what you need to protect.
If you need to shield a sensitive sample from the outside air, you use positive pressure. This means if a small leak occurs, the clean gas inside flows out. This pushes contaminants away.
If you are working with hazardous materials, you use negative pressure. That way, if there is a breach, outside air rushes in instead of hazardous fumes leaking out. This containment method is similar to how many laboratory fume hoods protect the user.
Comparing the Different Types of Lab Glove Boxes
Not all lab glove boxes are the same. Each type is built for a specific job. Getting to know the main categories helps you find the right fit for your lab. The choice comes down to your primary goal: isolation or containment.

The two main types are inert atmosphere glove boxes and containment glove boxes. They might look similar, but their functions and safety features are very different. Let’s look at each type.
Inert Atmosphere Glove Boxes
These boxes protect what is inside. Their main job is to create an environment free of oxygen and moisture. This is crucial for working with materials that react with normal air.
The box is filled with a non-reactive or inert gas, usually argon or nitrogen. A gas purification system constantly circulates this gas. It scrubs out any stray oxygen and water vapor. Top systems can keep impurity levels below 1 part per million (ppm).
You will find these systems in labs focused on:
- Battery Research: Assembling lithium-ion batteries with highly reactive components.
- Organometallic Chemistry: Making compounds that are very sensitive to air and moisture.
- Semiconductor Manufacturing: Handling delicate parts that can be damaged by oxidation.
Containment or Isolation Glove Boxes
Containment glove boxes do the opposite. They protect the user and the lab from hazardous materials inside the box. Here, safety is the top priority.
They operate under negative pressure. This means the pressure inside the box is slightly lower than the lab’s pressure. If a leak happens, air from the room would rush in, not out. These glove boxes often have HEPA filters to clean the exhaust air.
Containment glove boxes are standard for:
- Pharmaceutical Compounding: Handling potent active pharmaceutical ingredients (APIs).
- Biological Research: Working with viruses, bacteria, or other biohazards.
- Radiochemistry: Safely handling radioactive materials.
General-Purpose and Hybrid Models
You can also find more flexible glove boxes. General-purpose models, often made from acrylic, provide a simple physical barrier. They are good for tasks like weighing powders or protecting samples from dust. They do not offer a controlled atmosphere.
Hybrid models combine features from different types. For instance, a system might provide an inert atmosphere while running under negative pressure. This setup offers both product and user protection.
Lab Glove Box Types Comparison
This table provides a quick comparison of the primary types of glove boxes. It highlights their purpose, atmosphere, and common uses.
| Glove Box Type | Primary Purpose | Typical Atmosphere | Common Applications |
|---|---|---|---|
| Inert Atmosphere | Protect the sample from air and moisture. | Positive pressure with nitrogen or argon. | Battery research, materials science. |
| Containment/Isolation | Protect the user from hazardous materials. | Negative pressure with filtered air. | Pharmaceuticals, biological research. |
| General-Purpose | Provide a basic physical barrier. | Ambient air, no pressure control. | Powder weighing, dust-free assembly. |
Choosing the right glove box starts with a clear understanding of your goals. There is a specific design built to handle the job safely and effectively.
Understanding Key Materials and Construction
The quality of a lab glove box depends on its materials. You need to select a glove box built from materials that can handle your specific work. Making the right choice ensures chemical compatibility, a pure atmosphere, and a long lifespan.

Every part matters, from the main chamber to the gloves. Let’s review the common materials used in glove box construction.
Primary Chamber Materials
The main chamber is your first line of defense. The material used here determines chemical resistance, vacuum capability, and overall durability.
Stainless Steel
For demanding jobs, stainless steel is the best choice. It offers excellent chemical resistance, is easy to clean, and is very durable. Its non-porous surface is perfect for achieving low leak rates. This is essential for high-purity systems where oxygen and moisture must stay below 1 ppm.
Aluminum
Aluminum is a lighter and more affordable option. It does not have the same chemical resistance as steel. However, it is a good pick for general-purpose applications that do not involve harsh materials.
Plastics (Acrylic and Polycarbonate)
Plastics like acrylic offer great visibility. This makes them popular in educational settings or for processes where a clear view is important. They are also less expensive. The downside is that certain solvents can damage them, and they scratch easily.
Comparing Glove Box Construction Materials
This table offers a side-by-side look at common chamber materials.
| Material | Key Advantages | Common Disadvantages | Best For |
|---|---|---|---|
| Stainless Steel | Superior chemical resistance, low leak rates, high durability, easy to clean. | Higher cost, heavy weight, opaque body (requires window). | High-purity inert atmospheres, corrosive materials, pharmaceutical work. |
| Aluminum | Lightweight, lower cost than steel, good for custom designs. | Lower chemical resistance, softer material. | General-purpose inert atmosphere work, non-corrosive applications. |
| Acrylic/Polycarbonate | Excellent visibility, low cost, lightweight. | Prone to scratching, poor solvent resistance, can absorb moisture. | Educational use, powder weighing, dust-free assembly, low-risk tasks. |
Glove Materials and Selection
Choosing the right glove material is a critical safety decision. Your choice should be based on chemical resistance, dexterity, and durability. Always check a chemical compatibility chart and follow your facility’s safety rules.
- Butyl: This material offers the best protection against a wide range of chemicals, especially ketones and esters. It is also highly impermeable to gases.
- Neoprene: A great all-around option, neoprene offers good chemical resistance and is physically tough. It is more flexible than butyl.
- Hypalon: Known for its resistance to oxidizing chemicals, acids, and bases. It is also very durable and stands up well to abrasion.
The work surface inside the glove box also matters. Like the chamber, the material for the internal base must be chosen for its chemical resistance. You can learn more about picking the right laboratory work surfaces in our guide.
How to Choose the Right Lab Glove Box
Picking the perfect lab glove box can feel complex. However, if you break it down into a few steps, the process becomes much clearer. A careful approach ensures you will not miss any critical factors.
This checklist is a great framework for making an informed decision. As you work through each step, you will build a detailed specification list that matches your lab’s needs. This helps you avoid overspending on features you will not use or choosing a unit that does not protect your team.
A 5-Step Checklist for Selecting Your Glove Box
Follow these five steps to narrow down your options and find the ideal fit.
-
Define Your Application and Needs
First, what will you be doing inside the glove box? This question drives everything else. Do you need to protect a sample from the air (positive pressure) or protect yourself from a hazard (negative pressure)? Also, determine the purity levels required. Do you need oxygen and moisture below 1 ppm, or just a dust-free space? -
Assess Material Compatibility
Next, list every chemical and substance that will go inside the unit. This is essential, as it dictates the right construction materials for the chamber and gloves. For example, stainless steel offers broad chemical resistance. Acrylic is great for visibility in less aggressive applications. This choice affects the glove box’s lifespan and safety. -
Determine Size and Configuration
Think about your lab space and workflow. How much internal workspace do you need? Will one person use it, or do you need multiple glove ports? Consider the size of equipment you will move in and out. This helps you determine the right dimensions for the antechamber. As you plan, it is smart to review laboratory casework specifications to ensure a good fit. -
Evaluate Controls and Accessories
Modern glove boxes offer many accessories. Do you need sensors for real-time monitoring of oxygen or moisture? Would an automatic pressure controller be helpful? Other add-ons include shelving, internal power outlets, and microscope ports. Make a “must-have” and “nice-to-have” list to align features with your process. -
Consider Budget and Maintenance
Finally, look at the total cost of ownership. This includes the initial purchase, installation, and ongoing maintenance. A basic acrylic model might cost a few thousand dollars. A fully automated stainless steel system can exceed $75,000. Also, budget for consumables like replacement gloves and filters. Understanding how to get securing research grants can be a crucial part of financial planning.
5 Common Use-Case Scenarios
A lab glove box is a specialized tool that enables important work across many industries. To understand their value, let’s look at how they solve real-world problems. These mini-guides show how different labs use glove boxes to achieve their goals.
1. Lithium-Ion Battery R&D
Moisture is the enemy of lithium-ion batteries. The core components are very sensitive. Even a small amount of water vapor can react with the lithium, hurting performance and creating safety risks.
- Challenge: Keep moisture away from sensitive materials during cell assembly.
- Solution: An inert atmosphere glove box with high-purity argon gas. A gas purifier keeps moisture levels below 1 ppm.
- Outcome: Researchers can safely handle these materials, leading to more reliable and powerful batteries.
2. Pharmaceutical Compounding
In the pharmaceutical world, safety is key. Many active pharmaceutical ingredients (APIs) are potent powders that are hazardous if inhaled. You need a setup that protects the operator without contaminating the product. A key part of this is understanding chemical exposure.
- Challenge: Contain hazardous powders during handling and weighing.
- Solution: A containment glove box (isolator) running under negative pressure.
- Outcome: The negative pressure design contains any dangerous powders. This protects both the lab and the technician.
3. Semiconductor Manufacturing
The tiny components inside semiconductors are very fragile. A single speck of dust can destroy a microchip. Exposure to oxygen can ruin sensitive materials.
- Challenge: Create a particle-free and oxygen-free workspace for handling wafers.
- Solution: A positive pressure inert gas glove box with HEPA or ULPA filters.
- Outcome: Positive pressure creates a barrier against airborne particles. The inert gas stops oxidation, ensuring high product yields.
4. Organometallic Chemistry Synthesis
Organometallic compounds are useful in many chemical reactions. However, they often react strongly with oxygen and moisture. Exposing them to open air can destroy them instantly.
- Challenge: Handle and store air-sensitive compounds without degradation.
- Solution: An inert atmosphere glove box filled with nitrogen or argon.
- Outcome: The box provides a non-reactive environment. Chemists can synthesize and handle these sensitive compounds without risk.
5. Welding Reactive Metals
Metals like titanium are prized for their strength. The problem is that when heated for welding, they react with oxygen and nitrogen in the air. This reaction creates weak welds.
- Challenge: Weld reactive metals without atmospheric contamination.
- Solution: A glove box providing a controlled, inert atmosphere.
- Outcome: Welders can join these metals without contamination. The result is a pure, strong weld that preserves the metal’s properties.
Installation and Maintenance Best Practices
Setting up your lab glove box correctly and keeping it in good condition are essential. A careful approach to installation and regular maintenance protects your investment, ensures accurate results, and keeps everyone safe.
Before the unit arrives, check your lab space. Do you have enough room? Are utilities like electrical outlets and gas hookups nearby? A quick check now can save you from delays later.
Key Safety Procedures
Following strict safety protocols is critical. These steps are the foundation for a controlled, safe workspace.
- System Purging: Before use, you must purge the main chamber and antechamber to remove all air. This involves cycling between pulling a vacuum and backfilling with inert gas. You repeat this until oxygen and moisture levels are low enough for your work.
- Leak Testing: Leaks are a major problem for a controlled atmosphere. You must perform a leak test after installation and then regularly. You can do this by pressurizing the box and using a handheld leak detector or by tracking the pressure over time.
- Managing Breaches: Have a clear plan for a torn glove. In a negative pressure system, a breach safely pulls air in. For an inert system, contaminants rush in. Either way, stop all work immediately and follow your lab’s safety protocols.
A Simple Maintenance Checklist
Regular maintenance prevents downtime and costly repairs. A simple checklist helps you stay organized. Always refer to the manufacturer’s recommendations and your facility’s EHS guidelines.
Daily Tasks
- Inspect Gloves: Check gloves for wear, discoloration, or small holes.
- Check Pressure: Ensure the internal pressure is at the correct setpoint.
- Review Sensor Readings: Check that oxygen and moisture levels are within your required range.
Weekly Tasks
- Inspect Seals: Look at the main window and antechamber door seals for cracks.
- Clean Surfaces: Wipe down interior and exterior surfaces with an approved cleaner.
Monthly or Quarterly Tasks
- Perform a Leak Test: Do a formal pressure hold test to confirm the system is airtight.
- Calibrate Sensors: Follow the manufacturer’s guide to calibrate oxygen and moisture sensors.
- Check Vacuum Pump Oil: If your system has a vacuum pump, check the oil level and clarity.
Frequently Asked Questions About Lab Glove Boxes
Finalizing the details for a lab glove box purchase can bring up many questions. This section answers the most common questions from lab managers and researchers.
1. How do I choose the right inert gas?
The two main choices are nitrogen and argon. For most uses, nitrogen is the best option. It is less expensive and widely available. This makes it a practical choice for applications like battery research.
Sometimes, argon is necessary. It is denser than air, which helps keep fine powders from flying around. It is also required for specific tasks, like welding reactive metals such as titanium. Your choice should depend on the specific chemistry you are doing.
2. What is the difference between positive and negative pressure?
The pressure inside your glove box is a key safety control. The choice depends on what you are trying to protect.
- Positive Pressure: The pressure inside the box is higher than the room’s pressure. This protects what is inside the glove box. If a leak occurs, clean gas flows out, pushing away contaminants.
- Negative Pressure: The pressure inside is lower than the outside lab. This protects the user from anything hazardous inside the box. If there is a breach, room air flows in, containing the hazard.
3. How often should I replace the gloves?
There is no single answer. The lifespan of your gloves depends on use and chemical exposure. The most important habit is to inspect the gloves for wear before every use. As a general rule, replace them every six to twelve months, even if they look fine. Always follow your facility’s safety protocols.
4. How do I perform a basic leak test?
Checking for leaks regularly is the best way to maintain a pure atmosphere. A simple pressure hold test is effective.
- Seal every port on the glove box.
- Gently pressurize the main chamber with inert gas.
- Turn off the gas supply and record the initial pressure.
- Wait an hour or two, then record the pressure again.
- A significant drop in pressure means you have a leak that needs to be fixed.
5. Can I use my own equipment inside a glove box?
Yes, you can use your own equipment inside. Most glove boxes have feedthroughs for cables and gas lines. You can also add internal power outlets. Just make sure the equipment can tolerate the inert atmosphere or vacuum conditions. Also, check that it will physically fit through the antechamber.
6. What purity level do I need for my application?
The required purity level depends on your work. For applications like lithium-ion battery research, you need very low levels of oxygen and moisture, often less than 1 part per million (ppm). For less sensitive tasks, like weighing powders, a simple dust-free environment might be enough. Define your needs clearly before choosing a system.
7. What is the difference between an inert glove box and a fume hood?
While both provide protection, they do different jobs. An inert lab glove box creates a sealed, controlled atmosphere to protect a product from air. A laboratory fume hood is an open-fronted ventilated cabinet. It pulls air away from the user to protect them from hazardous fumes.
Conclusion
Choosing the right lab glove box is a critical decision for any facility. By carefully considering your application, materials, and safety needs, you can select a system that provides reliable performance for years to come. A well-chosen glove box not only protects your work but also ensures the safety of your team.
Ready to find the perfect fit for your laboratory?
- Compare Glove Box Options
- Request a Quote or Plan Your Lab Layout
Related Resources
Explore more solutions and guides that complement this topic:
Ready to Get Started?
Labs USA offers free design services, fast delivery, and expert installation on all lab furniture and equipment.

 biological safety cabinet.” />