A Practical Guide to Pharmaceutical Lab Casework - pharmaceutical lab casework

A Practical Guide to Pharmaceutical Lab Casework

When you walk into a pharmaceutical lab, you see more than beakers and instruments. You see a system built for precision. The cabinets, benches, and storage units are called pharmaceutical lab casework. They are much more than just furniture. They are the backbone of your research environment.

Think of casework as the skeleton of your lab. It supports every process, from drug discovery to quality control. In a field with strict rules, good casework is a must. It helps control contamination, resist harsh chemicals, and safely hold heavy equipment.

TL;DR: Key Takeaways

  • Function Over Form: Pharmaceutical lab casework is engineered for safety, chemical resistance, and cleanability, unlike standard office furniture.
  • Material Matters: Choose materials like stainless steel, phenolic resin, or painted steel based on the specific needs of each lab area. Stainless steel is best for sterile zones, while painted steel works for dry storage.
  • Compliance is Crucial: All casework must meet SEFA 8 standards for durability and support cGMP for cleanliness and contamination control.
  • Plan for Workflow: Design your lab layout around how your team works. Good ergonomics and smart placement of casework improve efficiency and safety.
  • Plan Ahead to Avoid Delays: Casework has long lead times. Planning early helps you secure materials and installation schedules, preventing costly project delays.

Understanding the Foundation of Modern Pharmaceutical Labs

Choosing the right casework is a critical investment. It affects your lab's success and scientific integrity. This is not just about storage. The right system shapes your lab's workflow, improves safety, and helps meet tough regulatory standards. It creates an environment where science can move forward efficiently.

The demand for high-quality lab infrastructure is growing. The global pharmaceutical lab equipment market trends show significant growth. This is due to more R&D in biopharmaceuticals and personalized medicine. These fields require robust, clean environments.

Why Standard Furniture Just Won't Cut It

You cannot use an office desk in a lab. Lab casework is built to handle the unique demands of a scientific setting. The key differences are clear.

  • Chemical Resistance: Surfaces are made to resist spills from acids, solvents, and strong cleaning agents.
  • Load-Bearing Capacity: It is built to safely support heavy and expensive equipment without bending over time.
  • Cleanability: Materials must be non-porous and seamless. Any crack is a place for microbes to grow, so sterility is a key design feature.
  • Durability: This furniture is not replaced every few years. Lab casework is built for decades of demanding use.

Planning for Success and Avoiding Delays

This guide covers everything important. We will discuss selecting materials, understanding compliance standards, and designing effective layouts. Making these choices early is key to building a lab that meets today's needs and is ready for tomorrow.

Good planning also helps you avoid costly project delays from supply chain issues. By taking a strategic approach from the start, you ensure your facility opens on time. It also helps it operate at peak efficiency for years.

Meeting the Core Requirements for Pharma Labs

Pharmaceutical labs are different. They operate under strict regulations. The casework you choose must meet specific standards for safety and durability. It is not about looks. It is about furniture engineered for performance.

The demand for high-performance lab infrastructure is growing. This is driven by the fast pace of R&D in biotech and pharma.

SEFA Standards: The Benchmark for Quality

When you look for lab furniture, you will see the name SEFA. This stands for the Scientific Equipment and Furniture Association. Their standards are the benchmark for quality. For fixed casework, SEFA 8 is the most important one. It is like a tough test for lab furniture.

Compliance means the casework has passed many tests.

  • Load Capacity: Tests ensure cabinets and shelves can hold heavy equipment without failing.
  • Finish Durability: The finish is tested with 49 different chemicals to prove it can resist acids and solvents.
  • Construction Integrity: Doors, drawers, and hinges are opened and closed thousands of times to simulate years of use.

Insisting on SEFA 8-compliant casework is your baseline for quality. It is a must-have for any serious lab.

Chemical Resistance and Cleanability

Beyond toughness, the surface is very important. In a pharma lab, you need non-porous, seamless surfaces. This leaves no place for germs to hide. A chemical spill should not damage the finish. Any damage can create tiny cracks where microbes can grow.

Pharmaceutical labs use many substances. This makes a thorough chemical risk assessment a priority. The results of this assessment help in selecting the right lab casework.

Current Good Manufacturing Practices (cGMP) are also important here. Your casework must be easy to clean and sanitize without breaking down. Materials like stainless steel and phenolic resin are great for this. They offer smooth, strong surfaces built for sterile work. Our guide on how to handle hazardous drugs in laboratories covers these principles in more detail.

Meeting cGMP and Regulatory Expectations

When regulators from agencies like the FDA visit, they look for a controlled, clean environment. Your casework is a big part of this. Furniture that is chipped or hard to clean is a red flag. It can be a source of contamination.

Small details matter. Seamless construction and coved corners make cleaning more effective. By choosing casework designed for sterile environments, you build compliance into your lab from the start. Planning this upfront saves you from expensive changes later. It also ensures you are ready for inspection.

Comparing The Best Materials For Lab Casework

Various material samples, including wood grains and a green finish, displayed on a blue surface for comparison.

Choosing the right material for your casework is a critical decision. This choice affects contamination control, chemical resistance, durability, and your budget.

Your main options are painted steel, stainless steel, wood, and phenolic resin. Each offers a different mix of performance and cost. Understanding them helps you match the casework to your lab's needs. What works for a dry storage area will not work in a sterile room.

Let's look at these materials to see their strengths and weaknesses. This will help you make a smart investment.

Painted Steel Casework

Painted steel is a reliable choice for labs. It is made from heavy-gauge steel with a chemical-resistant, powder-coat paint finish. The result is a tough, non-porous surface.

This material is strong and good for general lab use. It is a budget-friendly option for areas without harsh chemicals, like write-up stations.

  • Pros: High durability, great load-bearing capacity, and a lower initial cost.
  • Cons: The paint can chip or scratch. If this happens, the steel underneath can rust. It is not the best for areas with frequent sterilization.

Stainless Steel Casework

When sterility and cleanability are top priorities, stainless steel is the best choice. Its non-porous surface resists microbial growth. It can handle harsh cleaning without damage. This makes it ideal for cleanrooms and sterile pharmacies.

When you look at options, the durability of stainless steel stands out. A good guide can help you find the right stainless steel lab table for your needs.

  • Pros: Top-tier chemical and corrosion resistance, very easy to clean, and a long lifespan.
  • Cons: It is the most expensive material. The surface can also show smudges and scratches more easily.

Wood Casework

Wood casework has a classic look. It can be a good choice for the right setting, like educational labs or dry areas.

Wood can be treated with a chemical-resistant finish. However, it is naturally porous. If the finish gets damaged, wood can absorb moisture and become contaminated. For this reason, it is not recommended for wet labs or sterile areas.

  • Pros: It looks good and is usually cheaper than stainless steel.
  • Cons: It is vulnerable to moisture, chemicals, and scratches. It does not meet the strict cleanability standards for most pharma labs.

Phenolic Resin Casework

Phenolic resin is a modern material. It is made by layering special papers with resin and fusing them with heat and pressure. The result is a solid, durable panel that resists chemicals, moisture, and bacteria.

This material is a strong alternative to stainless steel. It offers high performance at a lower price. You can explore different laboratory work surfaces to see how phenolic resin compares.

  • Pros: Excellent resistance to chemicals and moisture, highly durable, and easy to clean.
  • Cons: It can be more expensive than painted steel or wood. It is also heavy and needs sturdy installation.

To help you decide, here is a table comparing these four materials.

Comparison Of Pharmaceutical Lab Casework Materials

Material Chemical Resistance Cleanability and Sterility Durability Cost Index
Painted Steel Good Good Excellent $$
Stainless Steel Excellent Excellent Excellent $$$$
Wood Fair Poor Good $$
Phenolic Resin Excellent Very Good Excellent $$$

This comparison helps you see which material fits your lab's work and budget. Choosing correctly means your casework will be a reliable part of your work for years.

How to Choose the Right Casework for Your Lab

Picking casework for a pharmaceutical lab can seem like a big job. Breaking it down into steps makes it easier. This five-step checklist will guide you through the process. Following these steps helps you get a system that works for your team and meets all standards.

Locking in these decisions early is smart. Planning ahead helps you get ahead of supply chain pressures. This can secure better delivery times and avoid delays for your project.

1. Start With Your Workflow, Not the Catalog

Before you look at materials, study your daily operations. Map out exactly what happens in each area.

Ask your team these questions.

  • Where do we handle wet processes with corrosive chemicals?
  • Where will the heavy equipment be placed?
  • What is the path from sample prep to analysis to cleanup?

Answering these questions first shows where you need high-performance materials. It is the best way to avoid overspending.

2. Line Up Your Regulatory and Cleanliness Needs

In a pharma lab, casework is part of your compliance plan. Sterile areas need non-porous materials that are easy to sanitize.

Think about the sterility level each area needs.

  • Sterile Compounding Areas: These almost always need seamless stainless steel to meet strict cGMP standards.
  • Quality Control Labs: These need durable, cleanable surfaces. Phenolic resin or high-quality painted steel often work well here.

Make sure any casework you consider meets SEFA 8 standards for durability. This is your baseline for quality.

3. Pick Materials and Finishes That Match the Job

Now you know your workflow and compliance needs. You can start looking at materials. Each has a different balance of performance, lifespan, and cost.

Here is a quick summary.

  • Stainless Steel: The best choice for sterile areas and places with harsh chemicals.
  • Phenolic Resin: A great option with excellent chemical resistance at a moderate price.
  • Painted Steel: A durable and budget-friendly choice for general-purpose labs and dry areas.
  • Wood: Best for administrative spots, away from spills.

Matching the material to the job is the best way to manage your budget without sacrificing safety.

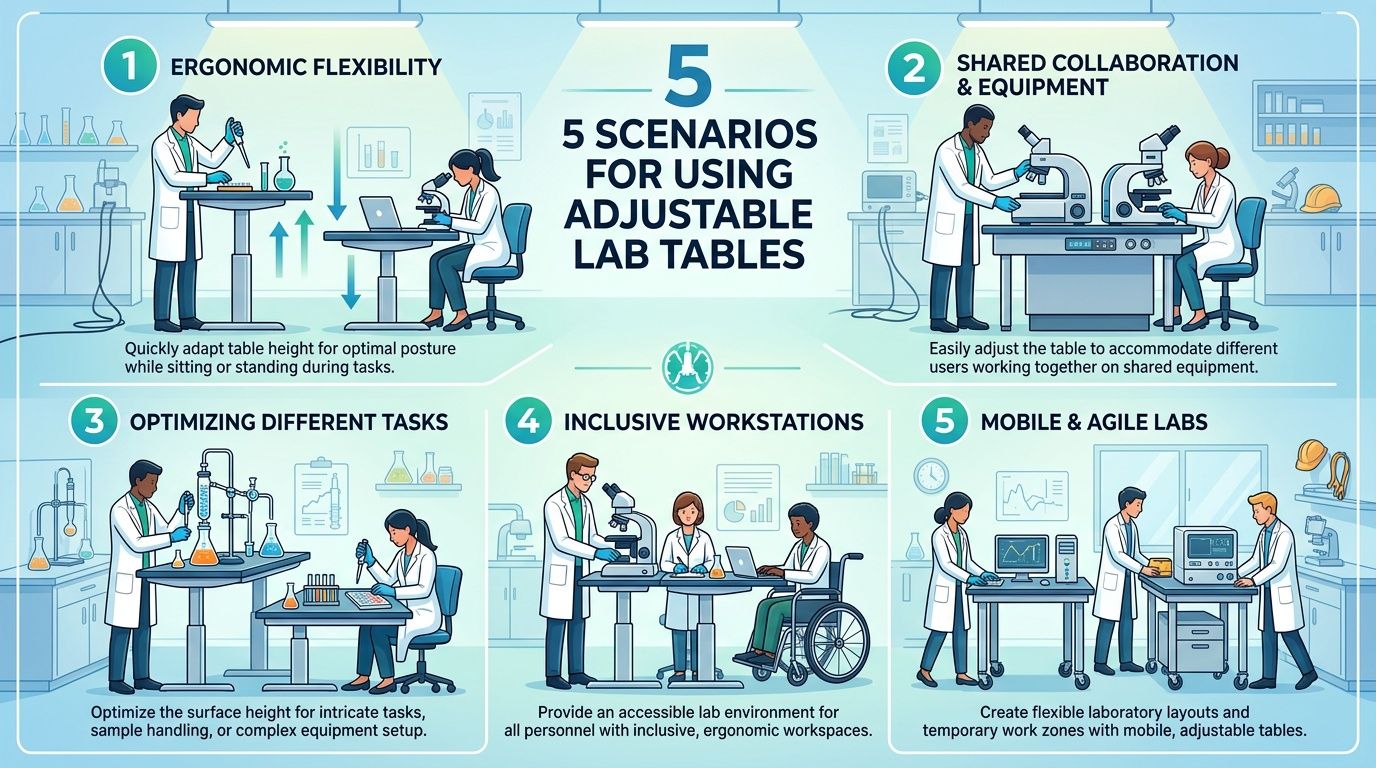
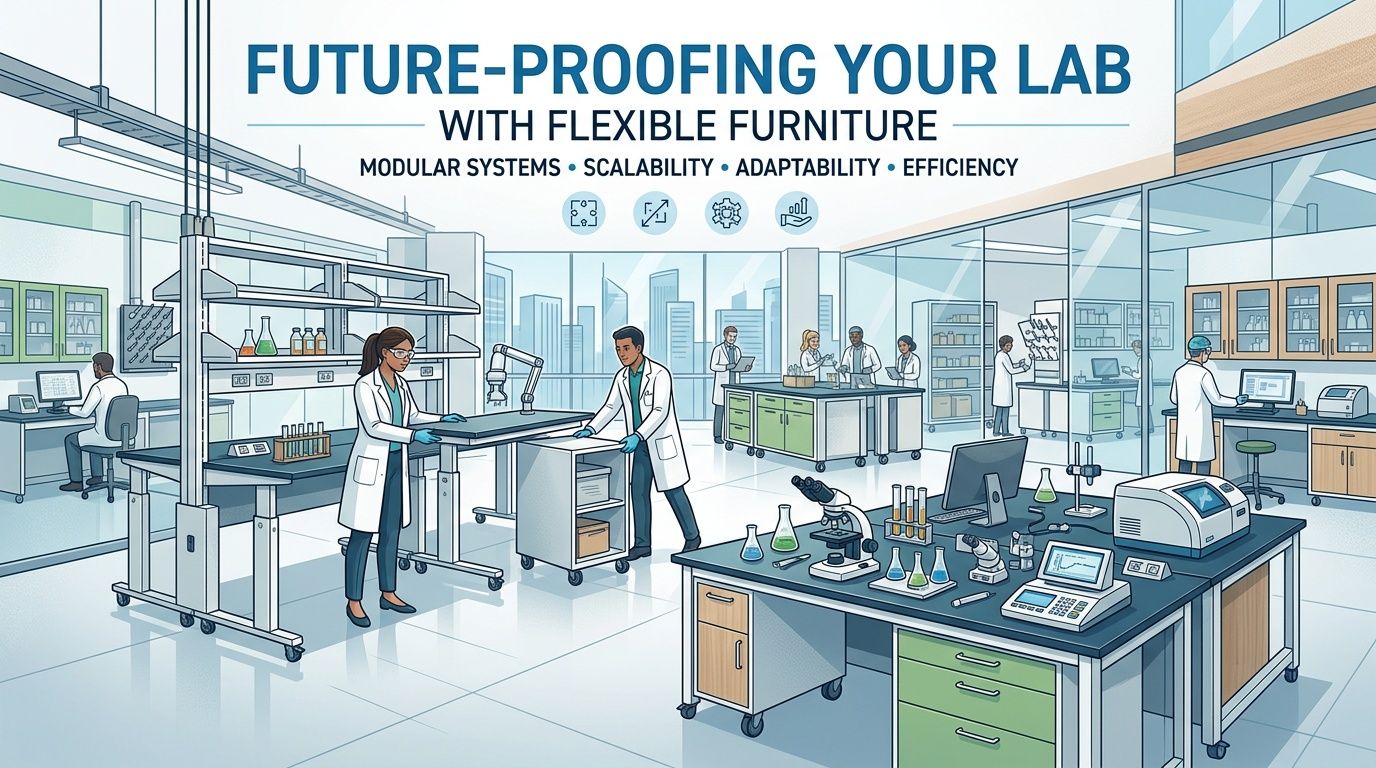
4. Design for People and for the Future

A well-designed lab is an efficient lab. Think about the people who work in it. Adjustable-height workbenches can reduce physical strain.

Also, think about the future. Research goals change, and new equipment arrives. Modular casework and mobile benches let you reconfigure your space later. This flexibility is a huge advantage. Our guide to laboratory casework specifications offers more on these options.

5. Nail Down the Budget and Timeline

Finally, bring everything together with your budget and schedule. Get detailed quotes that cover the cabinets, shipping, and installation.

Talk to your supplier about lead times. Knowing when materials will arrive helps keep your project on track. A clear financial and logistical plan from the start ensures a smooth installation.

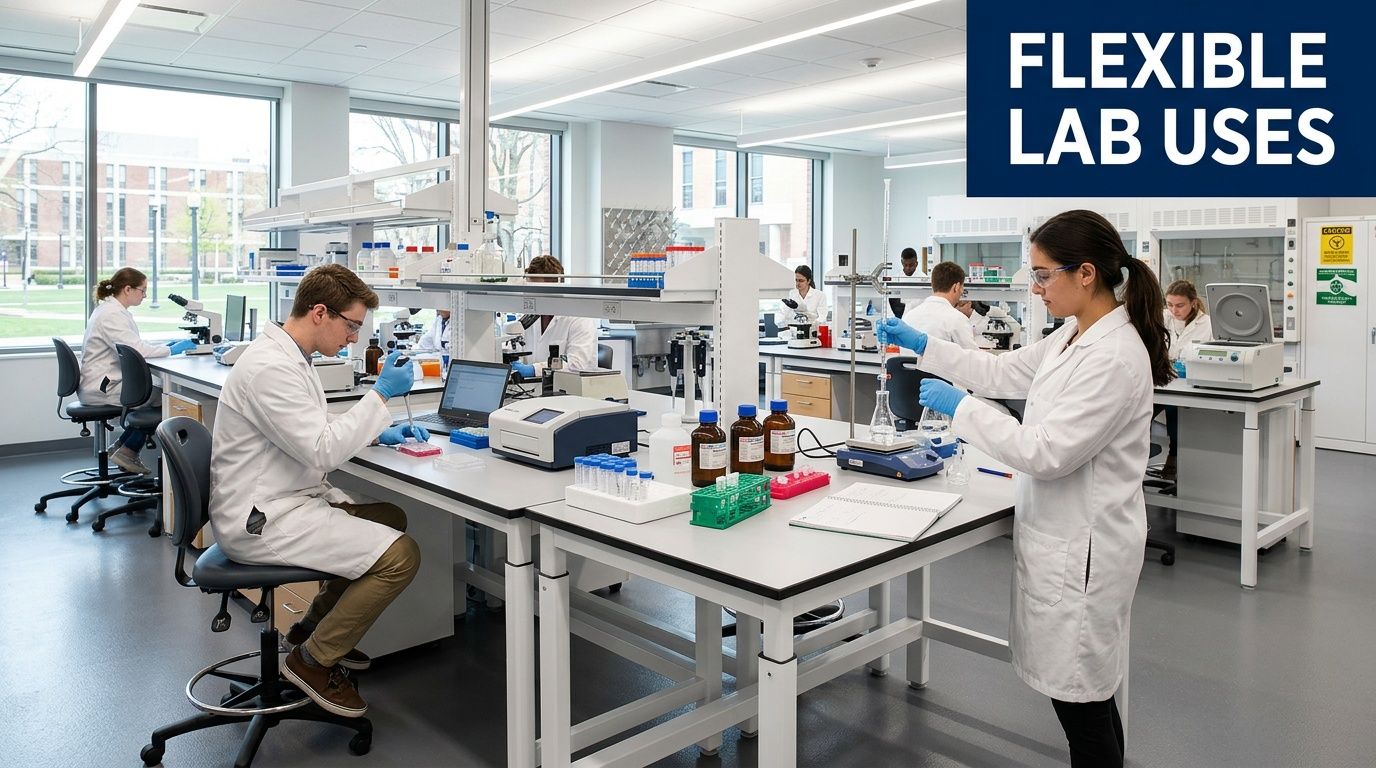
Optimizing Lab Layout and Workflow Efficiency

Overhead view of a modern pharmaceutical lab showcasing efficient workflow with various casework.

A great lab is more than its equipment. It is a space where science can happen smoothly and safely. How you place your pharmaceutical lab casework is the foundation of this process. A good layout can boost productivity, improve safety, and encourage collaboration.

This is about more than arranging furniture. It is about how your team moves and works. When the layout follows the natural path of your processes, the lab runs better. You reduce wasted steps and the risk of errors.

Ergonomics: The Foundation of Productivity

Your technicians spend long hours on their feet. Poorly designed workspaces lead to physical strain and lower efficiency. Good ergonomics is an investment in your team's well-being and work quality.

Here is what matters for ergonomics.

  • Work Surface Height: Adjustable-height benches let technicians set their workspace to a comfortable level.
  • Clearance and Spacing: Enough room between benches allows people to move safely. This prevents accidental spills.
  • Accessibility: Keep frequently used supplies within easy reach. This saves time and prevents injuries.

When you get these things right, you build a safer and more productive lab. You can explore different lab workstations and tables to see what fits your team.

Smart Layouts for Modern Pharma Workflows

Every lab is different, so there is no single "best" layout. The design should match the work being done in each area.

Open-Plan Layouts
Removing walls helps people collaborate. An open plan is great for R&D labs where scientists share ideas and equipment. This setup is also flexible for future changes.

Process-Specific Suites
For work that needs sterile conditions, dedicated suites are necessary. These are enclosed areas, often with stainless steel casework, that give you full control. They are vital for tasks like aseptic compounding, where preventing contamination is key.

A well-designed layout creates a high-performing research environment. It directly affects how smoothly operations run and how easily your team can adapt.

Integrating Casework with Lab Infrastructure

Your casework must work with your lab's infrastructure. This includes fume hoods, sinks, and utilities like gas, water, and power.

Fume Hood Placement
Fume hoods should be away from doorways and high-traffic areas. Drafts can disrupt airflow and reduce safety. Smart casework arrangement around fume hoods ensures technicians have workspace without compromising safety.

Utility Access
Plan for utilities from the start. Casework should allow for easy connections without creating trip hazards. Benches with built-in service channels keep utilities organized and safe.

Thinking about layout and infrastructure early saves you from expensive changes later. It helps your lab get running on schedule. Specialized installation crews are in high demand, and last-minute planning can lead to major delays.

Use Cases: Casework for Common Pharma Lab Scenarios

A stainless steel mobile workstation with shelves, drawers, and storage, used in a lab setting.

Theory is helpful, but real-world examples make things clearer. Let's look at a few common situations in a pharmaceutical setting. Each has unique challenges that need a specific pharmaceutical lab casework solution.

These examples show the connection between materials, design, and daily lab needs.

1. Sterile Compounding Pharmacy

The Challenge: This environment follows strict USP <797> and cGMP standards. Every surface must be non-porous, seamless, and able to withstand constant, harsh cleaning.

The Solution: The only real answer here is stainless steel casework. Its non-porous surface gives microbes no place to hide. It stands up to the strongest cleaning agents without damage. Seamless construction eliminates tiny gaps that trap germs, ensuring safety and compliance.

2. High-Throughput Screening Lab

The Challenge: This is a fast-paced workflow with robotic automation and many different chemicals. You need strong chemical resistance and the flexibility to change the layout as technology evolves.

The Solution: A mix of phenolic resin countertops on mobile steel casework works well. Phenolic resin resists a wide range of chemicals. Mobile benches let you move equipment and adapt the workflow easily, keeping your lab efficient.

3. Quality Control Lab

The Challenge: QC labs are workhorses. They need durable workstations for routine testing that can support heavy instruments. They also need plenty of storage to keep samples and paperwork organized.

The Solution: For this type of work, painted steel casework is a great, budget-friendly choice. It can support heavy equipment like HPLCs. Integrated cabinets and drawers keep the workspace tidy. Topped with epoxy or phenolic resin surfaces, it offers the durability needed for daily QC work.

4. R&D Chemistry Lab

The Challenge: R&D involves working with a wide variety of harsh solvents, acids, and reagents. The casework must offer extreme chemical resistance and be integrated with safety equipment.

The Solution: A hybrid approach is best. Use phenolic resin or epoxy resin for surfaces near wet chemistry areas. This provides maximum chemical defense. Build this on top of painted steel casework for strong support and storage. This setup requires smart integration with safety equipment, a topic covered in our guide on fume hoods for pharmaceutical labs.

5. University Research Lab

The Challenge: University labs often have tight budgets. They must serve many different students and research projects. Flexibility is the most important factor.

The Solution: Modular and mobile casework is the perfect fit. This includes adjustable-height benches, tables on wheels, and cabinets that can be reconfigured. This approach allows the lab to adapt to new projects without costly renovations.

Answering Your Questions About Pharmaceutical Casework

When outfitting a pharmaceutical lab, the details matter. We get many questions from lab managers and facility planners. Here are some of the most common ones, with clear answers.

1. What is the difference between SEFA 8 and SEFA 10 standards?

This is a common question. SEFA 8 is for durability. It is a performance standard for fixed, permanent casework. It tests structural integrity, finish durability, and chemical resistance. SEFA 10 is for flexibility. It is a practice for adaptable, modular casework systems. For most permanent pharma lab installations, SEFA 8 compliance is the standard to look for.

2. How does casework support cGMP compliance?

Good casework actively supports your Current Good Manufacturing Practices (cGMP). It helps with contamination control by design. To follow cGMP, your casework must be non-porous, smooth, and seamless. Materials like stainless steel and phenolic resin are ideal. The casework must also resist harsh cleaning chemicals without degrading.

3. Can I mix different casework materials in one lab?

Yes, and it is a smart strategy. This zonal approach helps you optimize both performance and budget. For example, use high-performance stainless steel in sterile areas. In dry areas like write-up stations, use more budget-friendly painted steel casework. This hybrid model means you invest in premium materials only where you need them.

4. What are typical lead times for casework?

Lead times vary based on customization and market demand. It is important to build this into your project timeline. As a general guide, custom casework can take 12 to 16 weeks or more. Many suppliers offer in-stock programs for standard items. These can often ship in just a few weeks. Planning your needs in advance is the best way to avoid delays.

5. How important is modular casework for a pharma lab?

It is becoming more and more important. Modern pharmaceutical research is always changing. Your lab space needs to adapt. Modular and mobile furniture gives you the flexibility to reconfigure layouts for new equipment or workflows. This future-proofs your investment.

6. What are the hidden costs of a casework installation?

The price of the cabinets is just the start. Other costs can affect your budget. Always account for shipping and freight, site preparation, and professional installation. Utility hookups for sinks and power are also often billed separately. Ask for a detailed quote that spells out everything that is included.

7. Why should I plan my casework purchase early?

Planning casework needs well in advance is the best way to avoid project delays. High demand for specialized materials and trained installation crews can create bottlenecks. Engaging with your supplier early helps you secure a spot on the schedule. This ensures your project stays on track and you get the lab operational sooner.

8. Is financing available for lab casework?

Yes, many suppliers offer financing options to help manage the significant investment in laboratory furniture. These options can make it easier to acquire high-quality casework without a large upfront capital expense. It is always a good idea to ask about payment plans or leasing programs when you request a quote.

Let's Build Your Lab

Choosing the right pharmaceutical lab casework is a major decision. It impacts your lab's efficiency, safety, and compliance for years to come. With careful planning, you can create a workspace that supports your team and helps you achieve your research goals.

Our team is here to help you navigate the options and design a solution that fits your specific needs and budget. By planning ahead, you can avoid common delays and get your facility running on schedule.

Ready to get started?

  • Compare Casework Options
  • Request a Quote or Plan Your Layout

Need Help Designing Your Lab?

Our laboratory design specialists provide free consultations, 3D lab layouts, and competitive pricing.

Request a Free Consultation → | Call (801) 855-8560

Frequently Asked Questions

How do I choose the right pharmaceutical lab casework?

Choosing the right pharmaceutical lab casework depends on your application, space, and budget. Labs USA provides free expert consultations. Call (801) 855-8560 or request a quote.

What is the lead time for pharmaceutical lab casework?

Lead times vary by product. Many items ship quickly; custom orders take 4-8 weeks. Call (801) 855-8560 for availability.

Do you offer installation?

Yes. Labs USA provides professional installation across the United States with factory-trained installers.

Can I get a custom configuration?

Absolutely. Our design team provides free layouts, specs, and competitive pricing tailored to your needs.

Who This Is For

Our pharmaceutical lab casework solutions are ideal for:

  • Laboratory directors
  • Facility architects
  • University science departments
  • Pharma/biotech companies
  • Hospital labs
  • Government research facilities

Ready to Get Started?

Labs USA offers free design services, fast delivery, and expert installation on all lab furniture and equipment.

Request a Free Quote Call (801) 899-0881

How to Select a Laboratory Furniture Supplier - laboratory furniture supplier

How to Select a Laboratory Furniture Supplier

Meta title: How to Select a Laboratory Furniture Supplier for Long-Term Lab Success

Meta description: Learn how to choose a laboratory furniture supplier with a practical guide to specs, RFPs, timelines, compliance, cost planning, and installation support.

A lot of lab projects start the same way. The budget gets approved, the renovation date gets set, and then someone realizes the furniture decision affects almost everything else.

If you're the facility manager, lab planner, or project lead holding that decision, you're not just buying cabinets and benches. You're setting the pace for construction, utility rough-ins, inspections, move-in, and daily workflow after the lab opens.

That pressure is real. The good news is that a structured process makes the choice much easier.

Quick summary

  • Start with function: Map workflow, equipment, chemicals, storage, and future change.
  • Screen suppliers by risk: Check compliance, materials, installation support, and schedule reliability.
  • Use a written RFP: Clear specifications reduce change orders and quote confusion.
  • Look past unit price: Installation disruption, maintenance, replacement, and rework often matter more.
  • Protect the timeline: In-stock availability can help keep builds and renovations moving.

Your Guide to Procuring Laboratory Furniture

A new lab manager usually asks the wrong first question. They ask, "Which supplier has the best price?"

The better first question is, "Which laboratory furniture supplier can help this project stay safe, on schedule, and useful for the next several years?"

That shift matters because furniture choices lock in layout, utility access, storage method, bench height, chemical resistance, and service access. If those decisions are rushed, the project pays for it later through change orders, workarounds, and user complaints.

The market itself shows why this choice deserves attention. The global laboratory furniture market is projected to grow from USD 1.14 billion in 2024 to USD 2.13 billion by 2034, and North America holds a 23.9% market share, with the U.S. dominating the region due to expanding R&D and strict standards, according to Fact.MR's laboratory furniture market analysis.

More suppliers and more demand don't always make procurement easier. They often make comparison harder.

Practical rule: If two quotes look similar on paper, the real difference is often in what happens after the PO is issued. Shop drawings, substitutions, installation sequencing, punch list response, and parts support decide whether the project runs smoothly.

For first-time buyers, the safest path is to treat furniture procurement like a lab systems project, not a simple commodity purchase. The strongest outcomes usually come from teams that define requirements clearly, compare suppliers with a scorecard, and test every promise against the actual project schedule.

Key Takeaways for Selecting a Supplier

Good procurement is less about finding a perfect catalog and more about reducing avoidable risk.

A capable laboratory furniture supplier needs to do more than quote products. They should fit the furniture to your workflow, match materials to your environment, support compliance review, and coordinate with the build schedule.

Keep these points in front of you during the process:

  • Define the lab before reviewing suppliers: Workflow, equipment loads, sink locations, power drops, and chemical exposure should be decided early.
  • Evaluate the supplier, not just the furniture: A strong product line doesn't help if drawings are slow, substitutions are vague, or installation support is weak.
  • Ask for proof of testing and specifications: Compliance language should be specific, not generic.
  • Treat schedule claims carefully: Delivery promises matter most when they align with available inventory and install sequencing.
  • Build your own value model: The industry still lacks clear, shared cost frameworks for comparing long-term ownership across supplier models.

A simple way to think about the process is this:

  1. Define what the lab must do.
  2. Match materials and configurations to that work.
  3. Compare suppliers using the same written criteria.
  4. Run a disciplined RFP and review process.
  5. Choose the option with the lowest total project risk, not just the lowest line-item price.

Defining Your Laboratory's Functional Requirements

The best supplier selection starts before you contact any supplier.

If your internal team hasn't agreed on how the lab will function, every quote you receive will be based on assumptions. That's when layout revisions multiply and budgets drift.

Start with workflow and adjacencies

Map the daily path of people, samples, equipment, and waste. You don't need fancy software for the first pass. A marked-up floor plan and a few operator interviews can surface most of the important issues.

Look for practical friction points:

  • Entry and staging: Where do samples, supplies, and clean items first land?
  • Process flow: Where does work pause because users must cross traffic paths?
  • Shared equipment: Which instruments create crowding or queueing at benches?
  • Support zones: Where do washing, temporary storage, and documentation happen?

If analysts need to move hot items, wet items, or sensitive samples across the room to finish a task, the furniture plan probably needs work.

Labs run better when the bench layout supports the task order people already follow. Forced detours create both delay and error.

Match materials to use conditions

Furniture that works in a teaching lab may not hold up in a pharmaceutical, biotech, food, or industrial testing space. The same is true for work surfaces.

Start with these questions:

  • What chemicals touch the surface directly?
  • Will the lab handle moisture, frequent washdown, or humidity swings?
  • Do benches support heavy instruments?
  • Will staff disinfect the surfaces often?
  • Does the room need mobile, modular, or fixed furniture?

Industry demand has moved toward ergonomic design, sustainability, and modular setups, with North America showing steady demand for advanced and ergonomic laboratory furniture, according to Market Research Future's laboratory furniture market report.

That trend shows up in real projects. Teams want benches that reduce strain, storage that fits actual tools, and layouts that can change without a full renovation.

For task-specific planning, it's useful to review examples of lab workstations and tables and compare how fixed benches, adjustable-height stations, and instrument tables affect movement and reach.

Plan for change, not just opening day

Most labs evolve faster than their original furniture package.

A new instrument arrives. A room shifts from chemistry to microbiology support. A bench once used for prep becomes a documentation station. If the furniture plan can't absorb those changes, users start solving the problem with carts, adapters, and off-plan storage.

Use this five-step checklist before requesting quotes:

  1. List core processes by room and by bench.
  2. Identify hazards tied to chemicals, heat, moisture, and cleaning.
  3. Document equipment dimensions, utility needs, and service clearances.
  4. Note user needs such as seated work, standing work, and accessibility.
  5. Flag future changes you expect within the next planning cycle.

That short exercise often reveals whether you need modular casework, mobile tables, heavier-duty frames, or simpler in-stock components.

Core Criteria for Evaluating a Laboratory Furniture Supplier

When requirements are clear, supplier differences become easier to see.

Some suppliers are strong at custom design but slow in execution. Others are fast on standard items but weak on coordination. A few can support the full chain from specification to install. Your job is to find the fit that matches the project, not the brochure.

A scientist in a laboratory reviewing technical quality standards data on a tablet device.

Check compliance and build quality first

If the furniture package fails on durability, no discount makes up for it.

One of the clearest technical checkpoints is SEFA 8 compliance for casework durability. That standard includes 10,000 open and close cycles on doors and drawers, plus load testing that requires casework to support 500 lbs/ft, according to the SEFA-related tender specification document. The same source notes common failures in non-compliant furniture, including humidity-related warping and weakness from inadequate steel gauges.

That matters because many procurement issues show up only after move-in:

  • Doors sag after repeated use
  • Drawers rack under loaded storage
  • Cabinet bases shift on uneven floors
  • Surface materials swell or distort in wet rooms

Ask suppliers for actual specification sheets, not just broad marketing statements.

Review:

  • Casework construction: steel, wood, stainless, or phenolic
  • Gauge or structural details: where applicable
  • Finish system: especially in corrosive or wet conditions
  • Hardware quality: hinges, slides, pulls, and leveling details
  • Testing documentation: for durability and load performance

A detailed reference point for this review is laboratory casework specifications, which helps buyers compare construction features in a more disciplined way.

Compare casework materials by use, not by habit

Some teams default to whatever they used in the last building. That's usually a mistake. Material choice should reflect what the room actually does.

Material Chemical Resistance Durability Cost Best For
Steel Good when properly finished High Moderate General labs, heavy-use areas, long service life
Stainless steel Strong for many wet and clean applications High Higher Clean environments, washdown areas, healthcare support
Wood Varies by finish and exposure Moderate Moderate Dry labs, academic spaces, lighter-duty use
Phenolic Strong for many chemical applications High Moderate to higher Chemical labs, wet zones, corrosive work areas

The table isn't a shortcut. It's a prompt for better questions.

For example, wood casework may suit a low-moisture academic room, while metal or phenolic often makes more sense where humidity, cleaning, or chemical contact are part of normal use.

Evaluate schedule reliability and inventory reality

At this stage, many projects face difficulties.

A supplier may promise quick delivery, but if the quote depends on components that aren't stocked or aren't coordinated, that schedule can fall apart once approvals begin. The risk increases when casework, fixtures, ventilation, and service fittings must land in sequence.

Here's the practical trade-off:

  • Custom-heavy packages can fit exact needs better, but they often require more review time and tighter coordination.
  • In-stock modular systems can simplify procurement and support tighter construction windows, but they may offer less design variation.

One option in this category is Labs USA, which supplies in-stock laboratory furniture and related lab systems with design and installation support. That kind of model can be useful when the schedule is tight and standardized components fit the room program.

Buyer note: Ask every supplier which items are stocked, which are built to order, and which depend on third-party coordination. Put that answer in writing before award.

Look at project support, not just products

Furniture procurement touches several people at once. Facilities, EHS, users, architects, and contractors all have a stake in the result.

A supplier that can only sell product but can't support shop drawings, layout refinement, utility coordination, or installation sequencing creates extra work for your internal team.

Review support in these areas:

  • Design assistance: layouts, submittals, and revision handling
  • Coordination: interface with MEP trades and general contractors
  • Installation management: trained installers, punch list response, and field adjustments
  • Documentation: specs, cut sheets, and finish schedules
  • After-sale support: replacement parts, service access, and change requests

Use a five-step supplier scorecard

To avoid bias, rate each laboratory furniture supplier against the same checklist.

  1. Fit to workflow: Does the proposed package support the room's actual tasks?
  2. Spec clarity: Are materials, compliance details, and accessories clearly defined?
  3. Schedule confidence: Are stock status and delivery assumptions transparent?
  4. Installation readiness: Can the supplier support field conditions and sequencing?
  5. Lifecycle support: Will your team be able to maintain, modify, and repair the system later?

This method usually surfaces the underlying trade-off. The lowest bidder often isn't the lowest-risk bidder.

Decision scenarios that change the right choice

Different labs need different supplier strengths.

University teaching lab

Look for durable, repeatable layouts, simpler maintenance, and furniture that can handle constant user turnover.

Research lab with changing programs

Favor modular systems, flexible benching, and suppliers who can support later reconfiguration.

Pharmaceutical support lab

Prioritize documented specifications, cleaner installation control, and durable casework under stricter operating expectations.

Hospital or clinical support space

Focus on surfaces, cleaning routines, storage control, and service response.

Food or industrial testing lab

Check resistance to moisture, routine cleaning, and heavier instrument use.

Fast-track renovation

In-stock availability and clear install sequencing usually matter more than custom aesthetics.

The Procurement Process from RFP to Installation

A good procurement process removes ambiguity before the first cabinet ships.

Most project problems don't begin in the field. They begin in the RFP, where terms are vague, room lists are incomplete, and the quote basis differs from one supplier to the next.

A blueprint of laboratory furniture sits on a desk next to a modern lab with <a href=fume hoods.” />

Build the RFP around decisions, not catalog pages

The industry still faces supply chain uncertainty. After 2023, many suppliers have continued to make broad delivery claims while buyers get limited hard detail on lead times, stock levels, or contingency plans. That's a serious issue because lab renovations depend on coordinated delivery of casework, ventilation, and fixtures.

So your RFP should force specifics.

Include these sections:

  • Room-by-room scope: identify spaces, functions, and user groups
  • Furniture schedule: list benches, cabinets, shelving, sinks, accessories, and finishes
  • Performance requirements: include compliance expectations and environmental conditions
  • Coordination notes: utility rough-in assumptions, wall conditions, floor slope, and ceiling constraints
  • Submittal requirements: drawings, finish samples, and cut sheets
  • Delivery and installation expectations: receiving conditions, phasing, debris removal, and punch list closeout

If your team wants a structured scoring method, a helpful outside framework is this guide to request for proposal evaluation criteria, which can help standardize how stakeholders compare proposals.

Sample RFP language you can adapt

Short, plain language works best. For example:

Provide a complete laboratory furniture package based on the attached room list and furniture schedule. Quote each room as specified. Identify any substitutions clearly. State which items are in stock, which are built to order, and any assumptions affecting delivery or installation sequencing.

Another useful clause:

Supplier shall provide submittal drawings for review prior to fabrication or release. Drawings must show dimensions, service access, and coordination points with adjacent building elements.

And one more for schedule protection:

Proposal must identify dependencies that could delay shipment, including third-party fixtures, accessories, or special finish approvals.

For planning support during this stage, many teams also review examples of how labs get help finding the right lab equipment and furniture so they can align furniture decisions with broader lab system needs.

A practical timeline that reduces surprises

Use milestones instead of a single delivery date.

A workable sequence often includes:

  1. Internal requirements freeze
  2. RFP issue and bidder questions
  3. Proposal review and scoring
  4. Clarification round
  5. Award decision
  6. Submittals and layout approval
  7. Field verification
  8. Shipment scheduling
  9. Installation
  10. Punch list and turnover

Don't let "delivery date" hide the real schedule. The real schedule includes approvals, field checks, unloading conditions, install sequencing, and final acceptance.

Installation details that buyers often miss

A furniture package can be technically correct and still fail in the field if installation planning is weak.

Check these items early:

  • Access path: elevators, loading docks, corridor width, and staging space
  • Site readiness: finished floors, wall backing, utility placement, and dust conditions
  • Trade sequence: who installs first when furniture meets plumbing, electrical, or ventilation
  • Protection plan: how installed surfaces are protected during remaining construction
  • Final verification: leveling, alignment, hardware adjustment, and user sign-off

In-stock programs can offer a strategic advantage here. If a project is racing against a semester start, validation deadline, or relocation date, available inventory may give the team more room to coordinate install windows and avoid idle trades.

Navigating Costs and Calculating Long-Term Value

A low quote can still be the expensive choice.

That isn't a slogan. It's just what happens when buyers compare only purchase price and ignore maintenance burden, replacement timing, install disruption, and the cost of making the lab functional after handover.

The challenge is that the market doesn't offer a clean universal calculator. As noted by Norlab's discussion of cost and delivery gaps, the industry lacks transparent comparisons for lifetime cost, maintenance expense, and the financial effect of installation downtime across supplier models. That means buyers need their own framework.

Build a simple total cost worksheet

You don't need a finance team to make a better decision. Start with a worksheet that compares each proposal across the full project life.

Include:

  • Purchase price: furniture, accessories, and freight if separated
  • Installation cost: on-site assembly, supervision, and adjustments
  • Downtime risk: likely disruption if items arrive late or incomplete
  • Maintenance burden: hardware replacement, finish touch-up, and service calls
  • Adaptability: cost and ease of future reconfiguration
  • Replacement exposure: how soon key components may need replacement

A useful companion process is asset planning. If your facility team tracks movable furniture, components, and replacement parts, these asset tracking best practices can help connect procurement decisions to long-term maintenance control.

What value means in different lab settings

The "best value" choice changes by use case.

Scenario 1: Academic renovation during a short shutdown

The right choice may be the supplier who can support a predictable install window with standard products and clear room-by-room packaging.

Scenario 2: Research lab with uncertain future programs

Paying more for modularity can make sense if the lab is likely to change equipment or process flow.

Scenario 3: High-use testing lab

Durability matters more than finish options. Drawer slides, hinges, and surface wear become operating issues fast.

Scenario 4: Clean or wet environment

More resilient materials can reduce long-term maintenance and avoid premature degradation.

Scenario 5: Multi-room phased project

Coordination value increases. A supplier who can support phased delivery and punch list closeout may save more trouble than a slightly lower base quote.

Scenario 6: Budget-constrained startup or small expansion

A standardized package may be the right move if it supports the work safely and leaves room for later upgrades.

Long-view test: Ask which option is easiest to maintain, modify, and keep in service without disrupting the lab. That's usually the better business decision.

Hidden costs that deserve attention

Three hidden costs show up often.

First, rework. If furniture dimensions, utility points, or field conditions don't align, crews lose time and the lab opening can slip.

Second, interruption. If replacement parts are hard to get or adjustments require repeated site visits, users carry the cost in lost productivity.

Third, premature replacement. A lower-grade cabinet in a demanding room may create a second procurement project much sooner than expected.

Some buyers also review tax treatment when planning capital purchases. Depending on the project and accounting approach, Section 179 information for laboratory equipment may help frame the financial discussion with internal stakeholders.

Frequently Asked Questions About Sourcing Lab Furniture

Procurement teams usually hear the same concerns from users, facilities, and finance. These are the questions that tend to matter most.

How early should I involve a laboratory furniture supplier

Earlier than expected.

Bring suppliers in once room functions, equipment lists, and rough planning are known. If you wait until construction documents are nearly final, changes become slower and more expensive.

Is in-stock furniture always better than custom

No. It depends on the project.

In-stock furniture often helps when schedule risk is high and room needs fit standard dimensions well. Custom solutions may be worth it when equipment integration, unusual room geometry, or strict workflow needs drive the layout.

What should I ask about work surfaces

Ask what chemicals, moisture, heat, and cleaning methods the surface must handle. Then confirm edge detail, thickness, support method, and replacement process.

For teams still comparing options, reviewing common laboratory work surfaces can help turn vague preferences into actual specification decisions.

How do I verify compliance claims

Ask for the exact standard, test basis, and documentation. Generic language like "built to lab standards" isn't enough.

If the furniture is described as SEFA compliant, request the supporting spec sheets and clarify which products in the quote meet that standard.

What causes the most avoidable delays

Unclear assumptions.

Typical examples include missing room dimensions, late utility coordination, substitutions hidden inside a quote, uncertain site readiness, and accessories that weren't included in the original package.

Should I buy all furniture from one supplier

Often, yes, if the supplier can support the full package.

Single-source coordination can reduce interface problems. Still, mixed sourcing may work when one supplier handles standard casework and another handles specialty ventilation or niche equipment. If you split packages, define responsibility lines clearly.

How much detail should the final quote include

Enough that your team can tell exactly what's included and what isn't.

A useful quote should identify room assignments, quantities, finishes, accessory assumptions, installation scope, and exclusions. If a proposal is hard to compare, it's hard to manage after award too.

What should happen before final acceptance

Do a field walk with a checklist.

Verify leveling, door and drawer operation, finish condition, accessory placement, service access, and any open punch list items. Don't rely on visual completion alone. Open every drawer. Check every hinge. Confirm that the installed layout matches the approved submittal.

Finalizing Your Partnership for a Future-Ready Lab

The right laboratory furniture supplier helps your project long after the quote is signed.

That partner should fit the furniture to the work, support compliance review, communicate clearly during procurement, and reduce installation risk instead of adding to it. When the process is disciplined, the result is a lab that opens with fewer surprises and holds up better in daily use.

Long-term value usually comes from clear specifications, realistic scheduling, durable materials, and support that continues after installation. In a market where demand remains strong and scheduling windows can tighten quickly, teams that make decisions earlier often gain better planning control and fewer project bottlenecks.

If you're narrowing your options, compare layouts, materials, and supplier support side by side before you commit.

Then take the next step. Compare options for your project, or request a quote or plan a layout by calling 801-855-8560 or emailing Sales@Labs-USA.com.


Suggested video embed

Use a broadly educational video from the Labs USA or Material Handling USA channel that showcases laboratory furniture, casework, or lab planning. A general laboratory furniture overview or lab casework walkthrough is the best fit for this topic.

Suggested images

  1. Featured image

    • Scene: Installed laboratory casework and workstations in an active modern lab, with a technician reviewing plans near the benches
    • Alt text: How to Select a Laboratory Furniture Supplier featured image with installed lab casework in a modern laboratory
  2. Supporting visual

    • Scene: Close-up of SEFA-style casework details, drawer hardware, and work surface edges
    • Alt text: Close-up of laboratory casework construction and work surface details
  3. Supporting visual

    • Scene: Facility manager reviewing a lab layout with furniture schedule and finish samples
    • Alt text: Facility manager reviewing laboratory furniture layouts and finish samples

Who This Is For

Our laboratory furniture supplier solutions are ideal for:

  • Laboratory directors
  • Facility architects
  • University science departments
  • Pharma/biotech companies
  • Hospital labs
  • Government research facilities

Ready to Get Started?

Labs USA offers free design services, fast delivery, and expert installation on all lab furniture and equipment.

Request a Free Quote Call (801) 899-0881

Mastering Adjustable Lab Tables: ADA Compliance for 2026 - adjustable lab tables ada

Mastering Adjustable Lab Tables: ADA Compliance for 2026

Meta title: Adjustable Lab Tables and ADA Planning Guide

Meta description: Learn how adjustable lab tables support ADA access, ergonomics, and flexible lab layouts. Compare manual and electric options.

Suggested URL slug: /adjustable-lab-tables-ada

Secondary keyword variations: adjustable-height lab tables, ADA lab tables, ergonomic lab tables, height-adjustable workstations, accessible laboratory workstations

Planning a lab often comes down to one hard question. How do you make the room productive, safe, and accessible without overbuilding every station?

Adjustable lab tables are one of the most practical answers. They can support ADA goals, improve ergonomics for seated and standing work, and make shared labs easier to use. But the table alone doesn't make a lab compliant. Final ADA results depend on the full workstation, including clear floor space, knee clearance, reach to equipment, utilities, and the surrounding layout. If you're comparing lab workstations and tables, that distinction matters.

Quick summary
  • Adjustable lab tables help support ADA access, but the full workstation design determines final compliance.
  • Accessible work surface height is 28 to 34 inches above the finished floor.
  • Knee clearance matters under the table, not just table height.
  • Clear floor space matters too, so users can approach and work safely.
  • Manual and electric adjustment solve different problems depending on how often the station changes users.
  • Shared labs, teaching labs, technical labs, and retrofit projects often benefit most from adjustable-height stations.
  • Project-specific ADA details should be confirmed with your architect, project team, or code professional.

After the intro, a short product video can help readers visualize how adjustable workstations fit real labs.

Video caption: A short overview like this helps buyers see how adjustable stations support changing lab tasks and user needs.

  • Key takeaway 1: Adjustable stations work well where one table serves more than one user.
  • Key takeaway 2: Accessories and layout matter as much as lift range.
  • Key takeaway 3: Early planning usually avoids hard-to-fix clearance problems later.

Mini outline

  • 0:00 Product overview
  • 0:30 Height adjustment options
  • 1:00 Workstation accessories
  • 1:30 Layout and use cases

See more videos on our channel

{
“@context”: “https://schema.org&#8221;,
“@type”: “VideoObject”,
“name”: “Adjustable Lab Tables Overview”,
“description”: “Overview of adjustable lab tables and workstation planning for flexible laboratory use.”,
“thumbnailUrl”: “https://i.ytimg.com/vi/default/maxresdefault.jpg&#8221;,
“uploadDate”: “2024-01-01”,
“duration”: “PT2M”,
“embedUrl”: “https://www.youtube.com/embed/default&#8221;,
“publisher”: {
“@type”: “Organization”,
“name”: “Labs USA”
}
}

Introduction

A modern lab has to work for more than one person, more than one task, and often more than one body type. That's why adjustable-height tables come up so often in planning meetings. They give teams a way to support seated work, standing work, and accessible workstations without locking every station into one fixed height.

In practical terms, an adjustable table is a lab work surface that can move up or down to better fit the user and the task. That sounds simple, but it solves real planning problems. A chemistry teaching lab may need one accessible station in a room of fixed benches. A research lab may need several shared stations that different users can reset through the day. A retrofit may need one flexible workstation where casework can't move.

Practical rule: Treat the table as one part of an accessible workstation, not the whole answer.

What ADA Compliance Means for Lab Tables

A modern, height-adjustable lab workstation featuring a microscope, laboratory equipment, and a tablet with protocols.

When buyers ask if a table is "ADA compliant," the underlying question is usually broader. They want to know whether the station will let a user approach, fit under the work surface, reach the task area, and work safely.

That means height is important, but it isn't the only issue. Planning the full station is what prevents expensive misses later. For deeper specification work, many teams also review adjacent items such as laboratory casework specifications so the table and surrounding furniture don't conflict.

What ADA height should an adjustable lab table be

The ADA work-surface target most planners start with is 28 to 34 inches above the finished floor. Supporting product data also notes that ADA-compliant adjustable lab tables must provide a knee clearance height of at least 27 inches, with work surface heights adjustable from 27.75 inches to 39 inches, to support wheelchair access and forward approach, as described in the ADA-compliant adjustable-height table reference.

For planning, that means the usable range matters more than a marketing label. If the table won't serve the seated height you need, it won't solve the problem.

Why knee and toe clearance matter

The open area under the surface is where many designs fail. A table may hit the right top height but still block access if legs, panels, storage, or utility drops interfere with knees and footrests.

In real labs, this shows up when someone can roll up to the station but can't get close enough to do the work. That's why planners should verify under-table clearance early, especially if the station needs shelves, reagent racks, drawers, or equipment supports.

Clear floor space is part of the station

An accessible table also needs approach space. The standard planning target is 30 inches by 48 inches minimum for clear floor space. That area can't be an afterthought. Stools, carts, waste bins, base cabinets, and nearby doors can all make a good table hard to use.

The safest planning approach is simple. Verify the table, the approach, the reach zone, and nearby obstructions together.

Final ADA outcomes depend on the exact room, utilities, accessories, and workflow. Confirm project-specific details with your architect, project team, or code professional before you release drawings.

How to Choose the Right Adjustable Lab Table A 5-Step Checklist

Students in white lab coats performing scientific experiments at adjustable height laboratory workstations in a bright classroom.

A good spec starts with use, not hardware. Before you compare finishes or lift styles, define what the station has to do and who has to use it. Surface selection matters too, especially when chemical resistance or cleaning demands are high, so it helps to review related laboratory work surfaces at the same time.

1. Define who will use the station

Start with the basic question. Is this for one assigned user, rotating users, or a public-facing teaching or healthcare environment?

Check for these conditions:

  • Single-user station: A dedicated bench may need fewer adjustments after setup.
  • Shared-user station: Frequent height changes usually favor easier adjustment.
  • Seated task: Microscopy, sample prep, and computer-heavy work often need closer ergonomic control.
  • Standing task: Packing, inspection, or active handling may need a higher work position.
  • ADA-focused station: Confirm the user approach, under-table access, and nearby reach needs.

2. Choose the adjustment method

Manual crank and electric lift both work. The right choice depends on how often the height changes and whether the user should be able to change it independently and quickly.

If the table will move often during the day, easier adjustment usually gets used more consistently. If the height changes rarely, a manual mechanism may be enough.

3. Match size to the task and equipment

Size drives both function and clearance. Labs USA lists adjustable tables in 28 to 44 inch height ranges, with standard depths of 24, 30, and 36 inches and lengths of 40, 48, 60, 72, and 80 inches on its adjustable lab tables page.

Use smaller depths when approach and reach are critical. Use larger surfaces only when the task really needs them.

4. Decide what needs to live on or above the table

A plain table is one thing. A workstation is another.

Think through:

  • Uprights and shelving: Helpful for keeping tools and supplies close, but they can affect reach.
  • Monitors and task lighting: Useful in technical work, but should not crowd the work zone.
  • Reagent racks and accessories: Good for process flow when they don't block access.
  • Casters: Helpful for mobility, but they affect how the station is parked and used.

5. Plan the room, not just the product

The last check is the one buyers skip most often. Look at utilities, adjacent benches, aisle flow, carts, and storage. Then confirm the final design with the project team.

If a station has the right table but the wrong surroundings, it still won't work well.

Manual Crank vs Electric Lift Which Is Better

Manual and electric both have a place. The best choice depends on frequency of adjustment, who controls the station, and how much layout flexibility the lab needs. For technical environments with integrated accessories, some buyers also compare technical workstations and tables before deciding.

Comparison of Lab Table Types
Feature Fixed-Height Table Manual Adjustable Table Electric Adjustable Table
Best use Dedicated task at one set height Stations adjusted from time to time Shared stations and frequent height changes
ADA flexibility Limited to the height selected Supports adaptation when properly planned Supports easier adaptation for different users when properly planned
Ergonomics Good only if the fixed height matches the task Better fit across different tasks Best fit for quick changes between seated and standing work
Budget level Lower Moderate Higher
Common applications Simple bench work, assigned rooms Teaching labs, light shared use, retrofits Research labs, technical labs, multi-user spaces
Planning note Does not solve changing user needs well Good value when users can accept slower changes Useful when adjustment speed affects whether the feature gets used

A manual crank table is often the sensible middle ground. It supports flexible height planning without the added cost of powered movement. In a teaching lab or assigned workstation, that may be enough.

An electric table usually makes more sense when the station serves different users or shifts between seated and standing work often. Ease matters. If changing height is awkward, people stop doing it.

Choose electric when height adjustment is part of the daily workflow, not just a setup step.

5 Scenarios for Using Adjustable Lab Tables

An infographic showing five scenarios for using adjustable lab tables to improve workspace ergonomics and accessibility.

University teaching lab

A school may not need to replace every fixed bench. Often, one or two accessible stations solve the immediate need if they're placed where users can approach them cleanly and use the same teaching tools as the rest of the class.

This approach works best when the accessible stations aren't treated like leftovers in the back corner. Keep them integrated into the room.

Shared research lab

A shared lab usually has the widest range of users and tasks. One person may run a seated instrument workflow. Another may need standing setup space later the same day.

Electric adjustment frequently proves its worth. It removes friction from shared use.

Retrofit with fixed utilities

Retrofits are where adjustable tables become especially useful. If the room has fixed casework and utility locations, a standalone accessible workstation can add flexibility without tearing out the whole lab.

The trade-off is coordination. Utility reach, nearby aisle space, and equipment placement need careful review.

Fixed ADA-height bench or adjustable table

Sometimes a fixed-height accessible bench is enough. If the task is stable, the user need is known, and the station won't change much, a fixed solution may be practical.

If the station may serve different users later, adjustability usually protects the layout from becoming outdated too quickly.

Pharmaceutical or technical QC station

Detailed bench work often benefits from tighter ergonomic fit. Instruments, keyboards, trays, and documentation tools all compete for space. A height-adjustable table can help position the work more naturally while keeping access open.

That matters most when precision work lasts for long periods and posture drift becomes a real issue.

Future-Proofing Your Lab with Flexible Furniture

A modern laboratory featuring scientists working at modular, height-adjustable lab tables and mobile storage units.

The long-term value of adjustable tables isn't only about access. It's about keeping a lab useful as staffing, equipment, and workflows change. That's one reason planners keep coming back to flexible systems and modular laboratory furniture when projects need a longer service life.

Height-adjustable workstations can also fit a broad range of users. One industry reference notes that these stations can accommodate users across the 5th to 95th percentile range, covering about 90% of the general population, as described by Bostontec's height-adjustable lab workstation guidance. In practice, that gives labs a better chance of serving mixed teams without custom-building every station.

Accessories can turn a table into a full workstation

A basic frame and top handle many tasks. But some labs need more than that.

Useful add-ons include:

  • Uprights for vertical storage: Helpful in technical and pharmaceutical spaces.
  • Shelves and power access: Better organization when reach is still manageable.
  • Casters for mobility: Good for rooms that reconfigure often.
  • Open space below: Important when access and seated work remain priorities.

Labs USA offers manual crank and electric lift adjustable tables, with optional casters and uprights, for settings such as technical labs, pharmaceutical labs, reagent-rack upgrades, and ADA motorized bench applications. That's a practical example of how one table platform can support different room types.

Flexibility now avoids planning bottlenecks later

Furniture that can adapt tends to reduce the number of hard layout decisions you have to make up front. That's useful when grant-funded projects, equipment plans, or staffing needs are still moving.

It also helps with timing. Teams that settle on flexible furniture earlier often avoid later redesign cycles and installation delays, especially when demand affects product availability and scheduling windows.

Frequently Asked Questions

What ADA height should an adjustable lab table be

For work surfaces, the common ADA planning target is 28 to 34 inches above the finished floor. Final suitability still depends on the full station and the user's needs.

Are adjustable lab tables automatically ADA compliant

No. An adjustable table can support ADA goals, but final compliance depends on the whole workstation design, including clearances, reach, accessories, utilities, and room layout.

What clear space is needed around an accessible lab table

A common planning minimum is 30 inches by 48 inches of clear floor space for approach. Keep carts, stools, bins, and swing paths from blocking that area.

Is an electric table better than a manual table

Not always. Electric is often better for shared spaces and frequent changes. Manual can be a good fit for assigned stations or lighter adjustment needs.

Can adjustable tables be used for both seated and standing work

Yes, if the adjustment range fits the work and the user. That's one of the main reasons buyers choose height-adjustable stations in mixed-use labs.

What depth works best for an ADA lab workstation

It depends on the task, equipment, and reach needs. In many cases, a shallower top is easier to use for accessible approach than a deep surface loaded with accessories.

Do casters affect accessibility planning

Yes. Casters can improve flexibility, but planners should confirm how the table will park, how it stays stable, and whether mobility affects approach or nearby clearances.

When should I choose adjustable tables instead of fixed benches

Choose adjustable tables when the station serves more than one user, supports seated and standing work, or may need to adapt over time. For early layout testing, tools like Room Sketch 3D for planning room layouts can help teams think through approach zones and traffic flow before final drawings.

Conclusion Plan Your Accessible Lab Today

Adjustable lab tables make the most sense when you need one station to do more than one job. They can support ADA planning, improve day-to-day ergonomics, and give the lab more room to adapt as people and work change.

If you're comparing options, review science lab tables, a laboratory furniture guide, lab bench configuration, and broader furniture for lab planning ideas. You can also explore laboratory furniture categories, request a quote, or contact Labs USA for help comparing manual, electric, and workstation options.

Suggested featured image prompt: Realistic commercial photo of a modern laboratory with an ADA-focused adjustable-height lab table slightly right of center, open knee space below, seated user position at the table, nearby standing workstation in background, bright white and soft blue lab interior, clean organized surfaces, microscope and small lab equipment on table, subtle dark blue gradient at top for headline placement, headline text “Adjustable Lab Tables and ADA Planning Guide”, subtitle “Accessibility, ergonomics, and flexible lab design”, three benefit callouts with technical icons: “Accessible Work Heights”, “Shared User Flexibility”, “Better Layout Planning”, crisp modern sans-serif typography, 16:9 banner, professional lighting, no warehouse scene.

Suggested real image placements from the article

  1. URL: https://labs-usa.com/wp-content/uploads/2026/04/adjustable-lab-tables-ada-laboratory-workspace.jpg
    Placement: What ADA Compliance Means for Lab Tables
    Caption: Adjustable workstation with open access around the work zone.
    Alt text: height-adjustable lab workstation for ADA planning in a modern laboratory

  2. URL: https://labs-usa.com/wp-content/uploads/2026/04/adjustable-lab-tables-ada-science-laboratory.jpg
    Placement: 5-step checklist section
    Caption: Adjustable stations work well in teaching spaces with different users.
    Alt text: students using adjustable-height lab tables in a science classroom

  3. URL: https://labs-usa.com/wp-content/uploads/2026/04/adjustable-lab-tables-ada-laboratory-workspace-1.jpg
    Placement: 5 scenarios section
    Caption: Common decision scenarios for accessible and ergonomic lab planning.
    Alt text: infographic of adjustable lab table use cases for ADA and ergonomics

  4. URL: https://labs-usa.com/wp-content/uploads/2026/04/adjustable-lab-tables-ada-laboratory-workspace-2.jpg
    Placement: Future-proofing section
    Caption: Flexible tables support changing teams and changing workflows.
    Alt text: modular lab with height-adjustable tables and mobile storage

Suggested additional AI image prompts

  1. Prompt: ADA-accessible laboratory workstation with adjustable-height table, open knee clearance, wheelchair forward approach, bright clinical lab interior, realistic commercial photography
    Placement: FAQ section
    Caption: Accessible approach depends on more than tabletop height.
    Alt text: ADA-accessible lab table with open knee space

  2. Prompt: Side-by-side lab table height comparison showing seated work height, ADA work height, and standing work height in one clean educational visual, modern lab setting
    Placement: Manual vs electric section
    Caption: Different tasks need different working heights.
    Alt text: comparison of seated ADA and standing lab table positions

  3. Prompt: Shared university lab with electric adjustable tables used by different researchers, mixed seated and standing tasks, bright modern interior
    Placement: 5 scenarios section
    Caption: Shared labs benefit when each user can reset the station quickly.
    Alt text: shared research lab with electric adjustable-height tables

  4. Prompt: Technical workstation built on an adjustable lab table with monitor arm, shelving uprights, task light, and organized tools within ergonomic reach
    Placement: Future-proofing section
    Caption: Accessories can turn a simple table into a complete workstation.
    Alt text: technical lab workstation with adjustable table and uprights

  5. Prompt: Clean planning diagram of adjustable lab table with clear floor space, approach zone, and under-table knee clearance marked visually, blueprint style but realistic
    Placement: What ADA Compliance Means section
    Caption: Layout planning should verify approach, clearance, and reach together.
    Alt text: adjustable lab table planning diagram with floor space and knee clearance

FAQ schema suggestion: Yes. Mark up the FAQ section with FAQPage schema using the eight questions listed above.

Ready to Get Started?

Labs USA offers free design services, fast delivery, and expert installation on all lab furniture and equipment.

Request a Free Quote Call (801) 899-0881

A Guide to Laboratory Casework - laboratory casework

A Guide to Laboratory Casework

Laboratory casework is the system of cabinets, work surfaces, and storage units that serves as the functional backbone of any scientific space. This is not just furniture. It is the durable, organized, and safe infrastructure built to handle experiments, equipment, and chemical storage. This foundational equipment is purpose-built to withstand the demanding conditions found in a lab.

TL;DR: Your Guide to Laboratory Casework

  • What It Is: Laboratory casework is the specialized system of cabinets, countertops, and storage designed for scientific environments. It must be durable, chemical-resistant, and safe.
  • Key Materials: The main options are painted steel, stainless steel, wood, and phenolic resin. The best choice depends on your lab's specific chemical use, budget, and need for sterile conditions.
  • Safety Standards: Look for SEFA 8 compliance. This certification ensures the casework has passed rigorous tests for load capacity, chemical resistance, and durability. Also, consider OSHA, ADA, and local fire codes.
  • Layout is Key: Choose between fixed casework (permanent) and modular casework (flexible). A good layout improves workflow, safety, and efficiency.
  • Maintenance Matters: Proper installation and a consistent cleaning plan extend the life of your casework and keep your lab safe.

What Is Laboratory Casework?

A modern laboratory with white laboratory casework, countertops, and advanced scientific equipment.

Laboratory casework is the essential foundation for everything that happens in your lab. It is more than standard cabinets and counters. This is a specialized system, engineered to support your processes and workflow. Unlike furniture for a home or office, it is designed for chemical resistance, heavy loads, and safety.

The main role of casework is to create a workspace that is organized, efficient, and compliant with industry standards. You achieve this by combining different, specialized components that work together.

Key Components and Their Functions

When you specify the right casework, you directly improve your lab's productivity and safety. The global market for laboratory cabinets reflects this importance. It is a growing industry because of the need for high-quality storage solutions in research and development.

Let’s review the main elements:

  • Base Cabinets: These are the workhorses. They form the foundation that supports countertops and provide the bulk of your storage for equipment and supplies.
  • Wall Cabinets: Mounted above work areas, these are ideal for keeping frequently used items within easy reach. This helps keep your countertops clear and organized.
  • Countertops: This is where work happens. These primary work surfaces are made from materials chosen for their ability to resist chemicals, heat, and scratches.
  • Specialty Storage Units: This category includes everything from dedicated acid and flammable safety cabinets to tall storage units for bulky items.

Each piece plays a part in creating a smooth workflow. Once you understand how these components function, you can see how they form a high-performance system. The full range of laboratory casework solutions includes options for every application, from schools to advanced research facilities. This integrated approach ensures every part of your lab is optimized for safety and performance.

Choosing the Right Casework Materials

Different samples of laboratory casework materials, including steel, stainless steel, wood, and phenolic resin, arranged for comparison.

Selecting the right material for your lab casework is a critical decision. This choice affects safety, durability, and your budget. It is about more than appearance, since each material is engineered for specific scientific work.

The four main materials in modern labs are painted steel, stainless steel, wood, and phenolic resin. Understanding the strengths and weaknesses of each is key to building a lab that performs well.

Painted Steel Casework

For many general lab applications, painted steel is a popular choice. It is built from heavy-gauge steel that gets a tough, chemical-resistant, powder-coat finish. This process creates a smooth, non-porous surface that is easy to clean.

Steel provides excellent strength. It handles heavy equipment and stands up to the daily use of a busy lab. Also, it is non-combustible, which adds a layer of fire safety. This mix of strength, affordability, and reliability makes it a solid choice for university chemistry labs and industrial quality control facilities.

Stainless Steel Casework

When your work requires sterile conditions and resistance to harsh chemicals, stainless steel is the top choice. It is common in pharmaceutical, biological, and medical research labs. Its non-porous surface prevents bacteria and other contaminants from growing.

Stainless steel resists a wide range of chemicals, heat, and moisture, making it very durable and simple to sterilize. While it costs more initially, the investment provides longevity and performance in critical applications. You can explore the specifics of our stainless steel laboratory casework to see if it is the right fit for your environment.

Wood Casework

Wood casework brings a classic, traditional feel to a lab. However, this is not standard kitchen cabinetry. Modern lab-grade wood is treated with a specialized chemical-resistant finish to protect against spills and damage. It is a popular choice for its appearance in school labs, dry labs, and doctors' offices where aggressive chemicals are not used daily.

Wood casework provides good structural integrity and can be a budget-friendly option. However, it is not the right fit for labs with high humidity or where strong acids and solvents are used regularly. Those conditions can damage the finish and the wood itself over time.

Phenolic Resin Casework

Phenolic resin is a high-tech composite engineered for tough lab conditions. It's made by layering resin-soaked papers and fusing them together with intense heat and pressure. The result is a solid, durable panel that resists chemicals, moisture, and bacteria.

This material is a great choice for any lab that is frequently wet or deals with corrosive materials. It will not rust, warp, or delaminate. This makes it a long-term solution for biology, chemistry, and clinical labs where conditions can be demanding.

How to Choose a Casework Material: A 5-Step Checklist

Use this checklist to select the best material for your lab's needs.

  1. Analyze Chemical Use: List all chemicals, solvents, and cleaning agents used in the lab. Note their concentrations and frequency of use. This determines the required level of chemical resistance.
  2. Evaluate Moisture Levels: Determine if the area will be consistently wet, humid, or dry. Phenolic resin and stainless steel excel in wet environments, while wood is best for dry labs.
  3. Assess Sterility Needs: If your work requires sterile or particle-free conditions (like in cleanrooms or biological labs), non-porous stainless steel is the best option.
  4. Consider Durability and Impact: Think about the daily physical demands. Steel offers high durability for industrial or high-traffic settings. Phenolic resin also resists impact well.
  5. Set Your Budget: Balance upfront costs with long-term value. Steel and wood are often more budget-friendly initially, while stainless steel and phenolic resin are premium materials that offer superior longevity in harsh conditions.

Comparing Laboratory Casework Materials

Which material is right for you? It is always a balance between performance and budget. To make it easier, here is a side-by-side comparison.

Material Chemical Resistance Durability Cost Best For
Painted Steel Good High $$ General purpose, industrial, and educational labs.
Stainless Steel Excellent Very High $$$$ Sterile environments, cleanrooms, and medical labs.
Wood Fair to Good Medium $ Dry labs, educational settings, and office areas.
Phenolic Resin Excellent High $$$ Wet labs, high-moisture areas, and chemical labs.

Use this table as a starting point. By matching your lab's daily activities with these material profiles, you can make a choice that will serve you reliably for years.

Meeting Critical Lab Safety Standards

A scientist in a lab coat and safety glasses working at a bench with properly organized laboratory casework.

In any lab, safety and compliance are strict requirements. These standards protect your team, ensure research integrity, and help your facility pass inspections. For laboratory casework, this means choosing products built to handle the demands of a scientific environment.

Understanding the key standards that govern casework is the first step toward a smart investment.

The Role of SEFA in Laboratory Casework

The Scientific Equipment and Furniture Association (SEFA) is the leading authority for lab furniture performance standards. If casework is SEFA 8 compliant, it means it has passed intense tests that mimic real-world lab conditions.

These tests measure several critical factors:

  • Load Capacity: This confirms that cabinets, shelves, and work surfaces can safely hold heavy equipment without failing.
  • Finish Performance: The finish is exposed to a list of common lab chemicals to evaluate its resistance to corrosion and degradation.
  • Cabinet Construction: Moving parts like drawers, doors, and hardware are tested for durability to ensure they can withstand constant use.

Specifying SEFA-compliant casework is the most direct way to ensure your furniture meets a high standard for safety, durability, and quality.

Other Key Compliance Considerations

SEFA is important, but other regulations also play a role in creating a safe lab. Well-designed casework helps you meet these requirements. A practical guide to implementing health and safety management systems provides a solid framework for maintaining a secure environment.

Here are a few other key regulations to consider:

  • OSHA Standards: The Occupational Safety and Health Administration has clear rules for workplace safety, including how hazardous materials must be stored. This is why dedicated laboratory safety cabinets for flammable or corrosive chemicals are necessary for compliance.
  • ADA Requirements: The Americans with Disabilities Act ensures labs are accessible to everyone. This influences casework design, from adjustable-height workbenches to ensuring enough clearance between benches for wheelchair access.
  • Fire and Building Codes: Local and national fire codes often affect the types of materials you can use. For example, steel casework is often preferred because it is non-combustible, adding another layer of fire safety.

By planning for these standards from the beginning, you ensure your casework supports your work and creates a secure, compliant facility for your team.

Optimizing Your Laboratory Layout

A well-planned laboratory layout with clean lines, showing efficient use of space and organized casework.

Great laboratory casework is only part of the solution. To create a high-performing workspace, that casework needs to fit into a smart, efficient layout. A good plan can improve productivity, enhance safety, and prepare your lab for future needs.

A well-designed layout does more than fill a room. It creates a functional ecosystem. It considers how people move, where supplies are stored, and how utilities are routed.

Fixed Versus Modular Casework

One of the first major decisions in layout design is choosing between fixed and modular casework. Both provide work surfaces and storage, but their impact on your lab’s future is very different.

Fixed casework is the traditional option. It is permanently installed and secured to the floor or walls. It is known for its stability and is a great choice for labs where processes are well-defined and unlikely to change.

Modular casework is built for adaptability. It consists of freestanding units that can be moved, reconfigured, or added to as your needs change. That flexibility is valuable in fast-paced research environments. If you expect any growth or change, exploring modular lab benches is a smart way to future-proof your space.

The laboratory testing services market is growing quickly. According to The Business Research Company's market report, this growth is driven by new technology and a greater demand for precision. A modular layout gives you the agility to adapt without a costly renovation.

Core Principles of an Efficient Layout

Beyond the fixed or modular choice, a few core principles are essential for good lab design.

  • Follow the Workflow: Arrange workstations to mirror your key processes. A logical sequence minimizes wasted steps and keeps materials moving smoothly.
  • Provide Adequate Space: Ensure there is plenty of clearance between benches and equipment. This is crucial for safe movement and is often required by safety and accessibility codes.
  • Use Smart Storage: Place storage where it is needed most. Frequently used items should be within arm's reach, while bulk supplies can be stored in less central locations.
  • Prioritize Safety: Create clear, unobstructed pathways. Safety equipment like eyewash stations, showers, and fire extinguishers must be easy to see and access.

Decision Scenarios: Which Casework is Right?

Here are five common scenarios to help illustrate how to choose the best casework for different applications.

  1. University Teaching Lab: This lab sees hundreds of students. The casework must handle constant use and minor spills of various chemicals.
    • Best Choice: Painted steel casework with phenolic resin countertops. Steel is durable, easy to clean, and budget-friendly. Phenolic tops offer excellent resistance to chemicals and moisture.
  2. Pharmaceutical R&D Lab: This lab develops new drugs. Projects change quickly and equipment is upgraded often. The space must be sterile and adaptable.
    • Best Choice: Modular stainless steel casework. Stainless steel is non-porous and easy to sanitize, making it ideal for sterile applications. The modular design allows the team to reconfigure the layout as research priorities shift.
  3. Clinical Diagnostics Lab: This hospital lab runs tests 24/7. The work involves biological samples and many reagents. The environment must be hygienic and efficient.
    • Best Choice: Phenolic resin or stainless steel casework with epoxy resin tops. Both casework options resist moisture and bacteria. Epoxy resin countertops create a seamless, durable surface that holds up to harsh disinfectants.
  4. Dry Electronics Lab: This lab assembles and tests sensitive electronic components. There are no wet chemicals, but surfaces must be static-dissipative.
    • Best Choice: Wood or steel casework with ESD laminate countertops. Since chemical resistance is not a concern, affordable wood or steel casework is a good fit. The critical feature here is the specialty ESD (electrostatic dissipative) work surface.
  5. Industrial Quality Control Lab: This lab tests product samples using heavy machinery and moderate chemicals. Durability and load capacity are the top priorities.
    • Best Choice: Fixed painted steel casework with epoxy resin countertops. The fixed steel base provides maximum stability for heavy equipment. Epoxy tops offer a good balance of chemical resistance and durability for this environment.

Integrating Utilities and Planning in 3D

Modern labs rely on a complex network of utilities, including power, data, gas, and water. Integrating these services into your casework is key to a clean and safe workspace. Service spines and overhead carriers keep cords and hoses off the floor, eliminating trip hazards.

Before installation, using 3D models and CAD drawings is a critical final check. These detailed plans allow you to take a virtual tour of the finished lab. This is where you can spot potential problems, such as a cabinet door that cannot open fully. This planning phase, often confirmed with detailed shop drawings, helps you catch expensive mistakes before they happen.

For a deeper dive into technical details, review our complete guide on laboratory casework specifications.

Installation and Long-Term Casework Care

Proper installation and routine care are critical for safety, compliance, and longevity. A proactive approach protects your investment and keeps your workspace in top condition.

Professional installation is the first step. It ensures every cabinet is level, securely anchored, and stable enough for heavy equipment. It also guarantees that utility connections for gas, water, and power are handled correctly and safely.

Creating a Casework Maintenance Plan

A consistent maintenance routine is the best defense against wear and tear. Different materials require different care, so your plan should be tailored to your lab's equipment.

A solid maintenance plan includes three key actions:

  • Routine Cleaning: Use appropriate, non-abrasive cleaners recommended for your casework material.
  • Regular Inspections: Periodically check for signs of wear, loose hardware, or surface damage.
  • Prompt Spill Management: Clean all spills immediately using the correct procedure to prevent staining or corrosion.

Material-Specific Cleaning and Care Tips

Using the right cleaner is essential for preserving your casework. Always check the manufacturer’s guidelines or your lab's Safety Data Sheets (SDS) before using a chemical on a surface.

  • Painted and Stainless Steel: Mild soap and water is usually sufficient. Wipe down and then dry completely with a soft cloth. Avoid harsh abrasives or cleaners with chlorine. For stainless steel, wipe in the direction of the grain.
  • Phenolic Resin: This material is very tough. A simple wipe-down with a damp cloth and a mild detergent works well. Most lab-grade disinfectants are safe, but it is wise to test a new one on a small area first.
  • Wood Casework: Dust regularly with a soft, dry cloth. For deeper cleaning, use a pH-neutral wood cleaner and wipe away any moisture immediately. Never let spills sit on wood.
  • Countertops (Epoxy/Phenolic): These surfaces are built for harsh environments but are not indestructible. Clean spills as soon as they happen. Use lab-grade cleaners and avoid abrasive scouring pads.

Following these simple care steps will ensure your laboratory casework remains a durable and functional asset.

Frequently Asked Questions About Laboratory Casework

Here are answers to some of the most common questions about planning, timelines, and materials for laboratory casework.

1. What is the typical lead time for ordering laboratory casework?
Generally, you should plan for a lead time of 8 to 14 weeks. This period starts after final drawings are approved and ends when your order arrives. The timeline can change based on the material, design complexity, and the manufacturer's current schedule. Steel casework often has a shorter lead time than custom wood or phenolic resin options.

2. What is the difference between overlay and inset cabinet design?
This choice affects the appearance of your casework. With an overlay design, the cabinet doors and drawers are larger than the opening and rest on top of the cabinet frame. This creates a clean, modern look. With an inset design, the doors and drawers fit perfectly inside the cabinet opening, sitting flush with the frame for a more traditional, built-in look.

3. How do I know what chemical resistance level I need?
The chemicals you use determine the required resistance level. Make a detailed list of every chemical and its concentration. Then, consult the manufacturer’s chemical resistance charts for materials like epoxy or phenolic resin. These charts show how a surface performs against specific agents.

4. Is wood casework suitable for a modern laboratory?
Yes, wood casework can be suitable for the right environment. Modern lab-grade wood is treated with a chemical-resistant finish. It is a good choice for dry labs, tech spaces, or educational facilities where harsh chemical use is minimal. For labs with high moisture or corrosive chemicals, steel or phenolic resin is a better choice.

5. Can I reconfigure modular casework myself?
Modular casework is designed for flexibility, but major changes should be handled by professionals. While you can likely move a small, freestanding cabinet, reconfiguring an entire layout, especially one with utility connections, requires an expert. We recommend contacting the original installer to ensure changes are made safely.

6. How much does laboratory casework cost?
Cost varies widely based on material, configuration, and level of customization. Painted steel and wood are typically the most budget-friendly options. Phenolic resin is a mid-range choice, while stainless steel is a premium material with the highest upfront cost. Always consider the total cost of ownership, as durable materials can save money on maintenance and replacement over time.

7. Are custom sizes available for laboratory casework?
Yes, most manufacturers offer custom sizing to fit the specific dimensions of your lab. Customization allows you to maximize storage and create a layout that fits your unique workflow. Keep in mind that custom orders may have longer lead times and higher costs than standard-sized units.

Conclusion

Choosing the right laboratory casework is a foundational step in creating a safe, efficient, and productive scientific workspace. By carefully considering your lab's applications, workflow, and safety requirements, you can select materials and a layout that will support your work for years to come. From durable steel to sterile stainless steel, there is a solution for every need.

Ready to find the perfect fit for your facility? Take the next step to build a better lab.

Compare Your Laboratory Casework Options

Request a Quote or Plan Your Layout

Need Help Designing Your Lab?

Our laboratory design specialists provide free consultations, 3D lab layouts, and competitive pricing.

Request a Free Consultation → | Call (801) 855-8560

Who This Is For

Our laboratory casework solutions are ideal for:

  • Laboratory directors
  • Facility architects
  • University science departments
  • Pharma/biotech companies
  • Hospital labs
  • Government research facilities

Ready to Get Started?

Labs USA offers free design services, fast delivery, and expert installation on all lab furniture and equipment.

Request a Free Quote Call (801) 899-0881

Choosing the Right Lab Wire Shelving - lab wire shelving

Choosing the Right Lab Wire Shelving

Your Complete Guide to Lab Wire Shelving

Choosing the right storage is a critical decision for any laboratory. Lab managers, facilities teams, and planners know that effective storage impacts workflow, cleanliness, and safety. While solid cabinets have their place, lab wire shelving offers a unique set of advantages that solve many common challenges in modern research and clinical environments. Its open design promotes airflow, enhances visibility, and provides unmatched flexibility for dynamic workspaces.

The core problem with traditional storage like solid shelving or bulky casework is that it can hinder lab operations. These options can block airflow, collect dust, and make it difficult to quickly locate necessary supplies. This can lead to wasted time, increased risk of contamination, and workflow bottlenecks. Lab wire shelving directly addresses these issues, providing a practical and efficient storage solution.

This guide will walk you through everything you need to know. We will cover the benefits of different materials, how to plan your layout, and how to choose the right accessories. By the end, you will have the information needed to select a wire shelving system that fits your lab’s specific needs.

How to Choose Lab Wire Shelving: A 5-Step Checklist

Selecting the right lab wire shelving system does not have to be complicated. Following a clear checklist ensures you cover all important factors, resulting in a storage solution that is safe, efficient, and perfectly suited to your space. This five-step process helps you avoid common mistakes, like choosing shelves with inadequate weight capacity or a finish that is wrong for the environment.

Step 1: Identify Storage Types and Load Requirements

First, determine exactly what you will store. The weight and type of items will dictate the required durability of the shelves. Create a list of all equipment, consumables, and containers.

  • Light-duty items: Consumables like gloves, pipette tips, and small glassware.
  • Medium-duty items: Reagent bottles, solution containers, and small benchtop equipment.
  • Heavy-duty items: Bulk chemical storage, large containers, or heavier instruments.

Most standard wire shelves hold between 600 and 800 pounds per shelf, but it is crucial to verify the manufacturer’s specifications. Never guess the load capacity. Overloading shelves is a significant safety risk that can lead to collapse and damage.

Step 2: Measure the Room and Clearances

Accurate measurements are essential. Measure the length, width, and height of the area where you plan to install the shelving. However, measuring the room is only the first part. You must also account for necessary clearances for safety and accessibility.

Plan for adequate aisle space for personnel and carts to move freely. A minimum aisle width of 36 inches is recommended. Also, consider vertical clearances for sprinkler systems, lighting fixtures, and ventilation ducts. Ensure the shelving placement does not block doorways or access to electrical outlets.

Step 3: Choose Shelf Width, Depth, and Height

With your storage needs and room dimensions defined, you can select the appropriate shelf sizes. Lab wire shelving comes in many standard dimensions.

  • Depths: Common depths are 14, 18, 21, and 24 inches.
  • Widths: Standard widths range from 24 to 72 inches.
  • Post Heights: Posts typically range from 34 to 96 inches tall.

Choose a shelf depth that accommodates your largest items without overhang. Taller units are great for maximizing vertical storage, but ensure your staff can safely access items on the top shelves. For detailed dimensions and options, you can download the wire shelving spec sheet.

Step 4: Decide on Mobile vs. Stationary Shelving

Consider your lab’s workflow. Do you need your storage to be fixed or flexible? This will determine whether you need stationary or mobile units.

  • Stationary Shelving: These units have leveling feet and offer the highest stability and weight capacity. They are ideal for permanent storage of heavy items or bulk supplies.
  • Mobile Shelving: These units are equipped with casters (wheels), allowing them to be moved easily. Mobile shelving is excellent for reconfiguring layouts, transporting materials, or cleaning floors.

Note that adding casters reduces the overall weight capacity of a unit. Always check the mobile capacity specifications from the manufacturer.

A high-density layout of mobile lab wire shelving units with casters for flexible storage in a laboratory setting.
Mobile wire shelving with casters offers flexibility in dynamic lab spaces.

Step 5: Plan for Add-Ons and Accessories

Accessories can turn a basic shelving unit into a highly organized system. Plan for these items from the start to optimize your storage.

  • Dividers: Keep items separated and upright.
  • Ledges: Prevent items from falling off the sides or back.
  • Bins: Contain small, loose items and reduce clutter.
  • Label Holders: Ensure everything is clearly marked for quick identification.

By planning for accessories, you create a customized storage solution tailored to your lab’s specific operational needs.

Comparing Wire Shelving with Other Storage Options

While wire shelving is a versatile choice, it is helpful to understand how it compares to other common laboratory storage solutions like solid steel shelving and enclosed cabinets. Each type has distinct advantages depending on the application.

Airflow and Contamination Control

The open-wire design is the biggest advantage of wire shelving for cleanliness. It allows air to circulate freely, which is crucial in cleanrooms, sterile processing areas, and cold rooms. This airflow minimizes the settling of dust and airborne contaminants. In contrast, solid steel shelving and cabinets create stagnant air pockets and have large surfaces where dust can accumulate.

Visibility and Accessibility

Wire shelves offer excellent visibility, allowing staff to quickly identify and retrieve items from any side. This transparency simplifies inventory management and reduces search time. Solid shelves and cabinets hide their contents, requiring meticulous labeling and organization to maintain efficiency. With enclosed storage, finding items often requires opening multiple doors or drawers.

Tall lab wire shelving unit with adjustable shelves and labeled storage bins, demonstrating organized sample storage.
Adjustable lab wire shelving supports organized storage of supplies and samples.

Load Capacity, Flexibility, and Cost

In terms of load capacity, solid steel shelving often holds more weight than wire shelving, making it suitable for very heavy equipment. However, wire shelving is far more flexible. Its modular design allows for tool-free shelf adjustments in one-inch increments. Cabinets offer the least flexibility. Cost-wise, wire shelving is typically more affordable than heavy-duty solid shelving or laboratory casework.

Comparison Table: Lab Storage Solutions

Storage Type Typical Load Capacity Airflow and Cleanliness Ease of Reconfiguration Ideal Applications
Wire Shelving 600–800 lbs per shelf Excellent airflow, easy to clean Very easy, tool-free adjustment General supplies, cold rooms, cleanrooms, glassware
Solid Steel Shelving 1,000+ lbs per shelf Poor airflow, contains spills Moderate, may require tools Heavy equipment, bulk chemical storage, industrial use
Cabinet Storage Moderate, varies by design No airflow, protects contents Difficult to reconfigure Secure storage, sensitive instruments, under-counter use

Decision Scenarios and Use Cases

Choosing the right shelving depends on the specific application. Here are several common scenarios to help guide your decision on when lab wire shelving is the best choice.

Scenario 1: General Purpose Storage for Consumables

For storing everyday supplies like gloves, pipette tips, and media bottles, standard chrome-plated wire shelving is an excellent and cost-effective solution. In a dry stockroom, you can line walls with tall, stationary units to maximize vertical space. Use shelf dividers and labeled bins to keep everything organized and easily accessible.

Scenario 2: Cold Room or Warm Room Applications

In environments with high humidity or temperature fluctuations, material choice is critical. For cold rooms or warm rooms, you should choose either epoxy-coated or stainless steel wire shelving. These finishes are designed to resist rust and corrosion caused by moisture. The open-wire design also promotes even temperature distribution, preventing hot or cold spots that could affect sensitive materials.

A detailed view of a lab wire shelving unit showing its open-wire construction for superior airflow in a lab environment.
The open-wire design enhances airflow, crucial for temperature-sensitive storage areas.

Scenario 3: High-Density Storage in Limited Space

When floor space is limited but storage needs are high, a mobile high-density system is the ideal solution. These systems place shelving units on tracks, allowing you to create a movable aisle. This design can nearly double your storage capacity within the same footprint. It is perfect for archiving samples, storing records, or managing large inventories in a small room.

Scenario 4: Mobile Transport Carts

Any wire shelving unit can become a mobile cart by adding casters. These carts are invaluable for transporting materials between workstations. You can create dedicated procedure carts, glassware transport carts, or mobile supply stations that can be moved wherever they are needed most, improving workflow efficiency.

Integrating Shelving with Other Lab Furniture

Lab wire shelving works well with other laboratory furniture. It can complement existing casework, workstations, and tables to create a comprehensive and organized workspace. For example, shorter wire shelving units can be placed at the end of a lab bench to provide open, accessible storage for frequently used items. This keeps primary work surfaces clear of clutter.

By combining the secure, enclosed storage of casework with the accessible, high-visibility storage of wire shelving, you create a balanced system. This integrated approach ensures that every item has a designated place. Explore our complete range of laboratory shelving systems to see how different solutions can work together.

Maintenance and Lifecycle of Lab Wire Shelving

Proper care and maintenance will extend the life of your lab wire shelving and ensure it remains a safe and reliable asset. A consistent routine of cleaning, inspection, and proper use is key.

Cleaning and Disinfection

Regular cleaning is essential for hygiene. For general cleaning, use a soft cloth and a mild detergent. For disinfection, follow protocols based on the shelf finish.

  • Chrome: Use mild soap and water. Avoid harsh or abrasive cleaners that can damage the finish.
  • Epoxy: Use a non-abrasive cleaner. Most common lab disinfectants are safe for epoxy coatings.
  • Stainless Steel: This material can withstand a wide range of disinfectants, including alcohol and diluted bleach. Always rinse thoroughly after using bleach.

Always refer to your facility’s safety guidelines and the Safety Data Sheet (SDS) for any cleaning agent.

Corrosion Resistance and Reconfiguration

The finish you choose determines the shelf’s corrosion resistance. Stainless steel offers the highest level of protection, followed by epoxy. Chrome is suitable only for dry environments. Inspect shelves regularly for any signs of rust or damage to the coating. If you need to reconfigure your storage, the modular design of wire shelving makes it easy to adjust shelf heights or move entire units as your lab’s needs change over time.

Accessibility and Usability Considerations

When planning your shelving layout, consider accessibility for all lab personnel. Ensure that aisles are wide enough for easy passage, including for carts or mobility aids. A minimum of 36 inches is a good standard. Also, consider reach ranges. Place frequently used items on shelves between waist and shoulder height. For higher shelves, provide safe access with appropriate step stools or ladders.

Good accessibility also includes how information is presented. For example, a helpful alt text for an image of shelving might be: “A mobile lab wire shelving cart with four tiers used for organized storage of small laboratory equipment.” This description helps users with screen readers understand the image’s content and context.

Frequently Asked Questions

What is the weight capacity of a wire shelf?

A standard lab wire shelf typically holds between 600 and 800 pounds of evenly distributed weight. This capacity is for stationary units. Adding casters to create a mobile unit will reduce the total capacity, so always check the manufacturer’s specifications.

How do I adjust the shelf height?

Adjusting shelves is a simple, tool-free process. The vertical posts have grooves at one-inch intervals. Plastic split sleeves snap onto these grooves, and the shelf slides down over them to lock in place. To adjust, simply lift the shelf, reposition the sleeves, and lower the shelf back down.

Can wire shelving be used in a cleanroom?

Yes, wire shelving is well-suited for cleanrooms, but the material is important. Stainless steel and epoxy-coated shelving are the best choices because their non-porous surfaces do not shed particles. The open-wire design also supports the laminar airflow required in sterile environments.

Which finish is best for rust prevention?

For wet or humid environments like cold rooms or glass wash areas, stainless steel offers the best protection against rust and corrosion. Epoxy-coated shelving is another excellent option that provides a durable barrier against moisture.

Can I use accessories from different brands?

It is not recommended. Minor differences in post diameter or collar design between brands can result in an unstable and unsafe unit. Always use accessories from the same manufacturer as your shelving to ensure a secure fit.

How is stationary shelving anchored?

For safety, stationary units can be anchored to a wall using L-brackets or secured to the floor with footplates. Anchoring is especially important in seismic zones or on uneven floors to prevent tipping.

What are the most popular accessories?

The most common accessories for lab wire shelving include shelf ledges to prevent items from falling, dividers to organize supplies, casters for mobility, and label holders for clear identification.

A mobile lab wire shelving cart with multiple tiers being used for organized storage of small laboratory equipment.
Wire shelving carts provide mobile solutions for transporting materials between workstations.

Get the Right Shelving for Your Lab

Lab wire shelving is a versatile, efficient, and cost-effective storage solution for almost any laboratory. Its open design promotes cleanliness and airflow, while its modularity provides the flexibility needed to adapt to changing research demands. From general supply storage to specialized applications in cold rooms and cleanrooms, there is a wire shelving configuration to meet your needs.

Labs USA can help you plan the perfect storage layout. We offer design support, quick quotes, and a wide inventory of quick ship options to get your lab organized faster. Explore our products or reach out to our team for personalized assistance.

Ready to improve your lab’s storage? Compare your lab wire shelving options today or contact us to request a quote.

Contact Labs USA

Do you have questions about planning your laboratory storage? Our team is here to help with everything from initial design and budgeting to final product selection. Whether you need a single shelving unit or a complete lab furniture overhaul, we have the expertise to guide you.

Get in touch with us to discuss your project requirements. You can reach our specialists through the Labs USA contact page for prompt and professional assistance.

Who This Is For

Our lab wire shelving solutions are ideal for:

  • Laboratory directors
  • Facility architects
  • University science departments
  • Pharma/biotech companies
  • Hospital labs
  • Government research facilities

Frequently Asked Questions About Lab Wire Shelving

What type of lab shelving is best for my needs?

Wire shelving works well for general lab storage and allows air and light to pass through. Solid steel shelving is better for small items and fine powders. Stainless steel is required for cleanroom applications.

Is the shelving adjustable?

Yes, most lab shelving systems have adjustable shelf heights that can be changed in 1-inch increments without tools. This allows you to customize the setup as your storage needs change.

Do you offer NSF certified shelving?

Yes, we carry NSF certified wire shelving for labs that require food-grade or clinical compliance. NSF shelving meets sanitation standards for healthcare, pharmaceutical, and food handling environments.

Related Resources

Need Help? Get a Free Quote

Labs USA can help you find the right solution. Call (800) 236-5657 or email sales@labs-usa.com to speak with a product specialist. We provide free quotes, layout assistance, and expert recommendations.

Ready to Get Started?

Labs USA offers free design services, fast delivery, and expert installation on all lab furniture and equipment.

Request a Free Quote Call (801) 899-0881