Biological Safety Cabinet vs Fume Hood: Quick Comparison

When you're outfitting a lab, one of the first and most critical safety decisions you'll make is choosing between a biological safety cabinet and a fume hood. It's a common point of confusion, but the distinction is simple and crucial.

A biological safety cabinet (BSC) is built to protect you, your work, and the environment from biological hazards like bacteria and viruses. In contrast, a chemical fume hood is designed with one job in mind: to protect you from breathing in hazardous chemical fumes. Getting this choice wrong doesn't just risk your results—it puts your health on the line.

Your First Critical Lab Safety Decision

The right decision starts with understanding what, exactly, you need to protect. A fume hood’s sole purpose is preventing you from inhaling dangerous vapors. It pulls air from the room, across your workspace, and vents it directly outside.

A biological safety cabinet, on the other hand, is a far more complex piece of engineering designed for triple protection: safeguarding the user (personnel), the experiment (product), and the surrounding area (environment) from contamination with biological agents. That core difference dictates every other aspect of their design, from airflow to filtration.

A scientist working in a modern laboratory with safety equipment like a biological safety cabinet and a fume hood.

This difference in protection comes down to fundamentally different mechanics. BSCs rely on HEPA filters to scrub microscopic biological particles from the air, a feature fume hoods simply don't have. The demand for this specialized equipment is clear, with the global BSC market valued at USD 202.5 million in 2023 and still growing. You can read more about what’s driving the growth in the BSC market here.

The rule of thumb I always tell people is this: Fume hoods are for chemistry; biological safety cabinets are for biology. Using one for the other's job isn't just bad practice; it's a major safety failure waiting to happen.

To break it down even further, here's a quick side-by-side look at the most important differences.

Quick Look: Biological Safety Cabinet vs Fume Hood

This table cuts right to the chase, outlining the fundamental differences between these two essential pieces of lab equipment. It’s a great starting point for figuring out which one fits your specific application.

Feature Biological Safety Cabinet (BSC) Chemical Fume Hood
Primary Protection Personnel, Product, & Environment Personnel Only
Primary Hazard Type Biological (e.g., bacteria, viruses, cell cultures) Chemical (e.g., acids, solvents, volatile compounds)
Air Filtration HEPA-filtered intake and/or exhaust No filtration; exhausts air directly outside
Airflow Pattern Laminar, sterile airflow over the work surface Inward flow of unfiltered lab air
Recirculation Can recirculate HEPA-filtered air (Class II A) No recirculation; 100% exhaust to exterior
Typical Use Sterile cell culture, microbiology, infectious agents Acid digestion, organic synthesis, handling volatile chemicals

As you can see, while they might look similar from a distance, their functions are worlds apart. Choosing correctly is the first step in building a safe and effective laboratory environment.

Comparing the Core Protection Goals

To pick the right piece of equipment, you first have to ask a simple question: what am I trying to protect? When we talk about lab safety, we’re really talking about a “protection triangle” with three points: the personnel (you), the product (your sample or experiment), and the environment (the lab itself and the outside world).

The entire debate between a biological safety cabinet vs fume hood comes down to how each unit handles this triangle. Getting this part wrong isn't just inefficient—it can be dangerous.

A scientist working in a laboratory, showing the need for proper safety equipment like a biological safety cabinet or a fume hood.

A chemical fume hood is a one-trick pony, but it's a trick it does exceptionally well. Its sole purpose is personnel protection. Everything about its design is engineered to pull hazardous chemical fumes, noxious vapors, and powders away from the person standing in front of it and vent them safely outside the building.

The downside? A fume hood offers absolutely zero product protection. The unfiltered room air it sucks across the work surface is a one-way ticket to contamination for any sterile sample. If you tried to work on a sensitive cell culture in a fume hood, you’d be introducing every airborne particle and microbe from the lab directly into your experiment.

Biological Safety Cabinet Protection Goals

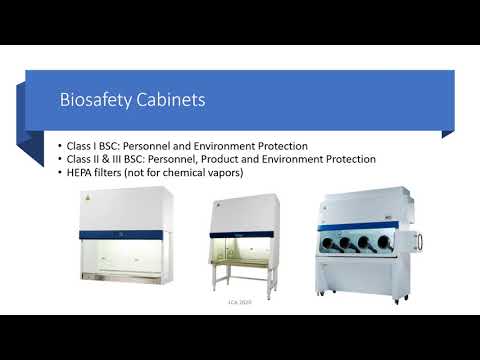
On the other hand, a biological safety cabinet (BSC) is built to be a comprehensive guardian, protecting all three corners of the safety triangle. BSCs are defined by their use of high-efficiency particulate air (HEPA) filters, which scrub biological contaminants out of the air. This creates a sterile workspace for your sample while also containing any infectious agents you're working with.

Not all BSCs are created equal, though. The class of the cabinet determines its specific protection profile:

  • Class I BSCs: These protect the user and the environment, but not the product. Think of them as a step up from a fume hood for biological work where sample sterility isn't the main concern.

  • Class II BSCs: This is the workhorse you’ll find in most labs. It protects personnel, product, and the environment by using a curtain of HEPA-filtered air to both create a sterile work zone and prevent contaminants from escaping.

  • Class III BSCs: Often called glove boxes, these provide the absolute maximum level of containment for all three elements. They are completely sealed and are reserved for the most high-risk pathogens.

A fume hood protects the user from the experiment. A Class II biological safety cabinet protects the user from the experiment, the experiment from the user, and the lab from the experiment. This multi-layered defense is what makes it indispensable for biological work.

Practical Scenarios Defining Protection Needs

Let's put this into practice. The right choice becomes obvious when you look at the actual work being done. Here are two real-world lab procedures that perfectly illustrate the critical differences in a biological safety cabinet vs fume hood showdown.

Scenario 1: Acid Digestion for Metals Analysis

  • The Hazard: Working with concentrated nitric and hydrochloric acids, which give off highly corrosive and toxic fumes.

  • The Priority: Keeping the chemist from breathing in those dangerous vapors. It’s all about personnel safety.

  • The Right Tool: A chemical fume hood, no question. Its powerful airflow is designed specifically to pull those heavy acid fumes away from the user and exhaust them outside. Putting this procedure in a BSC would be a huge mistake—the acid vapors would destroy the HEPA filters and could even be recirculated back into the lab.

Scenario 2: Culturing Human Stem Cells

  • The Hazard: Twofold—the risk of airborne microbes contaminating the delicate cell line, and the small but real biohazard risk to the user from aerosols.

  • The Priority: Protecting the cells from contamination (product protection) is just as important as protecting the researcher from any potential biohazards (personnel protection).

  • The Right Tool: A Class II biological safety cabinet. Its sterile, HEPA-filtered airflow is the only way to guarantee the aseptic conditions needed for cell culture. At the same time, its protective air curtain ensures any aerosols created are captured by the filtration system, not inhaled by the user. A fume hood would instantly contaminate the culture.

These examples drive the point home: the choice isn't about which is "better." It's about which tool provides the exact protection your specific application demands.

How Airflow and Filtration Mechanics Differ

The most fundamental difference between a biological safety cabinet vs fume hood boils down to how each machine manages air. On the outside, they can look surprisingly similar, but their internal engineering is built for completely opposite goals. Getting these mechanics right isn't just a technical detail—it's the bedrock of your lab's safety.

A chemical fume hood is all about brute force ventilation. Its job is to protect you, the user, from breathing in harmful chemical vapors. It does this by pulling a huge volume of air from the lab room, dragging it across the work surface, and shoving it straight into an exhaust duct.

This powerful inward rush of air acts as a barrier, keeping hazardous fumes contained within the hood and away from your face. The contaminated air is then piped directly out of the building and released, where it gets diluted by the atmosphere. There's no fancy recirculation and usually no filtration; the simple goal is to get the bad stuff out of the room.

The Fume Hood's Simple Approach to Air Management

The engineering behind a ducted fume hood is beautifully straightforward. Its main safety benchmark is face velocity—the speed of the air being sucked into the front opening. If that velocity is high enough, chemical fumes are captured before they can escape.

This robust design makes it a non-negotiable piece of equipment in any lab handling volatile solvents, strong acids, or toxic powders. It's a workhorse for personnel protection against chemical threats, and the global fume hood market is expected to jump from USD 3.17 billion in 2024 to USD 4.5 billion by 2035. You can dig into more data on the fume hood market's expansion to see just how critical these units are.

But this simple, powerful airflow has one major blind spot. Because it pulls unfiltered room air directly over your work, it offers zero protection to your experiment. Any dust, microbes, or other airborne junk floating around the lab gets sucked right onto your samples. This makes fume hoods totally wrong for any work that needs a sterile environment.

The Intricate Airflow of a Biological Safety Cabinet

A Class II Biological Safety Cabinet, on the other hand, operates with surgical precision. It uses a complex, controlled ballet of HEPA-filtered air to provide three layers of protection at once: for you, your product, and the environment.

It all starts at the front grille, where room air is pulled in to create an air curtain. This invisible barrier is the first line of defense, preventing any contaminated aerosols generated inside from escaping. This incoming air immediately mixes with the air inside the work zone and gets pulled down through the grilles.

From there, the air is sent through internal ductwork to a HEPA filter, where the magic happens:

  • Recirculated Air: A large portion of this freshly cleaned air, typically 70% in a Class II, Type A2 cabinet, is pushed back down into the work area. This creates a sterile, vertical, laminar flow—an "air shower"—that constantly bathes your samples in clean air, protecting them from contamination.

  • Exhaust Air: The other 30% of the air is pushed through a second HEPA filter before being exhausted out of the cabinet. This ensures no hazardous biological particles are released back into the lab or the outside world.

Fume hoods dilute and remove, while BSCs filter and contain. This single distinction captures the core operational difference and dictates which applications are safe for each unit.

To get a clearer picture of these distinct operational goals, let's break down how their mechanics line up side-by-side.

Operational Mechanics Airflow and Containment

Operational Aspect Biological Safety Cabinet (Class II) Chemical Fume Hood (Ducted)
Primary Goal Protect personnel, product, and environment from biohazards. Protect personnel from chemical fumes, vapors, and dust.
Air Intake Room air enters through a front grille to create a protective air curtain. Room air is drawn in through the entire front sash opening.
Internal Airflow Complex, controlled pattern. Air is recirculated and exhausted. Simple, one-way path. All air is exhausted directly.
Air Treatment All recirculated and exhausted air passes through HEPA filters. No filtration. Air is exhausted directly outside the building.
Product Protection High. Work area is continuously bathed in HEPA-filtered, sterile air. None. Unfiltered room air is pulled directly over the work surface.
Containment Method Uses an air curtain, HEPA filtration, and controlled airflow to contain particulates. Uses high face velocity to capture and remove chemical vapors via exhaust.
Exhaust 30% of air is HEPA-filtered before being exhausted (can be ducted or recirculated to the room). 100% of air is ducted outside the building without filtration.

This table makes it obvious: these are two fundamentally different machines designed for entirely different hazards. One is a containment device for tiny particles, while the other is a ventilation device for gases and vapors.

Filtration Systems Are Not Interchangeable

One of the most dangerous mistakes in a lab is assuming a filter is just a filter. The systems in BSCs and ductless fume hoods are engineered for completely different targets. Mixing them up is a recipe for a serious safety incident.

HEPA (High-Efficiency Particulate Air) Filters:
These are the heart and soul of a BSC. HEPA filters are masters at capturing physical particulates, grabbing 99.97% of particles down to 0.3 microns. They are incredibly effective at trapping bacteria, viruses, and spores. However, they are useless against chemical gases and vapors, which will pass right through them as if they weren't even there.

Activated Carbon Filters:
These are what you'll find in ductless fume hoods, and they work by adsorption. The vast, porous surface area of the carbon traps chemical molecules. They work well for specific organic vapors or solvents but have a limited lifespan and do absolutely nothing to stop biological particulates. Using a ductless hood for infectious agents would be like trying to catch mist with a chain-link fence.

Navigating Regulatory and Certification Standards

Choosing between a biological safety cabinet and a fume hood isn't just about function; it's a serious commitment to strict regulatory and certification standards. This isn't optional paperwork. Compliance is a non-negotiable requirement that proves your equipment is performing exactly as designed and giving your team the protection they count on. Getting these standards right is fundamental to running a safe and reliable lab.

For any lab working with biological agents, the gold standard is NSF/ANSI 49. This is the definitive rulebook for the design, construction, and performance of biological safety cabinets, ensuring they provide the necessary protection for personnel, the product, and the environment.

A scientist in a lab coat and gloves handling samples under a biological safety cabinet.

This standard goes hand-in-hand with the Biosafety Levels (BSLs) set by the CDC, which classify containment needs for various biological agents. For example, if you're doing BSL-2 work with moderately risky agents like Staphylococcus aureus, you absolutely need a Class II BSC that is certified to NSF/ANSI 49.

Standards Governing Chemical Fume Hoods

Chemical fume hoods play by a different set of rules, focusing exclusively on their ability to contain and exhaust chemical vapors. There's no single, all-encompassing design standard like NSF 49. Instead, their performance is confirmed through specific testing protocols.

You'll primarily run into two major standards:

  • ASHRAE 110: This isn't a design standard but a method for performance testing. It uses tracer gas tests to measure how well a fume hood contains vapors under real-world conditions.

  • SEFA 1: Developed by the Scientific Equipment and Furniture Association, this standard gives you the best practices for laboratory fume hood design, installation, and performance.

These standards confirm that a fume hood is doing its job—protecting the user from inhaling dangerous chemicals by validating things like face velocity and airflow patterns. Unlike a BSC's triple-protection focus, a fume hood's compliance is squarely aimed at personnel safety from chemical exposure.

Certification: What to Expect

Buying the unit is just the first step. Both BSCs and fume hoods need regular certification to stay compliant and operate safely. This is a critical point of difference, as their maintenance and validation processes are completely different.

Certification is the process that proves your equipment isn't just present in the lab—it's actively protecting your team. Skipping this step invalidates the very purpose of having a safety cabinet or fume hood in the first place.

For a BSC, certification is an annual and highly detailed affair. A certified technician will come in and perform a series of tests, including:

  1. HEPA Filter Integrity Test: This involves using an aerosol photometer to hunt for any leaks in the HEPA filters, guaranteeing 99.97% or greater particle capture efficiency.

  2. Inflow and Downflow Velocity Tests: Here, they verify that the protective air curtain and sterile downflow are moving at the correct speeds for both containment and product protection.

  3. Alarm and Interlock Checks: They'll make sure every safety alarm and interlock is fully functional.

A fume hood's certification, also typically done annually, is a bit more straightforward but just as crucial. The main test is measuring the face velocity—the speed at which air is pulled into the hood. This check ensures there's a steady inward airflow, usually between 80-120 feet per minute (FPM), to effectively capture and exhaust fumes.

Ultimately, mastering these standards is a core responsibility for any lab manager. It ensures the equipment you depend on delivers the protection it promises, safeguarding both your team and the integrity of your work.

Making the Right Choice with Practical Scenarios

Knowing the technical specs of a biological safety cabinet vs. a fume hood is one thing. Actually picking the right one for your specific lab work? That’s where safety really counts. Let's move from theory to the bench and walk through a few common procedures to see how the choice becomes obvious once you break down the hazards.

Think of these examples as a mental checklist you can run through for your own protocols. It’s all about matching the protection to the risk.

A laboratory technician carefully handling samples inside a biological safety cabinet.

Scenario 1: Culturing Human Cells

Picture yourself in a BSL-2 lab, growing a human cell line for cancer research. You’re opening sterile flasks, pipetting media, and moving cells—all work that demands aseptic conditions. Your two big goals are keeping the culture pristine and protecting yourself from any potential biohazards.

  • Materials: Human cell line, sterile culture media, pipettes, and flasks.

  • Primary Risk: This is a two-way street. First, product contamination is a huge concern; a stray airborne fungus can ruin the whole experiment. Second, you have to worry about personnel exposure to aerosols from the human cell line, which you have to treat as a potential biohazard.

  • Required Protection: You need a sterile field to protect the cells and a barrier to protect yourself from the cells.

Recommendation: Class II Biological Safety Cabinet
A Class II BSC is the only way to go here. It’s built for this exact situation. The HEPA-filtered laminar downflow creates an ultra-clean work area, bathing your culture in sterile air. At the same time, the inflow air curtain at the front acts like a force field, sucking any aerosols you create into the filters before they can escape and expose you. Trying to do this in a fume hood would be a disaster—it would just pull dirty room air right over your sterile culture, guaranteeing contamination.

Scenario 2: Acid Digestion for Trace Metal Analysis

Now, let's switch gears to an environmental testing lab. Your task is to digest soil samples with concentrated nitric acid on a hot plate, prepping them for heavy metal analysis. The process kicks off some seriously corrosive and toxic chemical fumes.

  • Materials: Soil samples, concentrated nitric acid, and a hot plate.

  • Primary Risk: The danger here is all about personnel exposure. Inhaling those acid vapors can do real damage to your respiratory system. There are no biologicals involved, and the soil sample doesn't need to be kept sterile.

  • Required Protection: The single, critical goal is to keep the technician from breathing in hazardous chemical fumes.

Recommendation: Chemical Fume Hood
This is a textbook case for a chemical fume hood. Its powerful exhaust fan is designed specifically to pull heavy, nasty vapors away from your breathing zone and shoot them straight outside the building. Using a BSC for this would be a massive mistake. The HEPA filters won’t catch acid fumes, which would just damage the cabinet and get pumped right back into the lab.

The demand for both types of equipment is clear. The global market for laboratory hoods, which includes both BSCs and fume hoods, hit USD 2.6 billion in 2024. That growth shows just how seriously labs worldwide are taking safety. North America, in particular, makes up a 40.5% share of the biological safety cabinet market, reflecting the region's massive research infrastructure. For a deeper dive, you can check out more data on the laboratory hoods and enclosure market.

Scenario 3: Working with Volatile Chemicals and Biohazards

Finally, let's look at a tricky one that mixes hazards. Imagine a researcher using methanol—a volatile solvent—to pull a toxin out of a pathogenic bacterial culture. Here you have a BSL-2 agent right next to a flammable, toxic chemical.

  • Materials: Pathogenic bacterial culture (BSL-2) and methanol.

  • Primary Risk: You’re dealing with a double threat: personnel exposure to infectious aerosols from the bacteria and, at the same time, exposure to toxic chemical fumes from the methanol. On top of that, you still need to keep things sterile.

  • Required Protection: The gear has to protect the user from both biohazards and chemicals while also protecting the product.

Recommendation: Class II, Type B2 Biological Safety Cabinet
Your standard BSC won’t cut it; recirculating the air would just create a dangerous concentration of methanol vapors. A fume hood is out, too, since it offers zero protection from the bacteria. The right tool is a specialized Class II, Type B2 BSC. Often called a "total exhaust" cabinet, this unit HEPA filters all air and then vents 100% of it directly outside—just like a fume hood. It's the perfect hybrid solution for safely handling both biologicals and volatile chemicals, making it the clear winner in a complex biological safety cabinet vs fume hood decision.

Answering Your Top Lab Safety Questions

Even after you know the technical specs, real-world questions always pop up when you’re standing in the lab, about to start a new procedure. Sometimes the specific details of a protocol can make the choice between a biological safety cabinet and a fume hood feel a little murky. This section cuts through the confusion, tackling the most critical questions we hear from lab managers and researchers every day.

Can I Use a Fume Hood for Biological Work After Decontaminating It?

We get this question a lot, and it points to a dangerous misunderstanding. The answer is an emphatic no. A chemical fume hood can never, under any circumstances, substitute for a biological safety cabinet, no matter how well you clean it.

It all comes down to its core design. A fume hood is built to protect you by aggressively pulling contaminated air away from your face and shooting it outside. It has absolutely no HEPA filters designed to capture microscopic hazards like bacteria, viruses, or fungal spores. Any aerosols you generate would be sucked straight into the building's ductwork and released into the environment.

On top of that, the high-velocity, turbulent airflow inside a fume hood would destroy any attempt at sterile work. It’s made to pull things away, not to create a clean, predictable workspace. Using it for biologicals is a triple threat: it risks exposing personnel, releasing agents into the environment, and guaranteeing contamination of your samples.

What if My Work Involves Both Biohazards and Volatile Chemicals?

This is a classic problem in many labs, and it's a tricky one. You can't just pick a standard BSC or fume hood because neither is designed to handle both threats at once. The right answer really depends on the specific chemicals you're using.

Here's how we advise people to handle this scenario:

  • For trace amounts of non-volatile chemicals: If your protocol just involves tiny quantities of something mild, like a disinfectant, alongside a BSL-2 agent, a standard ducted Class II, Type A2 BSC can often work. The critical factor is that the chemical can't be volatile enough to become a hazard if a small amount gets recirculated.

  • For significant amounts of volatile or toxic chemicals: The moment you're working with volatile, flammable, or toxic chemicals in your biological process, you have to upgrade. The only safe option is a Class II, Type B2 biological safety cabinet. We often call this a "total exhaust" cabinet because it vents 100% of its HEPA-filtered air outside, behaving much like a fume hood. It gives you the sterile work zone of a BSC with the chemical vapor protection of a fume hood.

Never use a standard recirculating BSC (like a Type A2) for work with volatile chemicals. The chemical fumes can pass right through the HEPA filter and build up in the recirculated air. This creates a serious exposure risk for the operator and can even lead to a fire or explosion inside the cabinet.

Are Ductless Fume Hoods a Safe Alternative?

Ductless fume hoods, which use carbon filters to clean air before returning it to the lab, have a very specific and narrow purpose. They are not a catch-all replacement for a traditional ducted fume hood and are completely inappropriate for many common lab procedures.

Their safety is entirely dependent on the carbon filters doing their job perfectly. These filters work by adsorption and are only effective for a limited range of chemicals. They have a limited lifespan and require constant monitoring and replacement. If you're working with a mix of chemicals, unknown substances, or anything that carbon can't easily trap, a ductless hood becomes a serious liability. And for biological work? They are never an option.

What Are the Main Cost Differences Between a BSC and a Fume Hood?

Looking purely at the sticker price, a fume hood often seems like the cheaper choice. But that's not the whole story—not even close. When you look at the total cost of ownership, the picture gets a lot more complex.

A standard ducted fume hood is an energy hog. It's constantly pulling massive amounts of conditioned air—air your building just paid to heat or cool—and dumping it outside. This forces your HVAC system to work overtime, and those energy bills can easily surpass the initial cost of the unit over its lifetime.

On the other hand, a biological safety cabinet (especially a recirculating one) is much more energy-efficient because it reuses most of the air. But its upfront cost is higher, and you have to factor in mandatory annual certification and periodic HEPA filter replacements, which can run from hundreds to thousands of dollars. The most expensive unit is often the Class II, Type B2 BSC, since it combines the high purchase price and certification costs of a BSC with the heavy-duty HVAC demands of a ducted fume hood.

Biological Safety Cabinet Types: Find the right fit

Biological safety cabinets, often called BSCs, are highly specialized containment workstations designed to protect lab personnel, the delicate samples being worked on, and the surrounding environment from hazardous biological materials. They are categorized into three main biological safety cabinet types: Class I, Class II, and Class III, with each class offering a progressively higher level of containment for different risk scenarios.

Unpacking the Role of Biological Safety Cabinets

A scientist working carefully inside a biological safety cabinet

It’s best to think of a BSC not just as a piece of lab furniture, but as an advanced containment shield. It relies on a meticulously engineered airflow system to forge an invisible barrier between the scientist and any potentially harmful microorganisms. This is a world away from a standard chemical fume hood, which just pulls air away from the user without filtering it to protect the sample inside.

A BSC’s real magic lies in how it manages airborne contaminants. It uses a combination of inward airflow to protect the person working and a HEPA-filtered downflow to keep the product sterile. This two-pronged approach is essential for maintaining a clean work area while simultaneously stopping hazardous aerosols from escaping into the lab.

The Three Pillars of Protection

Every single BSC is engineered around three non-negotiable protection goals. Getting a handle on these pillars is the first step to choosing the right cabinet for your lab’s specific needs:

  • Personnel Protection: This is all about keeping the researcher safe from exposure to the biohazardous agents inside the cabinet. It’s accomplished by pulling room air into the front of the cabinet, creating a curtain that keeps contaminants away from the user.

  • Product Protection: This pillar focuses on stopping airborne contaminants from the lab from getting into the work area and ruining samples, cell cultures, or other sterile materials.

  • Environmental Protection: Finally, this ensures that any contaminated air from inside the cabinet is thoroughly cleaned by high-efficiency particulate air (HEPA) filters before it’s exhausted back into the room or vented outside.

A Critical Tool for Modern Labs

You really can’t overstate the importance of these devices. Globally, biological safety cabinets are the bedrock of safely handling hazardous materials. In fact, over 70% of laboratories depend on them to maintain biosafety. That growing reliance is reflected in the market, which stood at USD 189 million in 2024 and is forecast to climb to nearly USD 387 million by 2033.

The primary purpose of a BSC is to act as the main containment tool for working safely with infectious microorganisms. Its design creates a tightly controlled environment where precise airflow isolates and captures particles that could pose a danger.

How you organize the space around a BSC is also critical to its performance. Storing supplies on a sturdy, easy-to-reach wire shelf helps keep airflow paths clear and minimizes clutter that could disrupt the cabinet’s protective air curtain. Next, we'll dive into the specifics of each class—I, II, and III—and see how their unique designs map to different biosafety levels and lab duties.

Decoding Class I and Class II Cabinets

Scientist carefully handling samples inside a Class II biological safety cabinet.

When you step into the world of biological safety cabinets, you’ll find that Class I and Class II models are the ones you'll see most often. They are the backbone of countless labs, handling everything from basic research to diagnostics and production. While they both aim for containment, they get there in very different ways.

Getting these differences right is about more than just checking a compliance box. It’s about making sure your lab is set up for success with the best possible safety and workflow. Let’s break down how each of these cabinets works, starting with the original workhorse, the Class I.

Class I: The Original Guardian

Think of a Class I biological safety cabinet as the original guardian of lab personnel. Its design is straightforward but highly effective, focusing entirely on protecting you and the surrounding lab environment from whatever is inside the cabinet. It does this by pulling a continuous stream of room air into the cabinet, away from the operator.

This constant inward flow of air, called inflow, creates an invisible but powerful barrier. It makes sure any aerosols or tiny particles kicked up during your work are immediately sucked into the cabinet’s filtration system before they have a chance to escape.

But there’s an important tradeoff. Because unfiltered room air is flowing directly over your work surface, the Class I cabinet provides zero product protection. This means it’s a no-go for sensitive applications like cell culture or preparing sterile compounds, where keeping your samples pristine is paramount.

It's best used for:

  • Housing specific equipment like centrifuges or fermenters.

  • Procedures that generate aerosols but don't require product sterility.

  • General containment of low- to moderate-risk biological materials.

Class II: The Triple-Duty Workhorse

The Class II cabinet is where things get more sophisticated, evolving to deliver all three kinds of protection: personnel, product, and environmental. This incredible versatility is exactly why it’s the most common type of BSC you'll find in labs all over the globe.

So how does it do it all? Through a clever combination of protective inflow and HEPA-filtered downflow.

Picture an invisible, sterile air shower constantly washing down over your work area—that’s the downflow. At the same time, room air is pulled into the front grille, creating that protective inflow curtain just like in a Class I. This dual-airflow system keeps the user safe from aerosols, the product safe from contamination, and the exhausted air clean.

This all-in-one protection makes Class II cabinets essential. They are so dominant, in fact, that they command over 40% of the global market share. Their ability to safeguard the user, the experiment, and the lab makes them a fixture everywhere from basic research labs to major pharmaceutical facilities. You can dig deeper into the market data for these vital lab tools on MarketsandMarkets.com.

Because of their more complex design, Class II cabinets are broken down into several subtypes, each with a unique way of managing airflow.

Diving into Class II Subtypes

The key difference between Class II subtypes comes down to how they handle air—specifically, the ratio of air that gets recirculated inside the cabinet versus the amount that gets exhausted. Let's walk through the most common types you’ll encounter.

The table below gives a quick overview of the main players in the Class II family. We'll break down the specifics of each one right after.

Class II Biological Safety Cabinet Subtype Comparison

Subtype Air Recirculation Exhaust Method Best For
Type A2 Recirculates ~70% HEPA-filtered exhaust into the room (can be thimble-ducted) Most common BSL-1, BSL-2, and BSL-3 applications; minute amounts of volatile chemicals with proper exhaust.
Type B1 Recirculates ~30% Hard-ducted exhaust to the outside (~70%) BSL-2 or BSL-3 work with trace amounts of volatile toxic chemicals or radionuclides.
Type B2 Recirculates 0% Hard-ducted total exhaust (100%) to the outside Work with significant amounts of volatile toxic chemicals and radionuclides where recirculation is dangerous.

As you can see, the choice really boils down to whether your work involves volatile chemicals and, if so, how much.

Class II, Type A2

The Type A2 is the undisputed champion of versatility and the most widely used BSC in clinical and research labs. It typically recirculates about 70% of the HEPA-filtered air back over the work surface (the downflow) and exhausts the remaining 30% back into the lab through another HEPA filter.

Because it can be ducted to the outside via a thimble connection, the Type A2 cabinet is suitable for work with minute quantities of volatile chemicals if properly exhausted. This flexibility makes it an ideal choice for a wide range of BSL-2 applications.

Class II, Type B1

The Type B1 cabinet strikes a different balance. It exhausts a much higher percentage of air—around 70%—and recirculates only 30%. Crucially, the exhausted air is hard-ducted directly to the outside of the building. This makes it a better option when you're working with trace amounts of toxic chemicals or radionuclides alongside your biological agents.

Class II, Type B2

For maximum chemical safety in a BSC, the Type B2 is the gold standard. It’s a total exhaust cabinet, which means 100% of the air is HEPA-filtered and ducted outside the lab; absolutely none of it is recirculated. This design prevents any buildup of chemical vapors inside the cabinet and the lab, making it essential for any procedure that involves significant amounts of volatile toxic chemicals.

Class III Cabinets for Maximum Containment

A Class III biological safety cabinet showing the sealed glove ports and pass-through chamber.

When you're dealing with the world's most dangerous pathogens, there's absolutely no room for error. This is the world of the Class III biological safety cabinet, the peak of personnel, product, and environmental protection. These aren't just cabinets; they are fully sealed, gas-tight containment systems.

Think of a Class III BSC as a high-tech isolation chamber or a "laboratory in a box." Its most defining feature is the absolute physical barrier it creates between the scientist and the hazardous materials. All manipulations happen through heavy-duty, arm-length rubber gloves built right into the cabinet's view screen.

This setup completely eliminates any chance of direct contact. It’s the ultimate expression of containment, reserved for work that carries the highest possible risk.

Advanced Filtration and Negative Pressure

The integrity of a Class III cabinet is locked down by a sophisticated airflow system. Unlike any other BSC, supply air enters through one HEPA filter, but the exhaust air is scrubbed by two HEPA filters in series before it's ever released outside. That double-filtration system creates critical, redundant safety.

On top of that, the entire cabinet is kept under significant negative pressure—at least 0.5 inches of water gauge—compared to the lab around it. This means that even if a leak were to somehow occur, air would rush into the cabinet, not out, preventing any hazardous aerosols from escaping.

A Class III cabinet is essentially a primary containment enclosure designed to be completely gas-tight. All materials are transferred into and out of the work area through a pass-through box that can be decontaminated, maintaining the sterile and contained environment at all times.

Reserved for Biosafety Level 4 Pathogens

Because of their uncompromising design, Class III cabinets are the exclusive tool for work with Biosafety Level 4 (BSL-4) agents. We're talking about dangerous and exotic pathogens that pose a high risk of aerosol-transmitted infections, are often fatal, and frequently have no available treatments or vaccines.

BSL-4 agents include some of the most infamous viruses known to science:

  • Ebola virus

  • Marburg virus

  • Lassa fever virus

  • Various hemorrhagic fever viruses

These cabinets are the cornerstones of high-containment labs focused on public health, biodefense, and emerging infectious diseases. The need for these facilities is undeniable; the global count of high-containment labs that rely on Class III BSCs or similar systems now tops 10,000. You can dive deeper into the growing demand and market dynamics in the full biological safety cabinets market report.

Working in a Class III cabinet requires incredibly strict protocols and serious training. Every single step, from introducing samples to disposing of waste, is meticulously planned to maintain absolute containment and protect researchers and the public from the most formidable biological threats.

Matching Cabinet Types to Biosafety Levels

Picking the right biological safety cabinet isn't just a matter of checking a box—it's the single most important decision you'll make for the safety and compliance of your lab. It all comes down to aligning your cabinet's capabilities with the risk level of the biological agents you're working with. This is where Biosafety Levels (BSLs) come into play.

Think of BSLs as a four-tiered system of containment, with each level building on the last. BSL-1 is for the microbes we understand well and that pose little risk, while BSL-4 is reserved for the world's most dangerous pathogens. Getting this match right isn't just a good idea; it's a non-negotiable rule in any lab.

This is especially true for the biggest players in the field, like pharmaceutical and biopharma companies. They make up over 40% of the market share and rely on these advanced containment systems to protect their people and their groundbreaking research. You can learn more about the market forces driving demand for these advanced containment solutions.

Biosafety Level 1: The Foundation of Safety

Biosafety Level 1 (BSL-1) is where it all starts. This level is for work with well-known agents that aren't known to cause disease in healthy adults—think non-pathogenic strains of E. coli or even chickenpox. The risk to lab staff and the environment is minimal.

Lab practices here are pretty basic, focusing on fundamentals like handwashing and wearing standard personal protective equipment (PPE).

For most BSL-1 work, you don't even need a BSC. Procedures can often be done safely on an open bench. But if there's any chance of creating aerosols, it’s a good practice to use a Class I or Class II cabinet for an extra layer of safety.

Biosafety Level 2: The Standard for Moderate Risk

Biosafety Level 2 (BSL-2) raises the bar for agents that pose a moderate hazard. We're talking about pathogens often linked to human diseases, like Hepatitis B, HIV, and various staph infections.

Here, the primary risks are accidental needlesticks, ingestion, or contact with mucous membranes. Because the risk is higher, lab access is more restricted, and everyone inside needs to wear enhanced PPE.

When it comes to BSL-2 work, there's a hard and fast rule: any procedure that could create infectious aerosols or splashes must be done in a Class II biological safety cabinet. It delivers the crucial combination of personnel, environmental, and product protection that you simply can't get on an open bench.

Biosafety Level 3: Containing Serious Threats

Biosafety Level 3 (BSL-3) is for labs handling indigenous or exotic agents that can cause serious, even lethal, disease if inhaled. This includes pathogens like Mycobacterium tuberculosis (which causes TB), West Nile virus, and SARS-CoV-2.

Since the biggest threat is aerosol transmission, the entire facility has to be designed for containment, with features like self-closing doors and specialized ventilation that creates directional airflow.

The cabinet requirements get much more stringent:

  • All procedures involving BSL-3 agents must be performed inside a Class II or Class III biological safety cabinet.

  • The most common choices are ducted Class II Type A2 cabinets or any of the Type B models, which provide the high level of containment required.

Biosafety Level 4: The Peak of Containment

Biosafety Level 4 (BSL-4) represents the absolute highest level of biocontainment. This is reserved for the most dangerous and exotic pathogens that pose a high risk of life-threatening disease, often with no vaccines or treatments available. Think Ebola and Marburg viruses.

The facility is completely isolated, almost like a building within a building, with incredibly complex ventilation and waste management systems. Researchers must wear full-body, air-supplied positive-pressure "space suits."

At this pinnacle of safety, there's no room for compromise. All work with BSL-4 agents must be conducted in a Class III biological safety cabinet, which provides a gas-tight, absolute physical barrier between the scientist and the pathogen.

To make it simple, we've put together a quick reference table that maps each Biosafety Level to the cabinets you should be using. This matrix helps you see at-a-glance which BSC types meet the safety requirements for the agents you handle in your lab.

Biosafety Level (BSL) and Required Cabinet Matrix

Biosafety Level Agent Risk Recommended/Required BSC Type
BSL-1 Low risk; not known to consistently cause disease in healthy adults. Not required, but a Class I or Class II can be used if aerosols may be generated.
BSL-2 Moderate risk; associated with human disease. Class II is required for any work with the potential to create infectious aerosols.
BSL-3 High risk; can cause serious or lethal disease through inhalation. All work must be performed in a Class II (ducted Type A2, B1, B2) or Class III cabinet.
BSL-4 Extreme risk; dangerous/exotic agents with high risk of life-threatening disease. All work must be performed in a Class III cabinet.

Ultimately, matching the right cabinet to the BSL is the foundation of a safe lab. This table ensures you’re not just guessing but making an informed decision that protects your team, your research, and the surrounding community.

Installation and Maintenance Best Practices

A technician in protective gear certifying a biological safety cabinet.

Picking the right biological safety cabinet is just the first step. To get the protection you're paying for, you absolutely have to get the installation and maintenance right. A BSC isn't just another piece of lab equipment; it's a precision instrument, and its performance depends entirely on where you put it and how you take care of it. This is where the rubber meets the road—turning your careful selection into real-world safety.

The single biggest factor during installation is its location. Think of that protective air curtain at the front of the cabinet as a delicate, invisible bubble. Anything that creates a draft can burst that bubble and compromise containment. A door swinging open, someone walking by too quickly, or even an HVAC vent blowing nearby can put your team at risk.

Placement is non-negotiable for safety. A biological safety cabinet should always be installed in a low-traffic area, away from doorways, open windows, and HVAC supply vents to prevent disruptive air currents that can compromise the protective air curtain.

Getting this right isn't just a suggestion; it's a global standard. North America, for instance, leads the market with over a 30% share, driven by a strong focus on healthcare infrastructure and safety. The U.S. alone accounted for about USD 68 million of the market in 2023, largely because of strict regulations that demand correct installation and upkeep. You can see more on these trends in this comprehensive market forecast.

Understanding Exhaust and Ducting

For many Class II cabinets, especially if you're working with volatile chemicals, the exhaust system is a critical safety feature. How you connect that cabinet to your building's HVAC system makes all the difference. There are two main ways to do it.

  • Thimble-Ducted Connection: This setup uses a small gap between the cabinet's exhaust port and the building's ductwork. It’s perfect for Type A2 cabinets handling tiny amounts of chemicals, as it lets the lab’s HVAC system stay balanced while still venting the filtered air outside.

  • Hard-Ducted Connection: This is a must for Type B1 and B2 cabinets. It creates a direct, sealed link to the building's exhaust, ensuring that 100% of any hazardous chemical vapors are pulled straight out of the building with no chance of re-entering the lab.

The Mandate for Professional Certification

A biological safety cabinet is not a plug-and-play device. Its performance must be verified by a qualified professional according to standards like NSF/ANSI 49. Certification isn't optional—it's mandatory when the cabinet is first installed and then at least once a year after that.

During certification, a technician runs a series of tests on critical functions:

  • Inflow and Downflow Velocities: Making sure the air curtain is strong enough and the work area stays sterile.

  • HEPA Filter Integrity: A smoke test to check for any leaks that could let contaminants escape.

  • Alarm Functions: Confirming that the safety alarms for airflow failure are actually working.

This whole process guarantees your cabinet is operating within its safety limits and gives you a documented record of compliance. Never, ever assume a cabinet is safe to use unless it has a current certification sticker from an accredited professional.

Simple Steps for Daily Upkeep

While the annual certification is the big one, the daily habits of your team play a huge part in a cabinet's long-term performance and safety. A simple routine can prevent a world of problems. Before and after every single use, wipe down all interior surfaces with the right disinfectant, always moving from the clean areas to the dirty ones.

Organization inside the cabinet matters, too. Keep your essential supplies neatly arranged on a dedicated wire shelving unit with bins to avoid cluttering the air grilles, which can mess with the airflow. At the end of the day, close the sash completely and run the UV light (if you have one) for decontamination—but only after everyone has left the area for the night.

Your Checklist for Selecting the Right BSC

Picking the right biological safety cabinet is a huge decision. It's not just about the budget; it's about the safety of your team and the integrity of your work. To sidestep any costly mistakes, a solid risk assessment is non-negotiable.

This final checklist boils everything down into a few practical questions. Think of it as your step-by-step guide to systematically figuring out exactly what you need.

Assess Your Biological Agents

First things first: what are you working with? The answer to this question drives the entire decision. The risk level of your agents determines the level of containment you absolutely must have.

  • What is the Biosafety Level (BSL) of your agents? This is the bedrock question. BSL-1 agents might not even need a BSC. If you're generating aerosols with BSL-2 materials, a Class II cabinet is mandatory. BSL-3 or BSL-4 work? That requires the serious containment of a ducted Class II or a Class III cabinet.

  • Do you need to protect your product from contamination? If you're dealing with cell cultures, sterile media, or anything sensitive to outside contaminants, you need product protection. This immediately takes Class I cabinets off the table and points you straight to a Class II or Class III model.

Evaluate Your Chemical Usage

Lots of lab work is a mix of biology and chemistry. If you're using volatile or hazardous chemicals alongside your biological agents, this becomes a critical factor that will quickly narrow your choices, especially within the Class II subtypes.

The single biggest differentiator between Class II subtypes is how they handle chemical vapors. Recirculating cabinets (like Type A2) are not suitable for significant chemical work, as vapors can build up to dangerous levels.

  • Will you work with volatile toxic chemicals or radionuclides? If yes, the next question is how much.

  • Trace Amounts: A Class II, Type B1 cabinet could be a good fit. It exhausts around 70% of its air, which can handle small amounts safely.

  • Significant Amounts: For anything more than trace quantities of volatile chemicals, you have to go with a Class II, Type B2 "total exhaust" cabinet. It ensures zero contaminated air is recirculated back into the lab.

Consider Your Facility and Workspace

Finally, let's get practical. The world's best BSC is useless if it doesn't fit in your lab or if your building can't support it.

  1. What are your spatial constraints? Get out the tape measure. Check the footprint and, just as importantly, the ceiling height to make sure the cabinet will physically fit. Don't forget to think about the people who will be standing in front of it all day—ergonomics matter.

  2. What are your building’s ventilation capabilities? Do you have the existing ductwork to hard-pipe a Type B cabinet to the outside? If your building's infrastructure can't support it, a ductless Class II, Type A2 cabinet might be your only realistic option.

  3. How will you organize your workspace? A cluttered workspace is a dangerous workspace, especially when it comes to airflow. Keep the area clear. Solutions like a bench rack bin organizer can help keep essential supplies handy without blocking the critical air grilles that make the cabinet work.

Got Questions About BSCs? We've Got Answers.

When you're dealing with something as critical as a biological safety cabinet, a few questions are bound to come up. In fact, it's a good thing—getting the details right is what keeps your lab, your people, and your work safe.

Let's clear up some of the most common points of confusion.

Class II A2 vs. B2: What's the Real Difference?

This is probably the number one question we get. The short answer? It’s all about the airflow.

A Class II Type A2 cabinet is the workhorse for many labs. It recirculates about 70% of the HEPA-filtered air back into your workspace and exhausts the other 30%. This makes it a fantastic choice for general cell culture and microbiology, but it's not designed for significant chemical use.

Then you have the Type B2, which is in a league of its own. This is a 100% total exhaust cabinet. Absolutely 0% of the air is recirculated; every bit of it is filtered and vented directly outside the building. This design means hazardous vapors can't build up, making the B2 the only safe option if your work involves more than just trace amounts of volatile toxic chemicals.

Can I Just Use a Fume Hood Instead?

Another frequent question, and the answer is always a hard no. It's easy to confuse the two, but they serve completely different purposes. A chemical fume hood is built for one thing: protecting you, the user, from chemical fumes by aggressively pulling air away from you and shooting it outside.

That's it. There’s no product protection from contamination and no HEPA filters. Using one for biological work is a major safety risk.

Think of it this way: a biological safety cabinet uses HEPA-filtered air to create a sterile bubble, protecting the user, the product, and the environment. A fume hood is a one-way street, only protecting the user from chemicals. It's not safe for biologicals, period.

How Often Do I Need to Get My BSC Certified?

Certification isn't a "one and done" deal. It's a critical, ongoing process. A qualified technician must certify your cabinet right after it's installed, any time you move it (even just across the room), and at a minimum, annually after that.

This isn't just a suggestion; it's a mandatory safety check. The technician runs a series of tests to verify everything from airflow velocities to the integrity of the HEPA filters. This process confirms your cabinet still meets the strict NSF/ANSI 49 standards and is actually providing the protection you count on.

Stainless Steel Countertops for Laboratories

Stainless steel countertops are a key component in many advanced laboratories, from pharmaceutical cleanrooms to university research centers. They provide more than just a surface; they are a critical part of a controlled environment, valued for their durability and hygiene. Making the right choice in material grade, finish, and features is essential for safety, compliance, and long-term performance, especially when paired with integrated stainless steel casework.

This guide explains where stainless steel countertops excel and where other surfaces may be a better fit. It offers practical guidance for lab managers, architects, and facility teams on how to specify the right countertop for a complete laboratory system.

Quick Answer: Why Choose Stainless Steel Countertops?

Stainless steel countertops are the best choice when hygiene, heat resistance, and a non-porous surface are required for your laboratory.

  • Best Environments: Ideal for cleanrooms, sterile processing areas, pharmaceutical labs, and food science applications where microbial control is critical.
  • Common Grades: Grade 304 is the standard for most general lab work, offering excellent durability. Grade 316 is necessary for environments with chlorides, saline solutions, or harsh corrosive agents.
  • Main Watchouts: The material can be vulnerable to certain strong acids and chlorides. It can also scratch or dent under heavy impact.
  • Integration: These work surfaces are often specified with integral sinks and coved backsplashes to create a seamless, easy-to-clean system.

See stainless cabinet and counter options to explore a complete system.

How to Choose a Stainless Steel Countertop: 5-Step Checklist

Selecting the right stainless steel countertop involves a few key decisions. This checklist breaks down the process into five manageable steps to ensure you specify a surface that fits your lab’s needs and integrates with your facility.

A detailed shot of a stainless steel countertop edge profile in a laboratory.

1. Review Chemicals and Disinfectants

First, list all chemicals, cleaning agents, and disinfectants used in your lab protocols. Pay special attention to any products containing chlorides, which can cause corrosion over time. This information will determine if the standard Grade 304 is sufficient or if you need the enhanced corrosion resistance of Grade 316.

2. Check Cleanroom or GMP Requirements

If your lab operates under Good Manufacturing Practice (GMP) guidelines or must meet a specific ISO cleanroom classification, your choices are more defined. These standards often require features like seamless welded construction, coved backsplashes, and specific finishes to eliminate areas where microbes can grow. Ensure your selection meets all regulatory requirements.

3. Evaluate Heat, Impact, and Abrasion Needs

Next, consider the physical demands on the surface. Will heavy equipment be placed on it? Is there a risk of dropping heavy tools or samples? This assessment will help determine the necessary gauge (thickness) of the steel. A thicker gauge provides better resistance to dents and offers a more solid feel.

4. Specify Sink, Backsplash, and Welding Details

Now, define the fabrication details. Do you need an integral sink welded directly into the countertop for a seamless washing station? Is a coved backsplash necessary to contain spills and simplify cleaning? Specify details like welded corners, marine edges to contain liquids, and cutouts for services. These features are critical for creating a functional workspace that integrates with your lab casework.

5. Consider Budget, Lead Time, and System Integration

Finally, balance the upfront cost with the long-term value of a durable, low-maintenance surface. Consider how the countertops will fit with your base cabinets and any overhead shelving. Proper planning ensures that all components work together to create an efficient and professional lab environment.

Comparing Stainless Steel with Other Lab Surfaces

While stainless steel is an excellent choice for many labs, it is important to compare it against alternatives like epoxy and phenolic resin. Each material offers a unique set of strengths and weaknesses. Understanding these differences helps you make the right long-term investment for your facility.

Different samples of laboratory countertop materials, including stainless steel, epoxy resin, and phenolic resin, arranged for comparison.

Stainless Steel Countertops

When sterility and heat tolerance are essential, stainless steel is the standard. Its non-porous surface prevents microbial growth, making it easy to sanitize. This quality makes it a top choice in pharmaceutical labs, biological cleanrooms, and food science applications. It is often specified with matching stainless lab storage.

  • Strengths: Excellent heat resistance, non-porous, ideal for sterile environments, and highly durable.
  • Limitations: Can be damaged by chlorides and certain strong acids. It can also scratch or dent.
  • Best Uses: Cleanrooms, sterile processing areas, surgical suites, and labs requiring frequent high-temperature sterilization.
  • Cost/Lead Time: Mid to high-tier cost. Lead time depends on fabrication complexity.
  • Choose this if: Microbial control, heat resistance, and a sterile, non-porous work environment are your main concerns.

Epoxy Resin

Epoxy resin is known for its exceptional chemical resistance. It is a solid, one-piece material created by casting and curing a compound of resin, silica, and hardeners. The result is a durable slab suitable for demanding applications.

  • Strengths: Superior resistance to a wide range of chemicals, including acids, bases, and solvents. It also has good heat resistance.
  • Limitations: Can be scratched or chipped by sharp impacts. It is also very heavy, which affects the supporting casework.
  • Best Uses: Chemistry labs, research facilities, and environments with exposure to corrosive chemicals.
  • Cost/Lead Time: High-tier cost, often with longer lead times.
  • Choose this if: Your lab handles a diverse mix of aggressive chemicals and requires the highest level of chemical resistance.

Phenolic Resin

Phenolic resin countertops offer a practical and versatile option. They are made by pressing layers of kraft paper saturated with phenolic resin under high heat and pressure. The resulting surface is lightweight, durable, and chemical-resistant.

  • Strengths: Good all-around chemical and moisture resistance. It is also durable against wear and scratches.
  • Limitations: Does not perform as well as epoxy or stainless steel under sustained, extreme heat.
  • Best Uses: K-12 and university teaching labs, clinical labs, and general-purpose research facilities.
  • Cost/Lead Time: Mid-tier cost, generally more affordable than epoxy, with moderate lead times.
  • Choose this if: You need a durable, chemical-resistant surface for a general-purpose lab with a moderate budget.

Solid Surface or Ceramic

This category includes materials like modified acrylics and solid ceramics, chosen for their appearance and specific performance traits. They are less common in heavy-duty labs but are suitable for certain applications.

  • Strengths: Solid surfaces can be seamless and repairable if scratched. Ceramics offer extreme scratch and stain resistance.
  • Limitations: Solid surfaces have lower heat and chemical resistance. Ceramics can be brittle and may chip.
  • Best Uses: Light-duty labs, product testing areas, and spaces where appearance is a priority and chemical exposure is low.
  • Cost/Lead Time: Varies from mid to very high-tier, with custom fabrication affecting lead times.
  • Choose this if: Aesthetics, repairability, or scratch resistance are more important than broad chemical or heat resistance.

Comparison of Laboratory Countertop Materials

Material Heat Resistance Chemical Resistance Cleanability Microbial Resistance Impact/Dent Resistance Typical Use Cases Approx. Cost Tier Notes
Stainless Steel Excellent Good to Excellent Excellent Excellent Good Sterile, pharma, cleanrooms Mid to High Grade 316 for high chloride exposure.
Epoxy Resin Very Good Excellent Very Good Very Good Fair to Good Heavy chemistry, R&D High Very heavy material.
Phenolic Resin Good Good Very Good Very Good Excellent Teaching labs, clinical Mid Good balance of cost and performance.
Solid Surface/Ceramic Fair to Excellent Poor to Excellent Excellent Excellent Poor to Good Light-duty, aesthetic areas Mid to Very High Performance varies greatly by type.

Specifying Stainless Steel Countertops

Getting the specifications right is critical for performance and longevity. These details determine how well your countertops will withstand chemical spills, cleaning cycles, and daily use in a busy lab.

A close-up of a stainless steel countertop in a modern laboratory setting, highlighting its clean finish and integrated sink.

304 vs. 316 Grade Selection

The grade of stainless steel should be based on the chemicals used in your facility.

  • Type 304: The industry standard for most general lab applications. It offers excellent resistance to a wide range of common chemicals and is a cost-effective choice for labs without heavy chloride exposure.
  • Type 316: Contains molybdenum, which provides superior resistance to chlorides, saline solutions, and other corrosive agents. Specify Type 316 if your protocols involve bleach, deionized water, or saltwater.

Gauge and Finish Options

The steel’s thickness (gauge) and surface finish affect both durability and ease of cleaning. A lower gauge number means thicker, stronger steel.

  • Gauge: For most lab work, 16-gauge steel offers a good balance of durability and cost. For heavy equipment or high-impact areas, 14-gauge provides better dent resistance.
  • Finish: The #4 brushed finish is common in labs. Its uniform grain helps hide minor scratches and reduces glare. A matte or non-directional finish can also be used to conceal wear over time.

Fabrication Details

Proper fabrication transforms a sheet of metal into a high-performance work surface.

  • Sound-Deadening Underlayment: A core bonded to the steel’s underside dampens noise from equipment and adds rigidity.
  • Coved Backsplashes and Integral Sinks: A coved backsplash creates a smooth, curved transition from the countertop to the wall, eliminating corners where dirt can collect. An integral sink is welded into the countertop to form a seamless unit that is easy to sanitize.
  • Welded Corners: All corners should be fully welded and ground smooth to create a continuous, non-porous surface that prevents microbial growth. This is essential for cleanroom worktops and other GMP compliant surfaces.
  • Cleanroom Compatibility: These features make stainless lab countertops ideal for sterile environments. They are a core component of comprehensive stainless cleanroom furniture systems.

Integrating with Cabinets, Benches, and Shelving

Stainless steel countertops should be integrated with a complete laboratory furniture system. They can be paired with stainless steel or painted steel base cabinets, mobile bases, or adjustable frames depending on the lab’s needs. Proper integration ensures a stable, functional, and cohesive workspace.

When planning your lab, consider how the countertops will work with different cabinet configurations and laboratory shelving systems. Sourcing all components from approved lab furniture vendors ensures compatibility and simplifies the installation process. A unified system, including matching stainless base cabinets, creates a professional and efficient lab environment.

Maintenance and Cleaning

Proper maintenance protects your investment and ensures your stainless steel countertops perform for years. Follow these simple guidelines for daily care and long-term upkeep.

  • Daily Cleaning: Wipe down surfaces with a soft cloth, water, and a mild detergent. Always clean in the direction of the metal’s grain to avoid swirl marks.
  • Compatible Disinfectants: Most common lab disinfectants, such as 70% isopropyl alcohol and quaternary ammonium compounds, are safe for stainless steel.
  • Avoid Chlorides: Avoid prolonged contact with chloride-based cleaners like bleach. If used, dilute the solution, rinse the surface thoroughly with clean water, and wipe it completely dry.
  • Remove Stains: “Tea staining” or minor discoloration can be removed with a specialized stainless steel cleaner.
  • Protect Against Dents: Avoid dropping heavy or sharp objects on the surface. Use cutting boards for any slicing or sharp tool work.
  • Periodic Inspection: Regularly check fasteners and welded seams to ensure they remain secure and intact, especially around sinks and integrated equipment.
  • 316 vs. 304: If frequent exposure to harsh disinfectants or corrosive agents is unavoidable, specifying Grade 316 from the start is the best long-term solution.

Following these practices will maintain the appearance and integrity of your stainless cabinet options and countertops.

Decision Scenarios and Use Cases

Connecting material specifications to real-world applications can simplify your decision. Here are common scenarios with countertop recommendations.

  • ISO-Rated Cleanroom with Frequent Sanitization: An ISO-rated cleanroom requires a sterile environment. Recommendation: Choose 316 stainless steel with fully welded corners, integral sinks, and coved backsplashes. This setup is part of a complete system of stainless cleanroom furniture.
  • High Chloride or Saline Environment: A marine biology lab works with seawater and is located near the coast. Recommendation: Grade 316 stainless steel is required to resist corrosion from chlorides. Standard 304 stainless would degrade in this environment.
  • Heavy Acid Use but Not Chloride-Rich: A university chemistry lab uses strong acids but few chlorides. Recommendation: Compare 304 stainless steel vs. epoxy resin. Epoxy offers broader chemical resistance for heavy acid use, but 304 stainless is a durable option for moderate use.
  • Teaching Lab with a Limited Budget: A general science lab for students needs a durable, multi-purpose surface. Recommendation: Consider phenolic resin. It offers a good balance of chemical resistance, durability, and cost for this type of environment.
  • Food and Beverage QA with Washdowns: A quality assurance lab requires hygienic surfaces that can withstand daily high-pressure washdowns. Recommendation: 304 stainless steel is the standard. Specify countertops with a slight slope and marine edges to manage water runoff and ensure easy cleaning.

Frequently Asked Questions

Here are answers to common questions about specifying and maintaining stainless steel lab countertops.

1. What is the main difference between 304 and 316 stainless for lab countertops?

The key difference is corrosion resistance. Type 304 is the industry standard for general lab use. Type 316 contains molybdenum, which provides superior resistance to chlorides, saline solutions, and harsh disinfectants. Choose 316 if your lab uses these agents regularly.

2. Are welded seams required around sinks?

Yes, for lab applications, welded seams are essential. An integral sink welded into the countertop creates a seamless, non-porous surface. This design eliminates gaps where bacteria can grow, making it easier to maintain a sterile environment.

3. Which disinfectants are safe for stainless counters?

Most common lab disinfectants, including 70% isopropyl alcohol and quaternary ammonium compounds, are safe. Avoid prolonged exposure to chloride-based cleaners like bleach. If you must use them, rinse the surface thoroughly with clean water and dry it immediately.

4. How can I avoid scratches and swirl marks?

Always clean in the direction of the metal’s grain, which are the faint parallel lines in a #4 brushed finish. Use a soft cloth and avoid abrasive scouring pads or powders. This simple technique helps minimize the appearance of minor scratches.

5. Can stainless counters be grounded for ESD?

Yes, stainless steel countertops can be grounded for Electrostatic Discharge (ESD) protection. A grounding wire connects the countertop to a common point ground, safely dissipating any static buildup to protect sensitive electronic components.

6. What thickness or gauge should I specify?

For most lab applications, 16-gauge stainless steel provides a good balance of durability and cost. If the countertop will support heavy equipment or is in a high-impact area, upgrading to a thicker 14-gauge is recommended for better dent resistance. Ensure the gauge is appropriate for the supporting stainless steel laboratory casework.

7. How do I source a complete laboratory system?

To ensure all components are compatible, it is best to work with established manufacturing partners who can supply an integrated system of countertops, casework, and shelving. This approach simplifies specification, procurement, and installation.

Conclusion

Stainless steel countertops are the ideal choice for laboratories where hygiene, durability, and resistance to heat and moisture are top priorities. Their non-porous surface is unmatched for sterile applications, cleanrooms, and GMP-compliant facilities. By carefully selecting the right grade, finish, and fabrication details, you can create a high-performance workspace that supports safe and efficient lab operations for decades.

Ready to find the right surface for your laboratory?

Laboratory Wood Casework: How It Compares to Steel and Specialty Options

Laboratory wood casework offers a distinct combination of aesthetics, acoustic performance, and cost-effectiveness for many lab environments. While steel is often considered the default, understanding where wood fits helps lab managers and specifiers make smarter decisions. For teaching labs, dry research areas, and instrument rooms, wood provides a durable and appealing alternative to metal or plastic systems, balancing performance with budget and design goals. Explore our full range of lab casework to see all available configurations.


Casework Comparison Snapshot

  • Choose Wood Casework for teaching labs, dry research spaces, instrument rooms, and office areas where aesthetics, noise reduction, and budget are key factors. It provides good performance in environments with light chemical and moisture exposure.

  • Choose Steel or Stainless Steel for wet labs, corrosive environments, or sterile spaces requiring frequent washdowns and harsh disinfection. Steel offers superior durability, while stainless steel provides the ultimate chemical and moisture resistance.

  • Choose Specialty Plastics or Phenolic Frames for areas with extreme humidity or constant exposure to a wide range of harsh chemicals where a non-metallic solution is preferred.

  • For detailed material criteria, review our casework specifications.


How to Choose Laboratory Casework in 5 Checks

Selecting the right casework material is a critical decision that impacts lab safety, workflow, and long-term budget. This five-step checklist provides a framework to match the material to the real-world demands of your facility.

1. Chemical and Disinfectant Exposure

First, identify all chemicals, solvents, and disinfectants used regularly. The type and frequency of exposure are the most important factors in your decision.

  • Light Exposure: For mild acids, bases, and standard cleaners, wood casework with a factory-applied chemical-resistant finish is a suitable and cost-effective choice.

  • Moderate to Heavy Exposure: If protocols involve frequent use of harsh solvents or aggressive disinfectants, painted steel provides a more durable surface.

  • Constant Harsh Exposure: For environments with continuous contact with corrosive agents, stainless steel or specialty phenolic casework is necessary.

Remember that the work surface takes the most abuse. Pairing wood base cabinets with durable phenolic work surfaces is a common strategy to enhance durability where it matters most.

2. Humidity and Moisture Control

Assess the ambient moisture conditions in your lab. Wood is more sensitive to humidity changes than steel or composite materials.

While modern wood casework performs well in labs with stable HVAC systems, it is not suitable for high-humidity areas, spaces around sinks with frequent splashes, or rooms requiring regular washdowns. In these cases, painted steel, stainless steel, or phenolic resin is the correct choice. The importance of phenolic resins is clear in these environments, as they are completely immune to moisture damage.

3. Impact, Abrasion, and Noise Considerations

Consider the physical demands of your lab. Will heavy carts bump into cabinets? How much noise can your workspace tolerate?

  • Noise Profile: Wood naturally dampens sound, creating a quieter work environment. This is a significant advantage in instrument rooms or open-plan labs where focus is essential.

  • Impact Resistance: Steel is very durable but its painted finish can chip, exposing the metal to potential rust. Wood is often more forgiving with minor impacts and is easier to repair cosmetically.

4. Flexibility and Reconfiguration Needs

Think about your lab's future. If you anticipate changes in workflow, equipment, or layout, choose a system that can adapt.

Traditional, fixed casework offers maximum stability but locks you into a single configuration. For labs that require agility, reconfigurable wood benches and mobile cabinets provide the flexibility to change layouts easily without major construction.

5. Budget, Lead Time, and Aesthetic Goals

Finally, align your technical requirements with project constraints. Wood casework generally has a lower upfront cost than stainless steel or phenolic systems.

From a design perspective, wood offers a warmer, less clinical appearance, which is often preferred in educational and some research settings. Lead times vary by material and customization, so confirm availability early in the planning phase to align with your project timeline.

Side-by-Side Analysis: Wood vs. Steel vs. Stainless vs. Specialty

Each casework material offers a unique profile of strengths and limitations. This direct comparison helps clarify which option best fits your lab's specific application, budget, and performance needs.

Wood Casework

  • What It Is: Cabinets and benches constructed from hardwood veneer plywood or industrial-grade particleboard, protected by a factory-applied, chemical-resistant UV finish.

  • Top Strengths: Excellent aesthetics, natural sound dampening, cost-effective, and easily repairable for minor cosmetic damage.

  • Limits: Not suitable for high-moisture, corrosive, or sterile environments requiring frequent washdowns. Performance depends heavily on the integrity of the finish.

  • Best Environments: Teaching labs, dry research labs, physics labs, instrument rooms, and office areas within a lab suite.

  • Maintenance: Clean with mild detergents. Avoid abrasive cleaners and wipe up all spills promptly to protect the finish.

  • Cost & Lead Time: Generally the most budget-friendly option with competitive lead times for standard configurations.

  • Choose this if… you need a functional, quiet, and visually appealing solution for a dry lab environment on a controlled budget.

Painted Steel Casework

  • What It Is: Heavy-gauge steel, typically fully welded for strength, with a durable, baked-on powder-coat epoxy paint finish.

  • Top Strengths: High durability, excellent structural strength, very good chemical resistance, and an easy-to-clean, non-porous surface.

  • Limits: The painted finish can be chipped or scratched, exposing the underlying steel to rust. It can be noisy (clanging drawers and doors).

  • Best Environments: General chemistry labs, industrial R&D facilities, and any high-traffic area requiring robust, long-lasting furniture.

  • Maintenance: Inspect regularly for deep scratches and touch them up to prevent corrosion. Clean with standard lab-grade disinfectants.

  • Cost & Lead Time: Mid-range cost, typically more than wood but less than stainless steel. Lead times can vary.

  • Choose this if… your priority is durability and chemical resistance for a general-purpose lab.

Stainless Steel Casework

  • What It Is: Casework constructed from Type 304 or Type 316 stainless steel with welded and polished seams for a seamless, non-porous surface.

  • Top Strengths: The highest level of corrosion, moisture, and heat resistance. It is the standard for sterile and hygienic applications.

  • Limits: The highest initial cost. It can be dented or scratched and tends to show fingerprints.

  • Best Environments: Cleanrooms, pharmaceutical labs, vivariums, biological labs, and any facility requiring aggressive, frequent washdowns.

  • Maintenance: Can be cleaned with nearly any harsh disinfectant or sterilizing agent. Use non-abrasive cleaners to avoid scratching.

  • Cost & Lead Time: The most expensive option, often with longer lead times due to specialized fabrication.

  • Choose this if… sterility, corrosion resistance, and cleanability are non-negotiable and budget is a secondary concern.

Specialty Plastics or Phenolic Frames

  • What It Is: Casework built from solid phenolic resin, a composite material created by fusing layers of resin-saturated paper under high heat and pressure.

  • Top Strengths: Completely waterproof and immune to a very broad range of chemicals, acids, and solvents. Will not delaminate, swell, or corrode.

  • Limits: Higher cost than wood or painted steel. May have lower load-bearing capacity compared to fully welded steel frames.

  • Best Environments: Highly corrosive labs, high-humidity rooms, and applications where guaranteed moisture protection is essential.

  • Maintenance: Extremely low maintenance. Can be cleaned with harsh chemicals without risk of damage.

  • Cost & Lead Time: A premium price point, higher than painted steel but sometimes competitive with stainless steel.

  • Choose this if… you need absolute protection against moisture and a wide array of chemicals in a non-metallic form.

You can find more detailed information on all casework configurations to compare these options further.


HTML Comparison Table

Feature Wood Painted Steel Stainless Steel Specialty Phenolic/Plastics
Chemical Resistance Good (Finish-Dependent) Very Good Excellent Excellent
Moisture Resistance Poor Good Excellent Excellent
Cleanability Good Excellent Excellent Excellent
Impact and Noise Excellent (Quiet) Good (Noisy) Fair (Dents) Very Good (Quiet)
Flexibility Excellent Good Fair Good
Typical Use Cases Teaching Labs, Instrument Rooms, Dry Research General Chemistry, Industrial R&D Cleanrooms, Sterile Labs, Washdown Areas High Humidity, Corrosive Environments
Approx. Cost Tier $ $$ $$$$ $$$
Notes Warm aesthetic, easy to repair cosmetically. Workhorse durability, finish can chip. Ultimate corrosion resistance, highest cost. Completely waterproof, non-metallic.

Where Wood Shines: Ideal Applications

Wood casework is a strategic choice in many modern laboratories where its unique advantages align with the facility's goals.

Teaching Labs

In educational settings, wood creates a warmer, more inviting atmosphere than steel. Its lower cost is also a significant benefit for institutions with limited budgets. The durable finish is sufficient for the light chemical use typical in teaching environments.

Offices within Labs

For integrated lab and office spaces, wood provides a seamless design transition, creating a cohesive and less clinical work environment that promotes collaboration.

Dry Research and Instrument Rooms

For physics, electronics, and instrumentation labs, wood is an excellent choice. Its natural sound-dampening qualities help reduce ambient noise from equipment, creating a quieter and more focused atmosphere for precise work. This is especially true for facilities using modular wood workspaces for reconfigurable layouts.

Spaces Where Acoustics and Aesthetics Matter

When the goal is to create a professional, comfortable, and quiet workspace, the aesthetic warmth and noise-absorbing properties of wood make it a superior choice over metal alternatives.

When to Step Up from Wood

Wood casework has its limits. In certain demanding environments, upgrading to steel or specialty materials is essential for safety, compliance, and longevity.

Choose painted steel, stainless steel, or phenolic frames for:

  • Corrosive Environments: Where strong acids, bases, or solvents are used frequently.

  • Frequent Harsh Disinfectants: If protocols require daily use of aggressive cleaning agents that could degrade a wood finish over time. For worktops that must handle this abuse, phenolic work surfaces are a great choice.

  • High Humidity or Washdown Rooms: Any area with constant moisture will cause wood to fail. Stainless steel and phenolic are the best choices here due to the importance of phenolic resins in wet applications.

Specifying Wood Casework

Proper specification is key to ensuring performance and longevity. For architects, lab planners, and facility managers, focusing on the right details is crucial.

Key specification points include:

  • Substrate and Veneer: Specify hardwood veneer plywood or industrial-grade particleboard for stability.

  • Finish System: Mandate a factory-applied, multi-layer, chemical-resistant UV finish for protection.

  • Edge Banding: Require high-quality, durable edge banding to seal the core from moisture.

  • Hardware Quality: Specify heavy-duty, full-extension drawer slides and institutional-grade hinges.

  • Drawer Load Ratings: Ensure drawers are rated for the anticipated weight of lab equipment and supplies.

  • Specialty Units: Include details for sink bases with moisture-resistant properties, service voids for plumbing and wiring, and appropriate seismic anchoring where required.

For complete technical guidance, refer to our detailed spec guidelines. Our full line of wood casework options meets these stringent requirements.

Integration with Benches and Tops

Wood base cabinets are often paired with different benching systems and work surfaces to create a tailored solution.

Wood bases can be integrated into reconfigurable wood benches that allow for easy layout changes. This modular approach provides long-term flexibility.

For work surfaces, pairing wood bases with high-performance tops is a smart strategy:

  • Phenolic Resin: The top choice for chemical and disinfectant resistance. Pair with wood bases for a durable yet cost-effective workstation.

  • High-Pressure Laminate (HPL): A budget-friendly option for dry labs, write-up stations, and areas with very light chemical exposure.

This hybrid approach allows you to invest in performance where it is most needed—on the worktop—while gaining the benefits of wood for the base lab casework.

Decision Scenarios: Mini Use-Case Guides

Here are five common scenarios to help guide your decision:

  1. A high school teaching lab with light chemical use.

    • Decision: Wood bases with HPL or phenolic tops. This balances budget, durability, and provides a warm, inviting learning environment.
  2. A mixed office and lab suite needing a quiet, professional finish.

    • Decision: Wood casework throughout. This creates a cohesive aesthetic and the sound-dampening properties of wood reduce workplace noise.
  3. An industrial QC lab with a corrosive environment and frequent washdowns.

    • Decision: Stainless steel casework. This is a non-negotiable choice for safety and longevity in such a harsh environment.
  4. A dry instrument room with equipment that is frequently reconfigured.

    • Decision: Modular wood workspaces on mobile frames. This provides maximum flexibility to adapt the layout as needs change.
  5. A biosafety lab with constant use of harsh disinfectants.

    • Decision: Consider painted steel or phenolic frames with solid phenolic tops. These materials can withstand aggressive cleaning protocols without degrading.

Maintenance and Lifecycle

Proper maintenance ensures your wood casework lasts for decades.

  • Cleaning: Use mild, non-abrasive detergents compatible with the wood finish. Always refer to EHS guidelines for approved cleaning agents.

  • Humidity Control: Maintain a stable indoor climate with a modern HVAC system to prevent wood from swelling or shrinking.

  • Repairs: Minor scratches or dings in the finish can often be touched up, extending the cosmetic life of the cabinets.

  • Hardware Checks: Periodically inspect and tighten hinges and drawer slides to ensure proper function.

  • Replacement Triggers: Consider replacement if there is significant damage to the substrate from moisture or chemical exposure, or if hardware is failing beyond repair.

Consult our casework specifications for more on material care.

Frequently Asked Questions

1. Is laboratory wood casework durable enough for my lab?
Yes, for the right application. It is engineered with a high-density core and a chemical-resistant UV finish to withstand the demands of teaching, dry research, and instrument labs. It is not intended for highly corrosive or wet environments.

2. How does wood handle daily disinfecting?
It holds up well to standard, non-abrasive lab disinfectants. The chemical-resistant finish protects the wood, but harsh agents like bleach or abrasive cleaners should be avoided. Always wipe surfaces dry after cleaning.

3. Can I pair wood bases with phenolic worktops?
Absolutely. This is a very common and cost-effective combination. It provides the superior chemical resistance of phenolic on the work surface while retaining the aesthetic and acoustic benefits of wood for the base cabinets.

4. What about humidity and long-term stability?
In labs with stable HVAC systems, modern wood casework is very stable. The core materials and sealed edges are designed to resist typical ambient moisture changes. However, it is not suitable for high-humidity rooms or areas subject to washdowns.

5. Can wood be part of a modular lab plan?
Yes. Wood is an excellent material for flexible lab designs. Systems featuring modular wood workspaces allow labs to adapt layouts easily as research needs evolve.

6. How do lead times for wood casework compare to steel?
Lead times are generally comparable for standard configurations. Highly customized steel or stainless steel systems often have longer lead times. Always confirm current production schedules early in your planning. You can explore all lab casework options with our team.

Your Next Steps

Laboratory wood casework is an excellent choice for facilities that prioritize aesthetics, acoustic comfort, and budget without sacrificing performance in dry, light-duty environments. By matching the material to the application, you can create a functional and inviting workspace. For labs with more demanding chemical or moisture conditions, steel or specialty systems remain the superior option.

Ready to find the right fit for your facility?

Laminate Table Tops for Labs

High-pressure laminate (HPL) table tops offer a practical and cost-effective surface for many lab environments. They are a good choice for applications that do not involve harsh chemicals or high heat. This includes teaching labs, QA stations, and electronics assembly areas. Understanding where a laminate table top fits best helps you get the most value from your investment. For a full comparison, you can see all available lab work surfaces.

This guide provides a comprehensive round-up for choosing the right HPL surface. We will explore 25 practical tips, design considerations, and real-world use cases. This information will help you specify a top that meets your team’s needs and budget.

Quick Answers on Laminate Lab Tops

  • When to Choose Laminate: Laminate is ideal for dry applications, general prep work, electronics assembly, physical testing, and educational labs where budgets are tight.
  • Key Limitations: It has limited resistance to strong acids, bases, and organic solvents. It is also not suitable for direct contact with hot plates or open flames.
  • Recommended Cleaner: Use a simple solution of mild, neutral pH soap and water for daily cleaning. Avoid abrasive cleaners or harsh chemicals.
  • See all work surface options to compare materials.

The Round-up: 25 Tips, Picks, and Use Cases

This list offers concise, practical guidance for specifying and using HPL lab tops.

Choosing Laminate Wisely

1. When to pick laminate over epoxy or phenolic.
Choose laminate for its value in dry, low-chemical-exposure areas. It is perfect for instrumentation benches, writing desks, and general-purpose tables in teaching labs. If your work involves frequent spills of strong acids or solvents, epoxy or phenolic resin are better choices.

2. Understanding chemical exposure limits.
HPL surfaces can handle mild chemicals, alcohols, and common disinfectants. However, they are not designed for prolonged contact with strong acids, bases, or organic solvents like acetone. Always clean spills quickly to prevent damage.

3. Heat tolerance and using trivets.
A laminate table top can typically withstand intermittent heat up to 275°F (135°C). It is not meant for direct contact with hot plates, crucibles, or open flames. Always use a trivet or insulating pad to protect the surface from heat damage.

4. Substrate choices and moisture resistance.
The core material, or substrate, is usually particleboard or MDF. For areas near sinks or in humid environments, specify a moisture-resistant (MR) grade substrate. This helps prevent swelling and delamination if moisture gets past the surface.

5. Edge profiles and post-forming basics.
Edges are a critical component. Standard self-edge or vinyl T-molding are cost-effective. Post-formed edges create a seamless, rolled profile (“bullnose” or “waterfall”) that eliminates the front seam, improving cleanability and durability. Properly sealed edges are crucial for longevity. To explore different materials and their features, compare countertops.

Design and Configuration

6. Sizing tops for common bench frames.
Standard lab bench depths are 24″, 30″, and 36″. Lengths often come in 48″, 60″, 72″, and 96″ increments. Match the top size to your steel frame dimensions for proper support and stability.

7. Overhang, spans, and support placement.
A typical front overhang is 1″ to 1.5″ for user comfort. Ensure the top has adequate support from the frame, especially on long spans, to prevent sagging over time. Check the manufacturer’s guidelines for maximum unsupported spans.

8. Cutouts for sinks and services.
Plan for any necessary cutouts for sinks, faucets, power outlets, or data ports during the design phase. It is critical that all edges of a cutout are professionally sealed with silicone or epoxy to prevent moisture from reaching the substrate.

9. Splash options and water management.
For benches against a wall, a separate 4″ or 6″ high backsplash made from the same laminate material is common. This protects the wall from splashes. Ensure the seam between the top and the splash is properly caulked.

10. Pairing with lab casework for storage.
A laminate table top works well with a variety of base cabinets. You can pair it with suspended, mobile, or fixed lab casework to create a complete, functional workstation with integrated storage.

Benches, Desks, and Mobility

11. When a modular lab desk beats fixed benches.
For technology labs, data analysis stations, or flexible research pods, modular lab desks with laminate tops offer great versatility. They can be easily reconfigured as team sizes and project needs change, unlike fixed casework.

12. Adjustable frames for shared spaces.
Pairing a laminate top with an adjustable-height frame creates an ergonomic workstation. This is ideal for multi-user environments, hot-desking, or tasks that require switching between sitting and standing.

13. Caster use and vibration considerations.
Adding casters to a bench frame makes it mobile. However, casters can introduce vibration, which may affect sensitive instruments like microscopes or balances. For such equipment, a stationary bench is a more stable platform.

Operations and Maintenance

14. Daily cleaning with neutral pH cleaners.
For routine cleaning, use a soft cloth and a mild solution of soap and water. A neutral pH cleaner is best. Avoid abrasive pads or powders, as they can scratch and dull the laminate surface over time.

15. Disinfectants that are laminate friendly.
Most HPL surfaces are compatible with common disinfectants like 70% isopropyl alcohol and quaternary ammonium compounds (“quats”). Always wipe the surface with clean water after disinfecting to remove any chemical residue.

16. Scratch and abrasion prevention.
While durable, laminate can be scratched by sharp instruments or abrasive materials. Avoid dragging heavy equipment with rough bottoms across the surface. Use cutting boards for any tasks involving blades.

17. Spill response for light chemicals.
Clean up spills of mild chemicals, solvents, or staining agents immediately. Use a soft, absorbent cloth. The longer a substance sits on the surface, the higher the risk of staining or damage. For detailed guidance on specific substances, always consult your facility’s safety protocols and compare work surface options.

Budget and Lifecycle

18. Cost tier vs performance tradeoffs.
Laminate is one of the most budget-friendly lab countertop materials. This makes it a smart choice for large-scale installations like teaching labs. The tradeoff is lower chemical and heat resistance compared to premium materials like epoxy resin.

19. Lead times and standard vs custom sizes.
Standard-sized laminate tops often have shorter lead times and may even be in stock. Custom sizes, colors, or complex cutouts will require longer lead times and will increase the cost.

20. When to repair edges vs replace tops.
Minor damage to a vinyl T-mold edge can sometimes be repaired. However, if the substrate is swollen from moisture damage or the laminate surface is delaminated or badly damaged, it is usually more cost-effective to replace the entire top.

Use Cases and Real-World Examples

21. Teaching labs and general prep spaces.
HPL lab tops are an excellent fit for high school and university science labs. Their durability, cleanability, and low cost make them ideal for general chemistry, biology, and physics classrooms where harsh chemicals are used in controlled amounts.

22. QA benches with light solvents.
In quality assurance labs, benches are often used for physical testing, documentation, and inspection. A laminate top provides a smooth, resilient surface for these tasks, and it holds up well to occasional cleaning with light solvents like isopropyl alcohol.

23. Office-adjacent testing pods using modular lab desks.
Modern labs often blend research and office work. Using reconfigurable desks with laminate tops creates flexible pods for technicians who analyze data and perform light testing in the same space.

24. Industry trend note for emerging markets.
As new industries grow, they often need to build out lab space quickly and affordably. For example, the rise of specialized testing facilities highlights the need for adaptable CBD oil lab furniture, where laminate surfaces can serve well in instrumentation and sample processing areas.

25. Reference a past install to show laminate in practice.
Laminate tops are a proven solution in many settings. In a real-world install for a new facility, a bacteriological lab project successfully used a combination of surface materials. Laminate was specified for dry workstations and office areas to manage costs, while phenolic resin was used near sinks.

Quick Comparison: Laminate vs. Other Lab Surfaces

To provide context, here is how a laminate table top compares to other common materials.

  • Epoxy Resin: This is the top choice for harsh chemical environments. It offers excellent resistance to acids, solvents, and high heat. Choose this if your lab handles a wide range of corrosive chemicals daily.
  • Phenolic Resin: A solid composite material that provides very good chemical resistance and is highly durable. It’s a great all-around performer and a step up from laminate, especially in wet labs. Choose this if you need better chemical and moisture resistance than laminate but don’t require the elite performance of epoxy.
  • Stainless Steel: Known for its heat resistance and seamless construction options, stainless steel is ideal for sterile, high-heat, or radioactive applications. Choose this for biological labs, cleanrooms, or areas requiring high sterility.

Explore a detailed breakdown of these materials and more on our main lab work surfaces page.

Material Comparison Table

Feature Laminate (HPL) Epoxy Resin Phenolic Resin Stainless Steel
Heat Resistance Fair (up to 275°F) Excellent Very Good Excellent
Chemical Resistance Fair (limited) Excellent Very Good Good
Cleanability Excellent Excellent Excellent Excellent
Impact/Abrasion Good Very Good Excellent Good (can scratch)
Typical Use Cases Teaching labs, dry benches, electronics, QA Wet chemistry, research labs, harsh environments General research, biology, clinical labs Cleanrooms, sterile labs, high-heat areas
Approx. Cost Tier $ $$$$ $$$ $$$$
Notes Best value for dry, low-impact applications. The industry standard for chemical-heavy labs. A durable and versatile mid-tier option. Best for sterile and high-temperature work.

Frequently Asked Questions (FAQ)

1. Is a laminate table top safe to use with alcohol wipes and quats?
Yes. High-pressure laminate is generally resistant to common disinfectants like 70% isopropyl alcohol and quaternary ammonium compounds (quats). Wipe the surface with clean water after use to remove residue.

2. Can laminate take hot glassware or hot plates?
No. You should never place items directly from an autoclave or a hot plate directly onto a laminate surface. Always use a heat-resistant pad or trivet to prevent burns, discoloration, and delamination.

3. How do you properly seal the edges of a laminate top near a sink?
For any cutout, such as for a drop-in sink, the exposed edge of the substrate must be completely sealed. A lab furniture installer will typically use a two-part epoxy or a high-quality silicone caulk to create a waterproof barrier, preventing moisture from wicking into the core.

4. How long do laminate tops last in a typical teaching lab?
With proper use and maintenance, a quality laminate table top can last 10 to 15 years in a school or university setting. The lifespan depends on preventing prolonged chemical exposure, avoiding direct heat, and protecting the edges from moisture.

5. What type of frame works best with laminate tops?
Laminate tops are versatile and work well with fully welded steel C-frame or H-frame benches. For lighter duty applications like data stations, they can also be paired with flexible modular lab desks to create mobile or reconfigurable workstations.

6. When should I definitely upgrade from laminate to epoxy or phenolic?
You should upgrade if your daily procedures involve strong acids (like sulfuric or nitric), bases, or aggressive organic solvents. Upgrade if you work with open flames or need to place hot equipment directly on the surface. Epoxy or phenolic are also better choices for areas around sinks that are constantly wet. When planning your lab, consider pairing your tops with durable storage options.

Conclusion

A laminate table top is a smart and economical choice for many laboratory applications. It provides a durable, cleanable, and functional work surface for teaching labs, dry prep areas, instrumentation benches, and QA stations. By understanding its limitations regarding heat and chemical exposure, you can deploy laminate effectively and get excellent long-term value. The key is matching the material’s capabilities to your specific operational needs.

Ready to find the right surface for your facility? Compare work surface options to see our full range of materials. To build a complete and productive workspace, plan your layout with the right base cabinets and reconfigurable desks.