
A fume extraction arm for laboratory use acts like a flexible, local vacuum for airborne contaminants. It is a key defense, capturing harmful particles at the source before they can spread. While a large fume hood is great for big areas, it is not always right for smaller, targeted tasks. A fume extraction arm offers a powerful way to keep your team safe in these situations.
Key Takeaways
- What It Is: A fume extraction arm, or lab snorkel, is a flexible device that captures airborne contaminants like fumes, dust, and vapors directly at their source.
- Why It’s Needed: It provides targeted “source capture” ventilation, which is more effective than general room ventilation for protecting lab personnel from inhaling hazardous substances.
- Key Features: Look for the right arm length, airflow capacity (CFM), mounting option (wall, ceiling, or bench), and material construction to match your lab’s specific chemicals and workflow.
- Best For: The Original Exhaust Snorkel is a reliable, all-around choice for general applications involving fumes and dust where aggressive chemicals or static discharge are not a concern.
Why Your Lab Needs a Fume Extraction Arm
Keeping the air clean in a laboratory is a must for safety. Everyday procedures, from weighing fine powders to working with solvents, can release harmful materials into the air. If not managed properly, these contaminants can pose serious health risks to workers.
This is where the idea of source capture is important. Instead of cleaning the air in a room after it is contaminated, source capture removes the hazard at the point it is created. It is a more effective way to protect your team. The perfect tool for this job is a fume extraction arm for laboratory use, often called a lab snorkel.
The Limits of General Ventilation
A building’s general ventilation system is designed to exchange the air in a room a few times an hour. However, it is not built to handle concentrated plumes of fumes or dust. By the time a chemical vapor reaches a ceiling vent, it has already passed through a lab technician’s breathing zone. This is an unnecessary risk.

A targeted fume extraction arm changes the approach. It creates a small, powerful zone of negative pressure that pulls contaminants directly into the arm and away from the user. The hazardous particles are handled before they can spread into the lab environment.
Key Benefits of Using a Lab Snorkel Arm
Using a source capture strategy in your lab is not just for safety compliance. It has real benefits that create a safer and more productive workspace.
Below is a quick rundown of why a fume extraction arm for laboratory use is so important for modern labs.
| Key Benefit | Impact on Laboratory Operations |
|---|---|
| Enhanced Safety | Directly protects workers from inhaling harmful substances, reducing health risks. |
| Improved Air Quality | Lowers the overall concentration of hazardous particles in the lab’s air. |
| Increased Flexibility | Arms can be moved and positioned exactly where needed for different tasks. |
| Energy Efficiency | Using a targeted arm is more energy-efficient than ventilating an entire room at a high rate. |
The advantages go beyond simple compliance. Targeted fume extraction is a key part of maintaining excellent overall laboratory indoor air quality. It is a proactive approach to health and safety.
Understanding the Parts of a Fume Extraction Arm

A fume extraction arm might look complex, but it is built on a simple idea. Think of it as a flexible snorkel for your workspace. Its job is to get close to the source of contaminants and pull them away before they reach you.
To pick the right one, you need to know its parts. Every piece, from the hood to the mounting bracket, is designed to work together for effective operation.
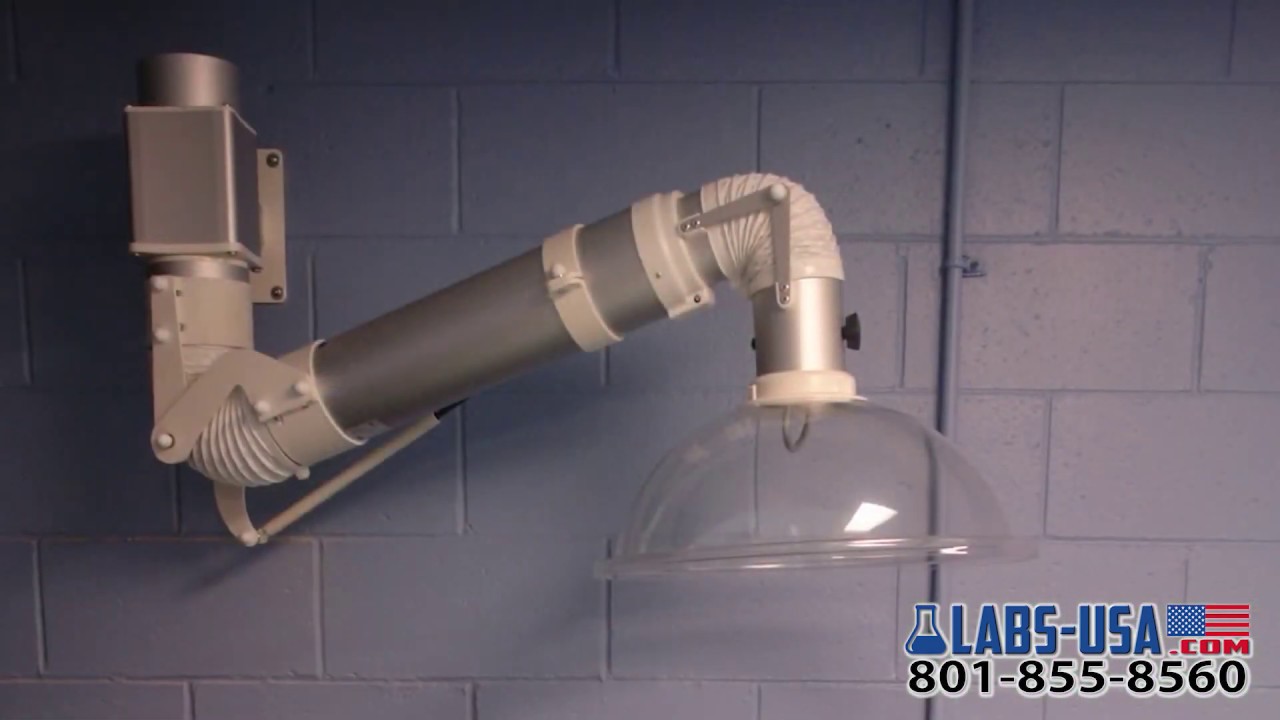
The Capture Hood
The capture hood is the “mouth” of the system. It is the entry point for contaminated air. Its shape and size are critical for creating an effective capture zone.
For most general lab work, a multi-purpose transparent hood is a great choice. It lets you see your work clearly while pulling fumes away. The closer you can get the hood to your process, the better it works.
Articulating Joints and Tubes
These are the “arm” and “elbow” of the unit. They give the fume extractor its range of motion. High quality arms use smooth tubes and joints that allow for easy, one handed positioning. You can simply push, pull, and pivot the arm to the exact spot you need.
These parts are designed for both movement and stability. Once you position the arm, it needs to stay put without drifting. The Original Exhaust Snorkel is built with durable joints that hold their position reliably.
Mounting Options
The mounting bracket is the anchor for the whole system. It secures the fume extraction arm for laboratory use to a solid surface. A strong, secure mount is essential for safety and proper function.
- Wall Mount: A wall mount exhaust snorkel is a great option for saving bench space. It is common in labs where workstations are lined up against a wall.
- Ceiling Mount: When wall space is limited or your work area is in the middle of a room, a ceiling mount exhaust snorkel is the perfect solution. It hangs from above, offering maximum reach.
- Bench Mount: An arm can be attached directly to the lab bench. This provides a sturdy, fixed point for extraction and is ideal for tasks performed in the same spot.
How to Choose the Right Fume Extraction Arm

Picking the right fume extraction arm for laboratory work is an important decision. It directly affects the safety of your team and your budget. This checklist will walk you through a five step process to help you choose the perfect arm for your lab.
5-Step Checklist for Selecting a Lab Snorkel
- Assess Your Application: First, what are you trying to capture? Are you dealing with fine powders, solvent vapors, or general fumes? The contaminant determines the airflow and materials you need. For general applications without harsh chemicals, a model like the Original Exhaust Snorkel is an excellent choice.
- Measure Your Workspace: Figure out where the arm will be mounted. Will it be on the wall, ceiling, or benchtop? Measure the distance from the mount to the farthest point of your workspace. The arm’s reach must be long enough to cover that area.
- Determine Required Airflow (CFM): Airflow, measured in Cubic Feet per Minute (CFM), is about extraction power. More hazardous contaminants need a higher CFM to pull them away effectively. Check with your Environmental Health and Safety (EHS) department for the right CFM for your process.
- Verify Material Compatibility: Make sure the arm’s materials can handle the chemicals you use. Standard arms are perfect for general fumes and dust. If you work with corrosive acids, you will need an arm made from materials like polypropylene. Always check the arm’s specs against your lab’s Safety Data Sheets (SDS).
- Consider Ease of Use: The best safety equipment is the equipment people use. Look for models with smooth joints that are easy to position and stay put. You should be able to adjust it with one hand.
Comparing Fume Extraction Arm Models
Not every fume extraction arm for laboratory use is the same. Some jobs need special equipment. The table below compares our versatile Original Exhaust Snorkel with models built for more demanding lab environments.
| Feature | Original Exhaust Snorkel | Chemical-Resistant Model | Anti-Static (ESD) Model |
|---|---|---|---|
| Primary Use Case | General fumes, dust, non-aggressive vapors | Highly corrosive chemicals, acids, solvents | Electronics soldering, sensitive powders |
| Tube Material | Aluminum or similar durable metal | Polypropylene (PP) or Stainless Steel | Conductive materials to dissipate static |
| Joint Material | Standard durable plastic or metal | Chemical-resistant polymers | ESD-safe components |
| Best For | University labs, light industrial tasks | Chemical research, wet chemistry labs | Electronics assembly, pharmaceutical labs |
The Original Exhaust Snorkel is a reliable and cost effective solution for many common laboratory tasks. It offers robust performance for general applications.
Ready to improve your lab’s safety and air quality?
Common Use Cases in Laboratory Settings
To understand how a fume extraction arm for laboratory work is used, it is helpful to look at a few common scenarios. Every lab is different, and the right arm depends on the specific jobs being done.
Scenario 1: University Teaching Labs
University chemistry labs are busy places with many students. Benches are crowded, and experiments produce a variety of fumes.
- The Challenge: Space is limited. Wall mounted arms cannot always reach island benches, and bench mounted units add to the clutter.
- The Solution: A ceiling mount exhaust snorkel is a great solution. It hangs from above, freeing up bench and wall space. One long arm can serve several students at a shared bench.

Scenario 2: Electronics and Soldering Workstations
Soldering creates smoke filled with flux fumes, which are a respiratory irritant. This delicate work requires a clear view of small components.
- The Challenge: Solder smoke rises fast and must be captured immediately. The arm must be easy to move and stay in place without drifting.
- The Solution: A bench mounted fume extraction arm is an excellent choice for a soldering station. For labs with static sensitive components, an anti-static (ESD) model is needed to protect the electronics.
Scenario 3: Quality Control and Sample Weighing
In QC labs, technicians often weigh fine powders or handle dusty samples. These tasks demand precision. Airflow from an extraction arm cannot disturb an analytical balance.
- The Challenge: Capture fine particles without disrupting the weighing process. The capture velocity needs to be strong enough to pull in dust but gentle enough to not create air currents.
- The Solution: A small diameter fume extraction arm for laboratory benches, placed slightly above and behind the balance, works well. A dome shaped hood can create a gentle, broad airflow.
Scenario 4: Pharmaceutical Compounding
When pharmacists compound medications, they may work with powders that can become airborne. Protecting the pharmacist from inhaling these active ingredients is critical.
- The Challenge: The work area is often small, and the process requires careful handling of materials. The extraction solution must be effective but not intrusive.
- The Solution: A bench mounted arm with a transparent dome hood provides excellent source capture. It contains any airborne powder while allowing the pharmacist a clear view of their work.
Scenario 5: Art Restoration and Conservation
Conservators often use solvents and other chemicals to clean and restore artifacts. These chemicals can release harmful vapors.
- The Challenge: The work is delicate and may be performed on large or unusually shaped objects. A fixed fume hood is not practical.
- The Solution: A flexible fume extraction arm for laboratory use, often a ceiling mounted model, can be positioned precisely over the area being treated. This protects the conservator without touching the artifact.
Installation and Maintenance Best Practices
Alt Text: A maintenance worker checks a fume extraction arm against a checklist to ensure proper function.
A fume extraction arm for laboratory use is only as good as its installation and care. Proper setup and regular maintenance ensure it provides reliable protection.
Always check with your facility’s EHS department before installation. They will have specific guidance for your lab. Following the manufacturer’s instructions is also essential for a safe setup.
Installation Tips
- Anchor Securely: Fasten the mounting bracket to a solid part of the wall, ceiling, or bench. A wobbly mount is a safety hazard.
- Position for Workflow: Mount the arm where it will not interfere with movement. It should be easy to pull into position and push away.
- Check Range of Motion: Before final setup, test the arm’s movement. Make sure it can reach all necessary positions without hitting lights or other equipment.
Simple Maintenance Checklist
A little regular attention will keep your fume extraction arm in top working order.
- Inspect Joints: Move the arm through its full range of motion. If it is too loose or stiff, adjust the tension according to the manufacturer’s guide.
- Clean the Hood: Wipe down the capture hood weekly. Residue can restrict airflow.
- Check for Blockages: With the fan running, feel for suction at the hood. If the pull seems weak, check for a blockage in the ductwork.
- Examine Hoses: Look at the flexible hoses for any cracks or loose fittings. Leaks can release contaminated air back into the lab.
Frequently Asked Questions
When you decide to laboratory snorkel arm buy online, a few questions often come up. Here are answers to common concerns.
1. What is the difference between a fume hood and a fume arm?
A traditional fume hood is a large, enclosed cabinet that ventilates an entire workspace inside it. It is for large scale work with a high volume of fumes. A fume extraction arm for laboratory use is a flexible “source capture” device. It grabs contaminants right where they are made, making it perfect for smaller tasks at an open bench.
2. How much airflow (CFM) do I need?
The required airflow, measured in CFM (Cubic Feet per Minute), depends on your application. The type of contaminant, how much is produced, and its density all matter. Heavier particles like dust need a higher capture velocity than lighter vapors. Consult your EHS department for specific recommendations.
3. Can multiple arms connect to one fan?
Yes. It is common to connect several fume arms to a single fan in a manifold system. This is an efficient way to equip a lab with multiple workstations. The system must be designed by a professional to ensure every arm has enough suction.
4. What is the Nederman exhaust snorkel price range?
The Nederman exhaust snorkel price varies based on the model, materials, and length. Standard, general purpose models are the most affordable. Specialized arms, such as those made from chemical resistant polypropylene or for anti-static (ESD) environments, will have a higher price. For accurate pricing, it is best to request a direct quote.
5. How do I clean a fume extraction arm?
Cleaning a fume arm is simple. Wipe the exterior tubes and joints with a mild detergent and a damp cloth. The capture hood may need more frequent cleaning with a compatible cleaner. Always turn the fan off before cleaning. Never use abrasive cleaners that can scratch the surfaces.

6. Where is the best place to position the extraction hood?
For best results, position the capture hood as close to the source of the fumes as possible, usually within 6 to 12 inches. Place it slightly above and behind the contaminant source to draw fumes away from the user’s breathing zone without disturbing the work process.
The Right Choice for a Safer Laboratory
Choosing the right fume extraction arm for laboratory use is a critical step in creating a safe and efficient workspace. By capturing harmful fumes, dust, and vapors at the source, these flexible arms provide targeted protection that general ventilation cannot match.
From understanding mounting options like the wall mount exhaust snorkel to selecting the right materials for your chemicals, making an informed decision protects your team. The Original Exhaust Snorkel from Nederman is a top choice for general lab applications, offering reliability, durability, and ease of use.
Labs-USA provides quality products with competitive pricing and the fastest shipping in the industry. Let our experts help you find the perfect solution for your lab.